Employee 360
The Employee 360 page provides a comprehensive view of an employee's profile, including their basic details, leave balance, attendance summary, task activity, warnings, project overview, and more — all in one place.
Viewing Employees:
At the top of the page, you can switch between three views:
- My Team – Shows the profile of employees who directly report to the logged-in user.
- Peers – Shows the profiles of employees at the same level as the logged-in user within the organization.
- All – Shows all employees under the selected person in the reporting hierarchy. If admin access has been enabled for the logged-in user from the User Rights page, this view will display all employee profiles across the organization.
Use the employee dropdown next to the view toggle to select and load a specific employee's profile. You can also switch between employees using the dropdown without changing the view mode.
Overview Tab:
The Overview tab is the default tab on the Employee 360 page and displays a summary of the selected employee's profile across multiple widgets.
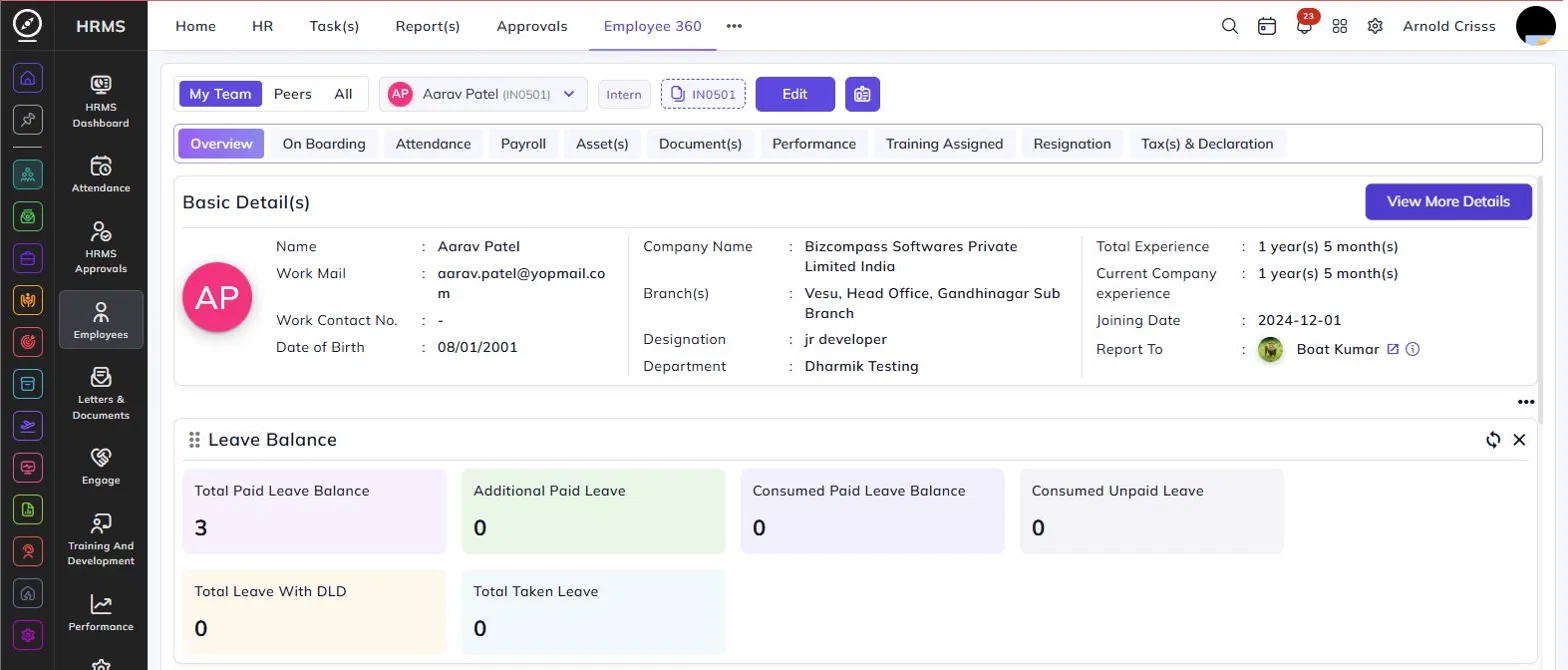
Basic Details:
The Basic Details section at the top shows the employee's key information including their name, work email, work contact number, date of birth, company name, branch, designation, department, total experience, current company experience, joining date, and reporting manager.
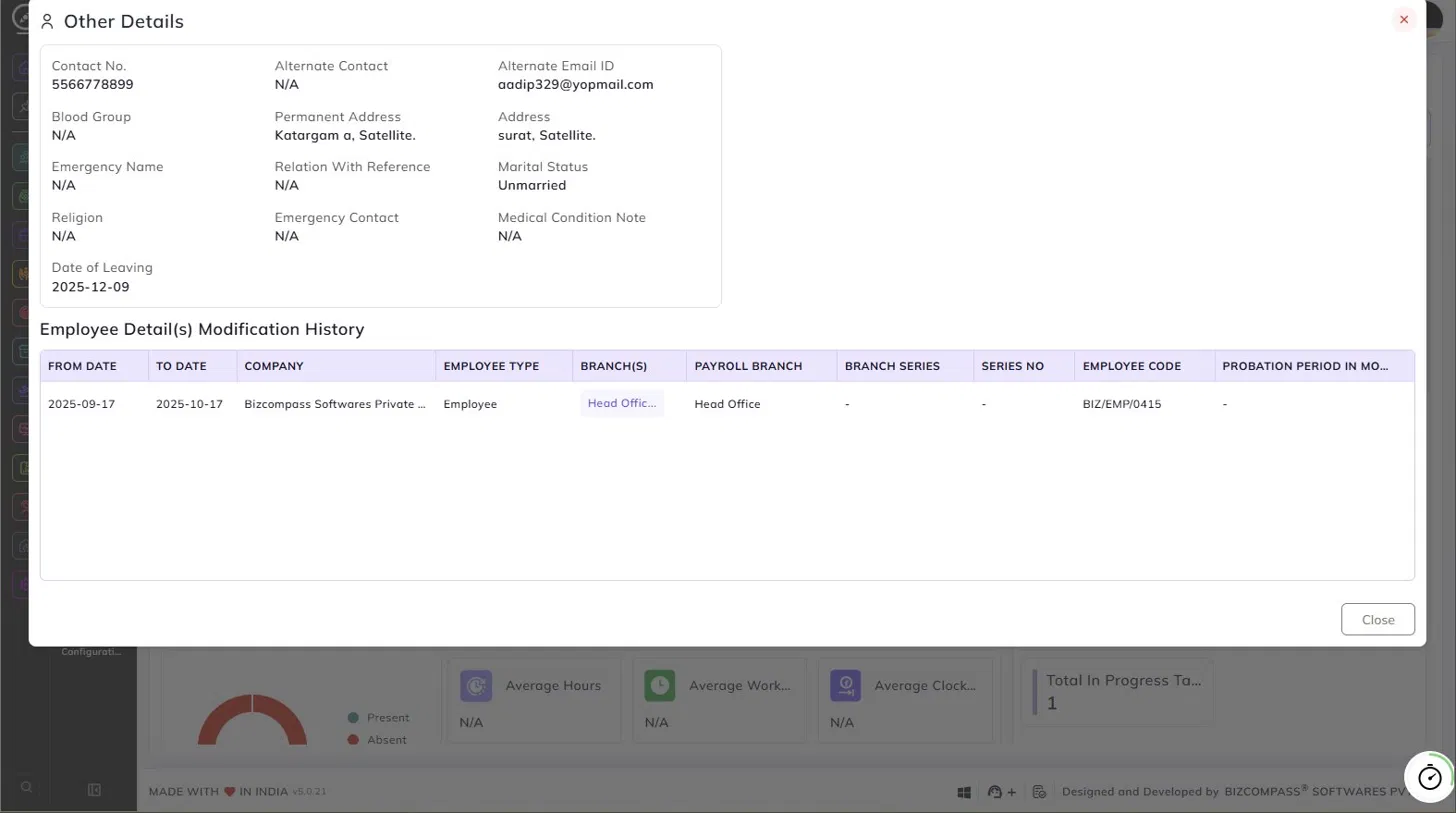
Click View More Details to open a panel with additional information including alternate contact number, alternate email, blood group, permanent address, current address, emergency contact details, marital status, religion, medical condition notes, date of leaving, and the Employee Details Modification History table. This table shows a log of changes made to the employee's profile, including the from and to dates, company, employee type, branch, payroll branch, branch series, series number, employee code, and probation period.
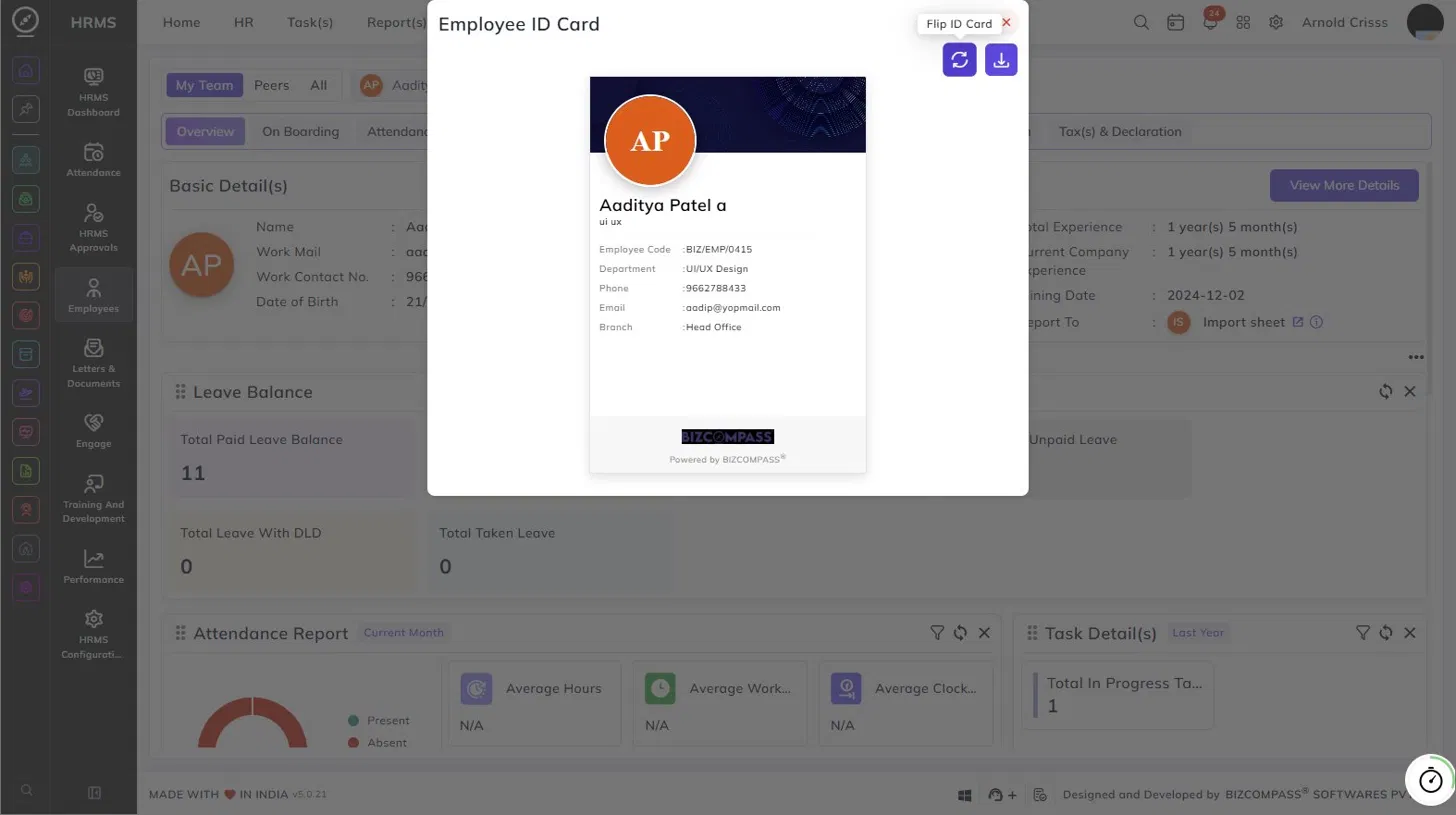
Employee ID Card:
Click the ID Card icon next to the Edit button to open the employee's digital ID card. The ID card displays the employee's photo, name, designation, employee code, department, phone number, email, and branch. You can flip the card using the Flip ID Card button to view the reverse side, or download it using the download icon.
Leave Balance:
The Leave Balance widget shows a quick summary of the employee's current leave status, including:
- Total Paid Leave Balance – The total paid leave available to the employee.
- Additional Paid Leave – Any extra paid leave credited to the employee.
- Consumed Paid Leave Balance – The number of paid leaves already used.
- Consumed Unpaid Leave – The number of unpaid leaves taken.
- Total Leave With DLD – Leave balance including deferred leave days.
- Total Taken Leave – The total number of leaves taken so far.
Click the filter tabs at the top of the widget (All, Loyalty Leave, and other leave type tabs) to view the leave balance broken down by leave type. Each leave type card shows the last year balance plus available balance, total consumed from paid leave, total remaining paid leave, and total consumed unpaid leave. You can also toggle between the card view and list view using the icons at the top right of the widget.

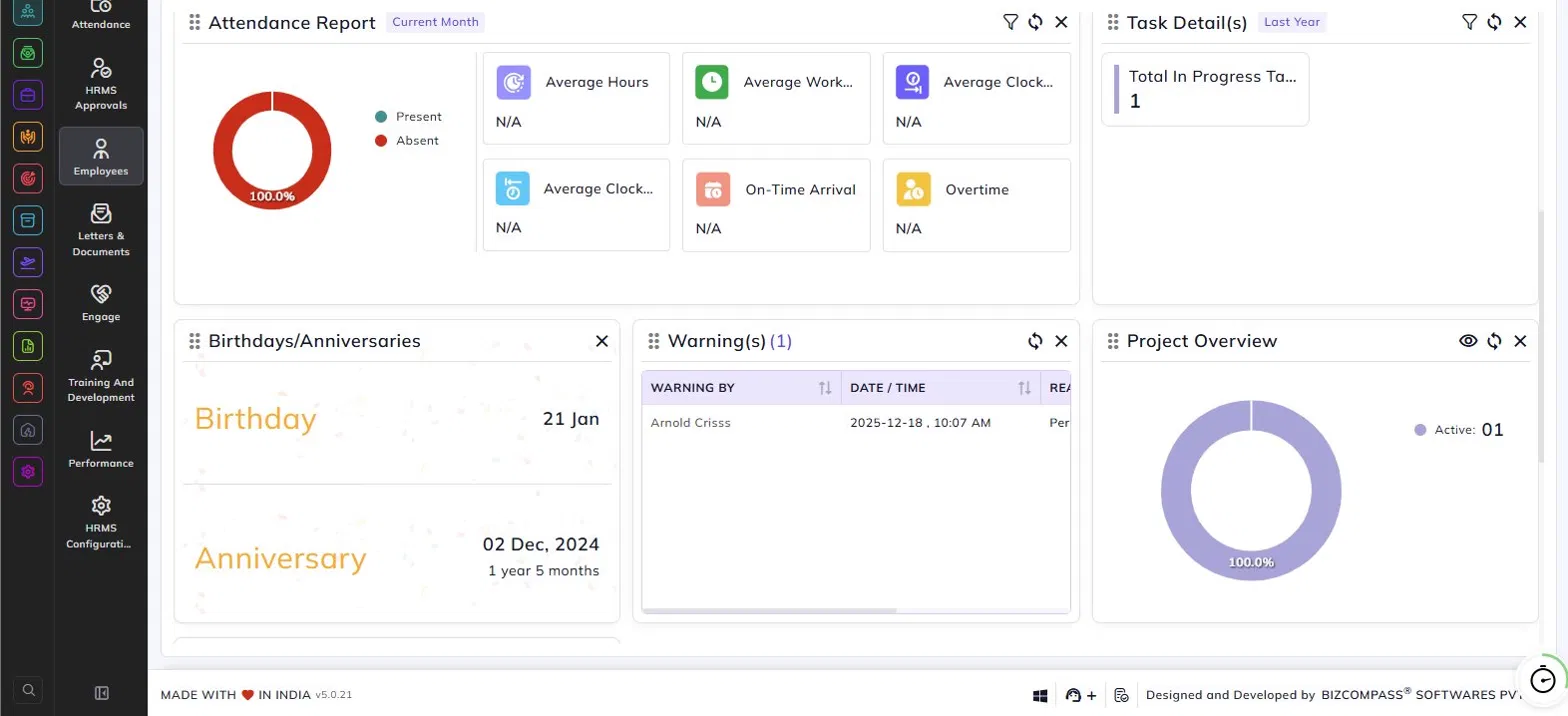
Attendance Report:
The Attendance Report widget displays the employee's attendance summary for the current month by default. It includes a donut chart showing the present and absent ratio, along with metric tiles for average hours, average working hours, average clock-in time, average clock-out time, on-time arrival, and overtime. Use the filter icon to change the date range.
Task Details:
The Task Details widget shows a summary of the employee's project tasks, including the total number of in-progress tasks. Use the filter icon to adjust the time period.
Birthdays / Anniversaries:
This widget displays the employee's upcoming or recent birthday and work anniversary date, along with the tenure at the company.
Warnings:
The Warnings widget lists any warnings issued to the employee, showing the warning issuer, date and time, and reason. The count of active warnings is shown in the widget header.
Project Overview:
The Project Overview widget displays a donut chart showing the distribution of the employee's active projects, along with the count of active projects.
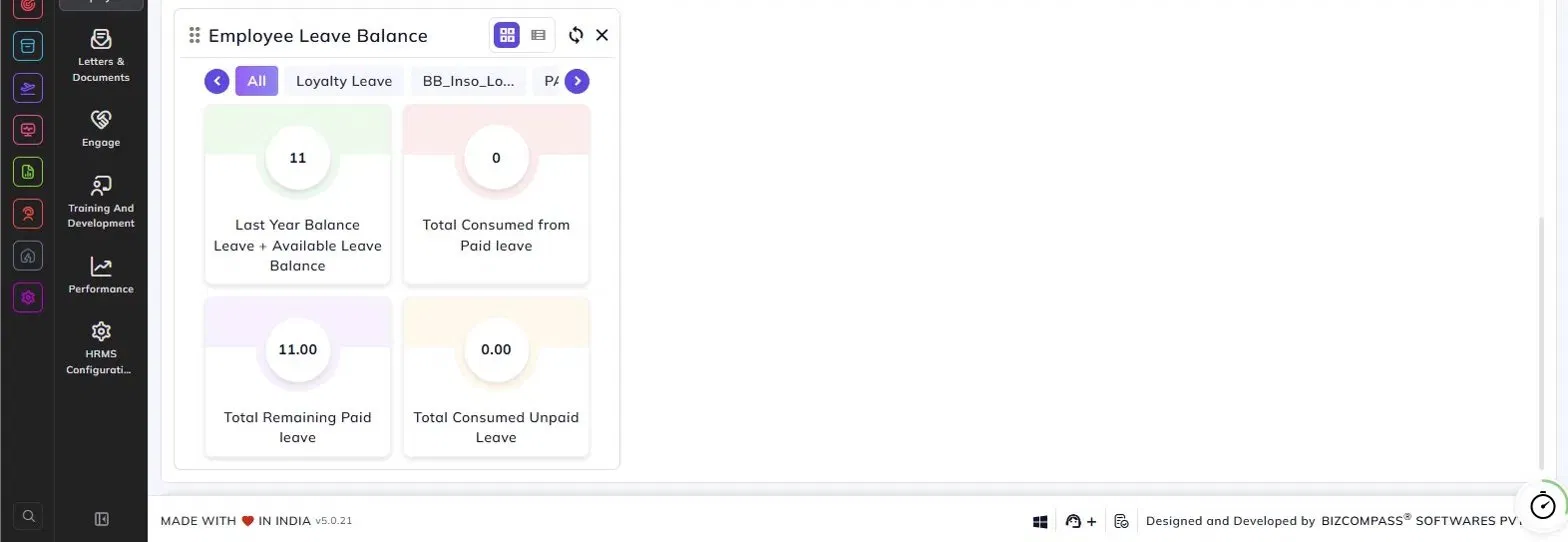
Employee Leave Balance:
The Employee Leave Balance widget provides a detailed breakdown of the employee's leave balance by leave type. Use the tabs at the top to filter by a specific leave type or view all leave types together by selecting All. Use the arrow buttons to scroll through additional leave type tabs.
Each leave type displays four metrics:
- Last Year Balance Leave + Available Leave Balance – The carried-forward balance from the previous year combined with the currently available leave balance.
- Total Consumed from Paid Leave – The total number of paid leaves consumed under this leave type.
- Total Remaining Paid Leave – The remaining paid leave balance available for the employee.
- Total Consumed Unpaid Leave – The total number of unpaid leaves taken under this leave type.
Use the toggle icons at the top right of the widget to switch between the card view and list view as preferred.
On Boarding Tab:
The On Boarding tab provides a complete view of the employee's pre-joining recruitment journey and their post-joining onboarding procedure, all in one place.
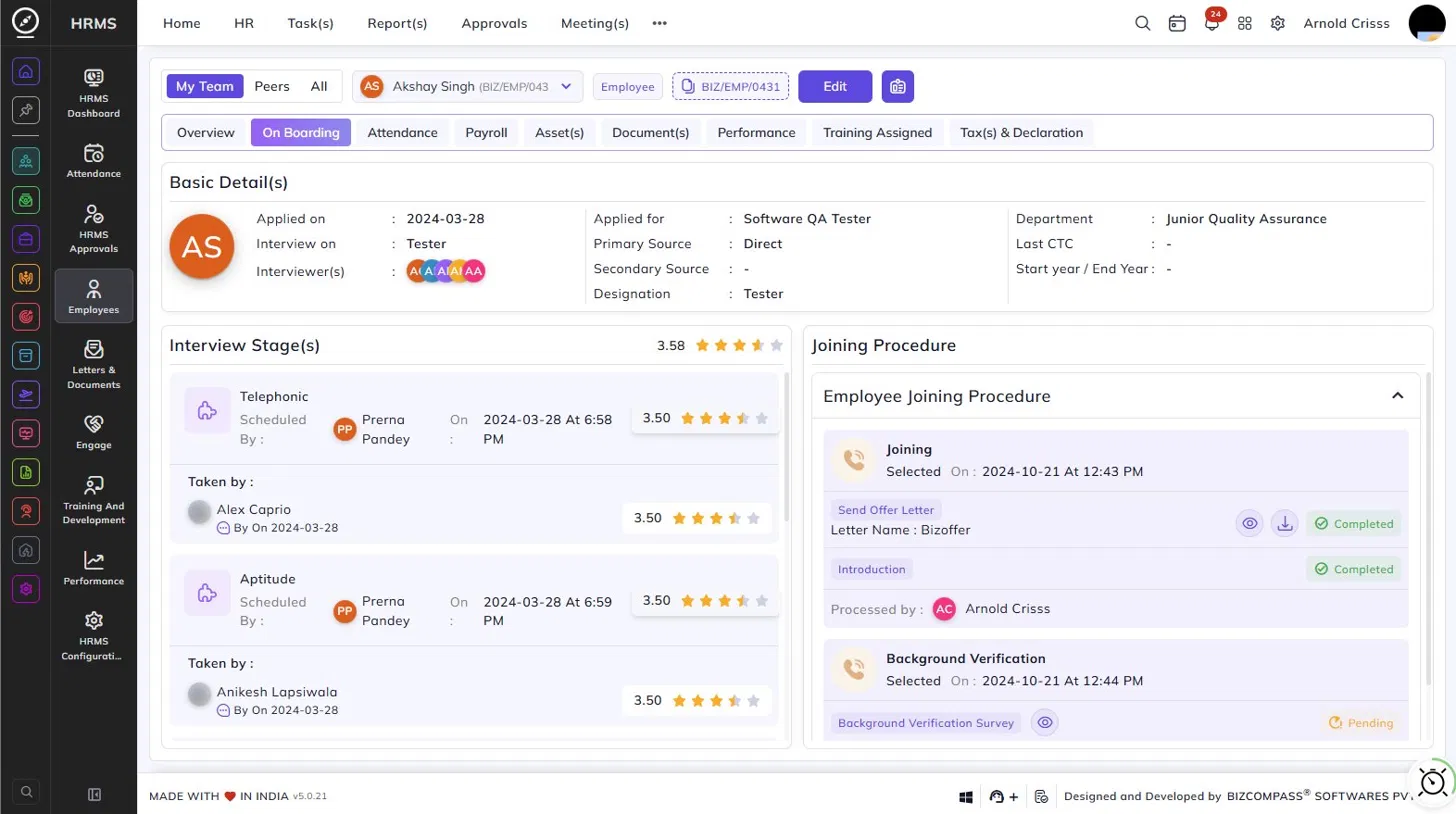
Basic Details:
The Basic Details section displays the candidate's recruitment information, including:
- Applied On – The date the candidate applied.
- Interview On – The interview type or mode.
- Interviewer(s) – The interviewers assigned to the candidate, shown as avatar icons.
- Applied For – The position the candidate applied for.
- Primary Source – The source through which the candidate was referred or applied (e.g., Direct).
- Secondary Source – Any secondary referral source, if applicable.
- Designation – The designation the candidate was considered for.
- Department – The department the candidate was hired into.
- Last CTC – The candidate's last drawn CTC, if provided.
- Start Year / End Year – The candidate's previous employment duration, if provided.
Interview Stage(s):
This section shows the complete interview history of the employee, along with an overall interview rating. Each stage card displays the stage name (e.g., Telephonic, Aptitude), the scheduled by, the date and time of the interview, the interviewer who took the round, and the rating given for that stage.
Joining Procedure:
The Joining Procedure section on the right shows the Employee Joining Procedure — a checklist of onboarding steps that need to be completed after the employee joins. Each step shows:
- Step name – Such as Joining, Background Verification, etc.
- Selected On – The date and time the step was initiated.
- Action items – Tasks within each step, such as sending an offer letter, completing an introduction, or a background verification survey. Each action item shows its current status — Completed or Pending — along with options to view or download related documents where applicable.
- Processed By – The admin or HR person who processed the step.
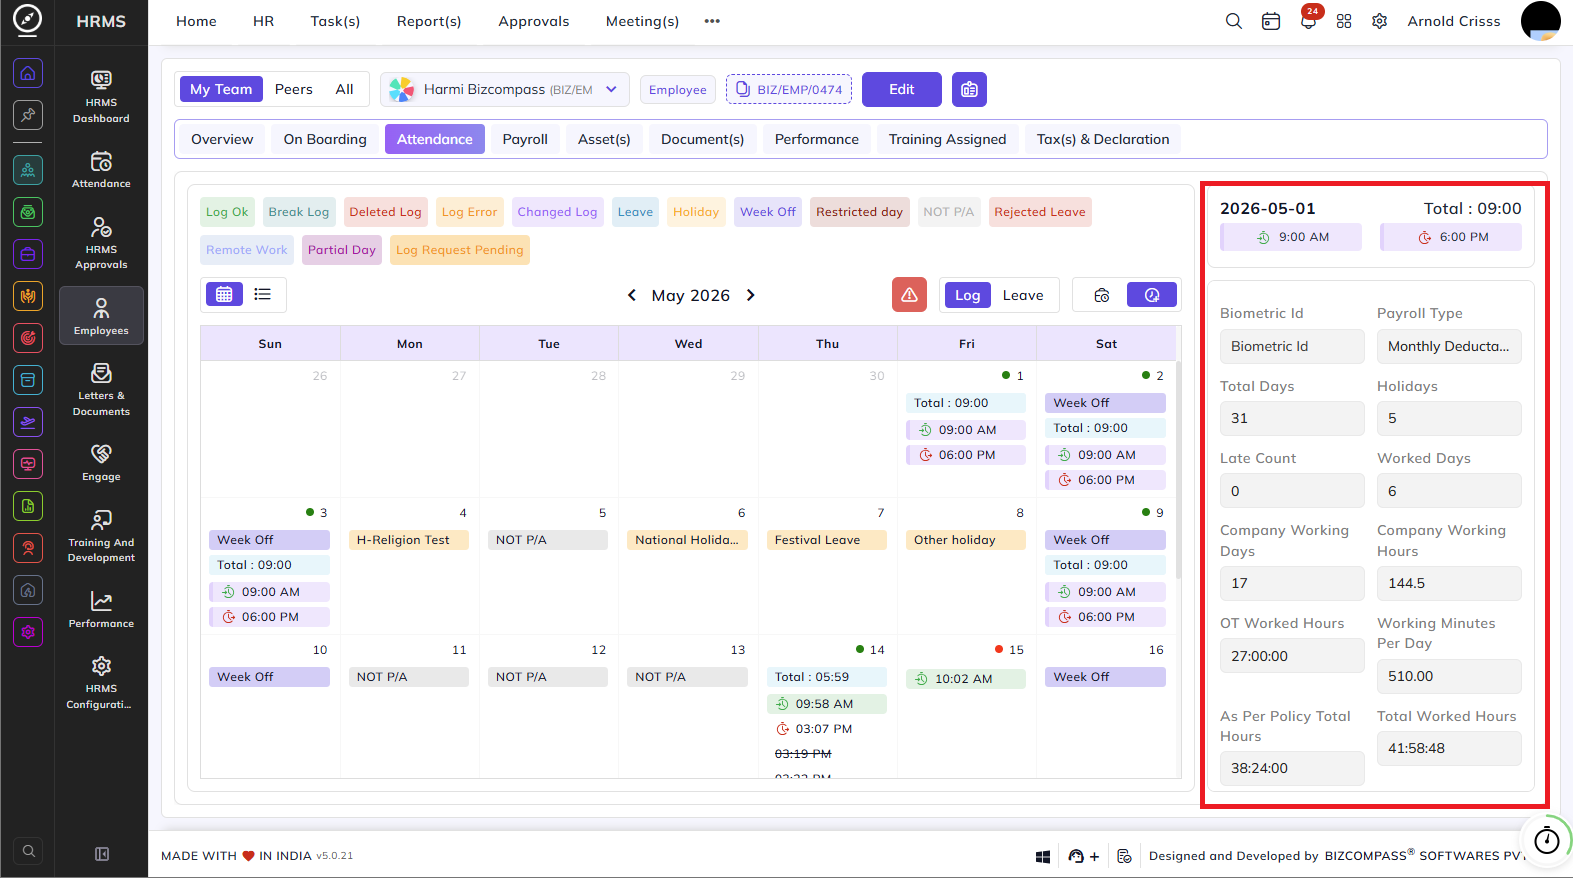
Attendance Tab:
The Attendance tab displays the selected employee's monthly attendance calendar along with a summary of their attendance statistics for the month.
Calendar View:
The calendar shows the attendance status for each day of the month. Use the left and right arrows to navigate between months. Each date on the calendar shows the clock-in time, clock-out time, and total hours worked for that day. Days are color-coded based on their status, as shown in the legend at the top:
- Log Ok – Attendance was recorded correctly.
- Break Log – A break was logged during the shift.
- Deleted Log – The attendance log was deleted.
- Log Error – An error was recorded in the attendance log.
- Changed Log – The attendance log was manually changed.
- Leave – The employee was on an approved leave.
- Holiday – A company holiday.
- Week Off – A scheduled week-off day.
- Restricted Day – A restricted day as configured in the shift roster.
- NOT P/A – The employee was neither present nor on an approved absence.
- Rejected Leave – A leave application that was rejected.
- Remote Work – The employee worked remotely on that day.
- Partial Day – The employee was present for only part of the day.
- Log Request Pending – A log correction request is awaiting approval.
You can toggle between the calendar view and grid view using the icons at the top left of the calendar. Clicking on a specific date on the right panel shows the clock-in and clock-out times for that day.
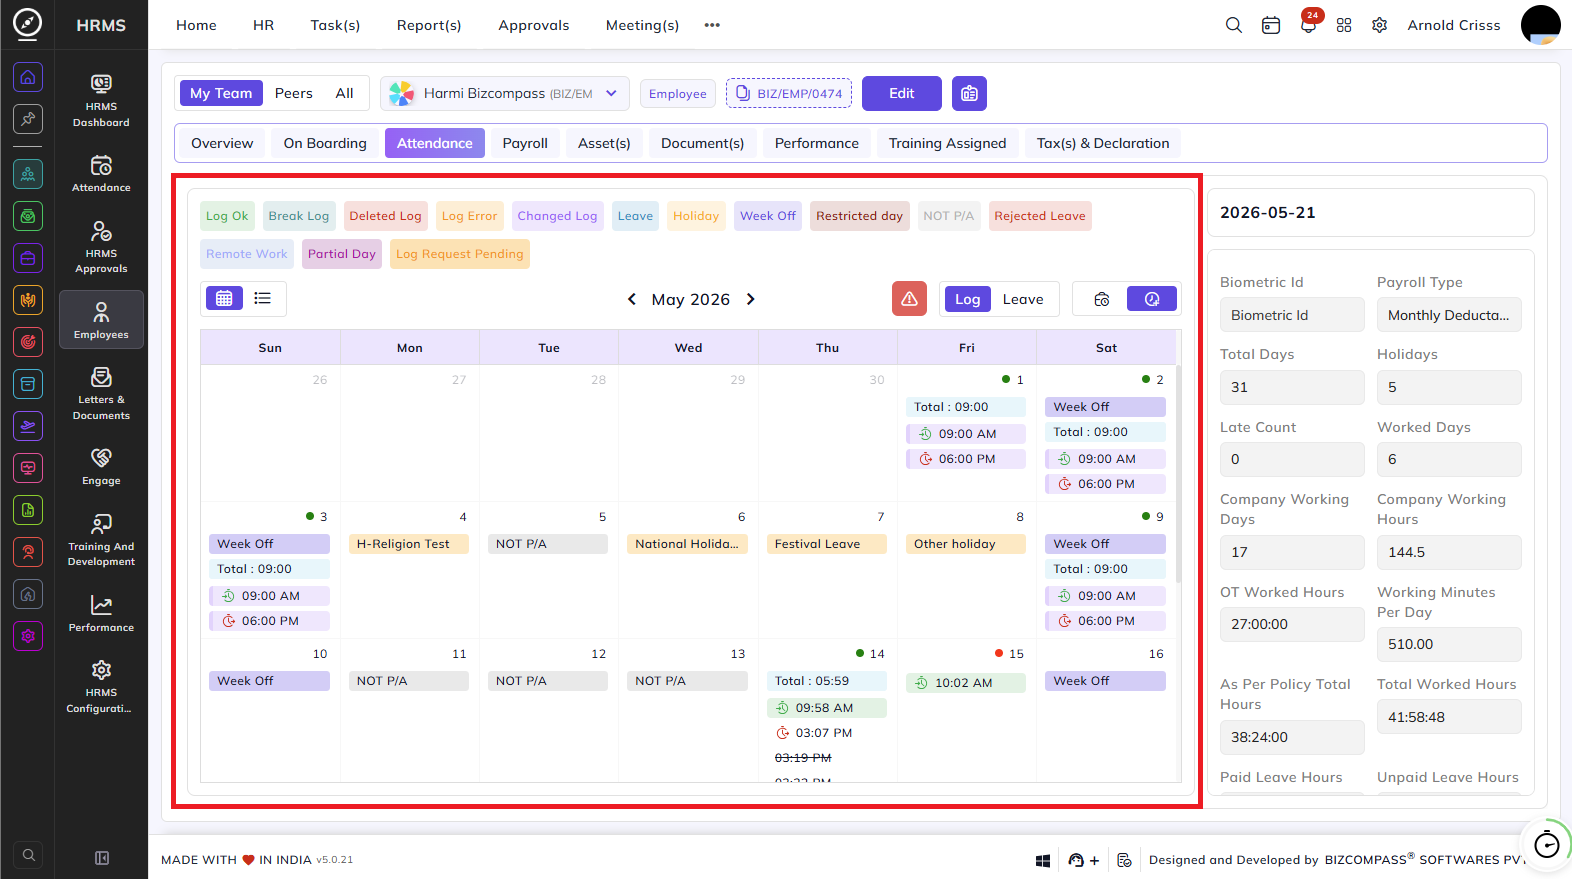
Viewing Logs and Leaves:
- Log – Click to view the attendance logs for the employee for the selected month.
- Leave – Click to view the leave records of the employee for the selected month.
Attendance Summary Panel:
The panel on the right side of the page displays the employee's attendance statistics for the selected month:
- Biometric ID – The employee's biometric device ID.
- Payroll Type – The payroll calculation type assigned to the employee (e.g., Monthly Deductable).
- Total Days – The total number of days in the selected month.
- Holidays – The number of holidays in the month.
- Late Count – The number of times the employee was late.
- Worked Days – The total number of days the employee worked.
- Company Working Days – The number of working days as per the company calendar.
- Company Working Hours – The total expected working hours for the month.
- OT Worked Hours – The total overtime hours worked by the employee.
- Working Minutes Per Day – The standard working minutes per day as per the employee's shift.
- As Per Policy Total Hours – The total hours the employee was expected to work as per company policy.
- Total Worked Hours – The actual total hours worked by the employee during the month.
Payroll Tab:
The Payroll tab provides a complete view of the selected employee's salary details, payroll configuration, salary history, salary slips, and payroll analytics.
If the employee is currently serving a notice period, a banner is displayed at the top showing the notice period start and end dates.
Salary Statistics:
The Salary Statistics section at the top displays key salary metrics:
- Current Salary – The employee's current salary. The value can be hidden or shown using the visibility toggle icon.
- Avg Growth – The average salary growth percentage, along with the last growth percentage.
- Total Paid – The total amount paid to the employee so far. The value can be toggled for visibility.
- Next Increment – The date or details of the employee's next scheduled salary increment.
- Payroll Type – The payroll calculation type assigned to the employee (e.g., Monthly Deductable).
- Company Work Day Type – The working day calculation method used for payroll (e.g., Days in Month - Holidays).
Payroll Details:
The Payroll Details section shows the full payroll configuration for the employee, including:
- Payroll Type and Payroll Branch – The payroll type and the branch under which payroll is processed.
- Salary Account – The account used for salary processing.
- Company Work Day Type – The method used to calculate working days for payroll.
- Pay For and Notice Period Policy – The pay basis and applicable notice period policy.
- Employee Category – The category the employee belongs to (e.g., Skilled).
- Remote Attendance – The modes allowed for remote attendance marking (App, Web, Chat).
- Remote Attendance Requirements – Any specific requirements for remote attendance.
- Salary Headers – The salary structure template assigned to the employee.
- No Week Off Pay on Full Week Absent – Whether the employee's week-off pay is deducted if they are absent for the full week.
- As Per Government Rule – Whether salary calculations follow government rules.
- Allowed IP – The IP address from which the employee is permitted to mark attendance.
- Attendance Based On – The attendance tracking method (Premises, Remote).
- Attendance Number – The employee's attendance device number, if applicable.
- PF, UAN Number, ESIC, PT – Provident fund, UAN, ESIC, and professional tax applicability for the employee.
- Bank Details – The employee's bank name, account number, IFSC code, account holder name, and branch.
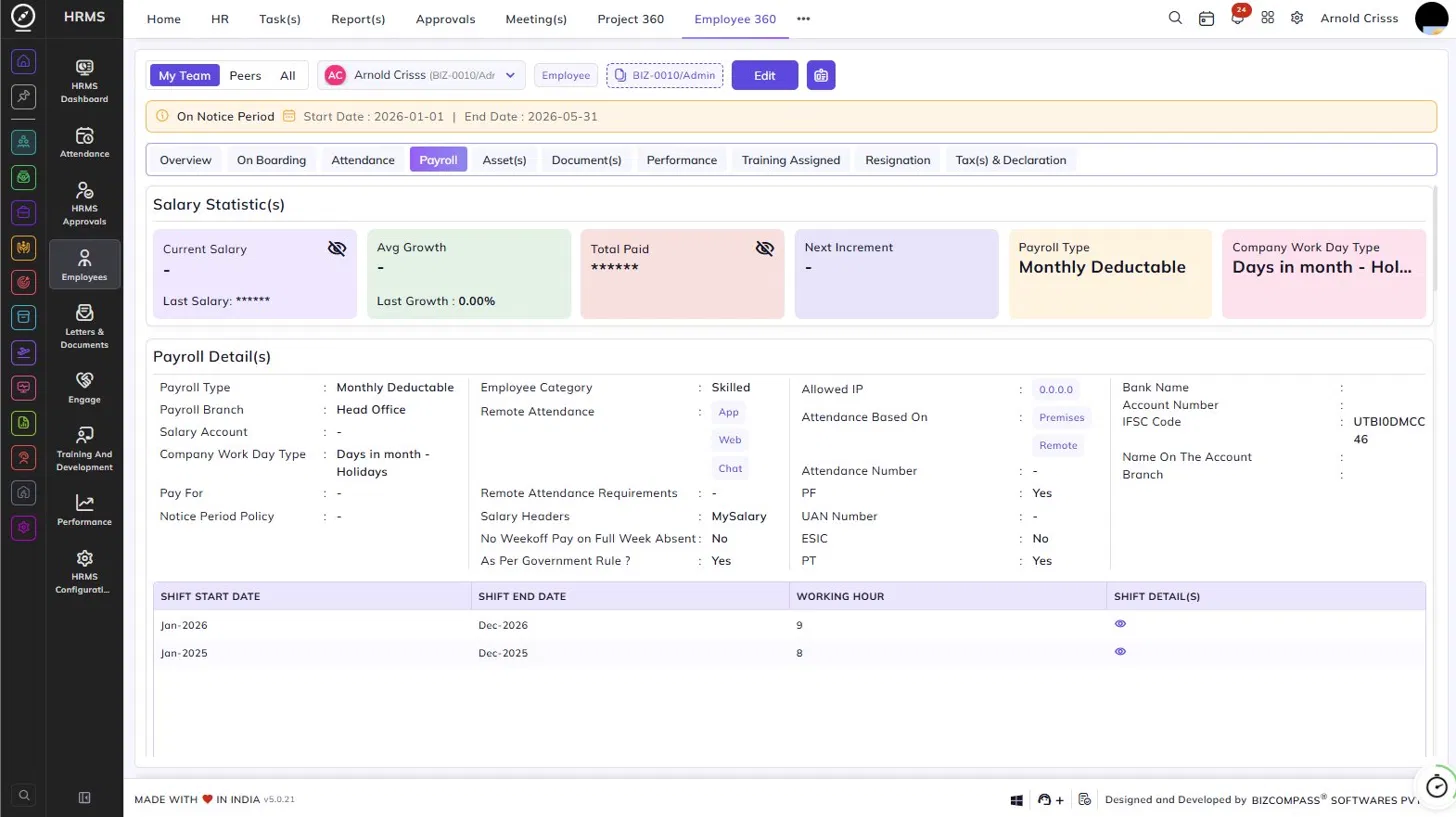
Shift Details:
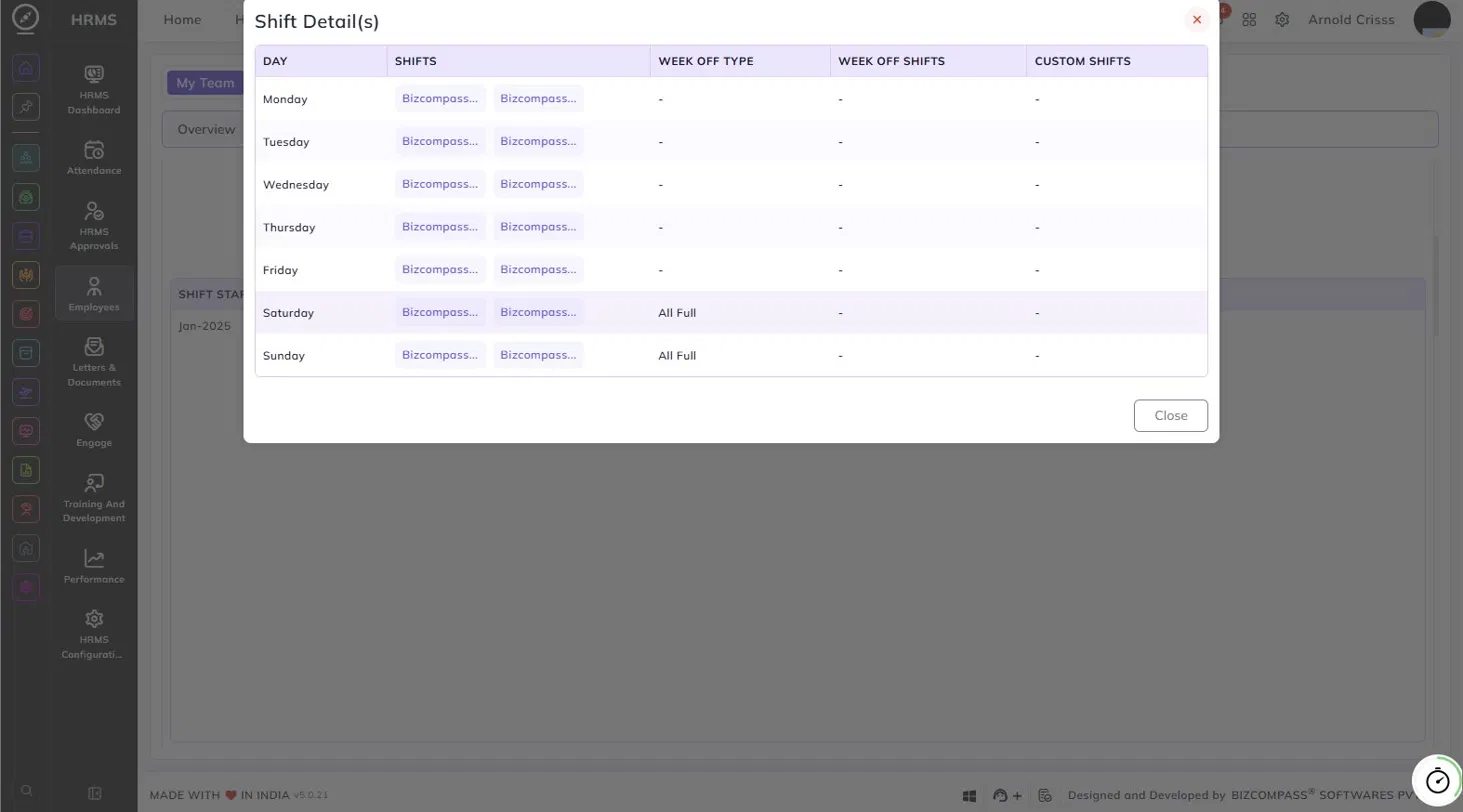
Below the payroll details, a table lists the employee's shift history showing the shift start date, shift end date, working hours per day, and a view icon to see the full shift details for each period.
Clicking the view icon in the Shift Details table opens the Shift Detail(s) dialog, which shows the day-wise shift configuration for that shift period. The table lists each day of the week along with the assigned shifts, week-off type, week-off shifts, and any custom shifts configured for that day. Days marked with All Full in the Week Off Type column indicate that the entire day is treated as a full week off.
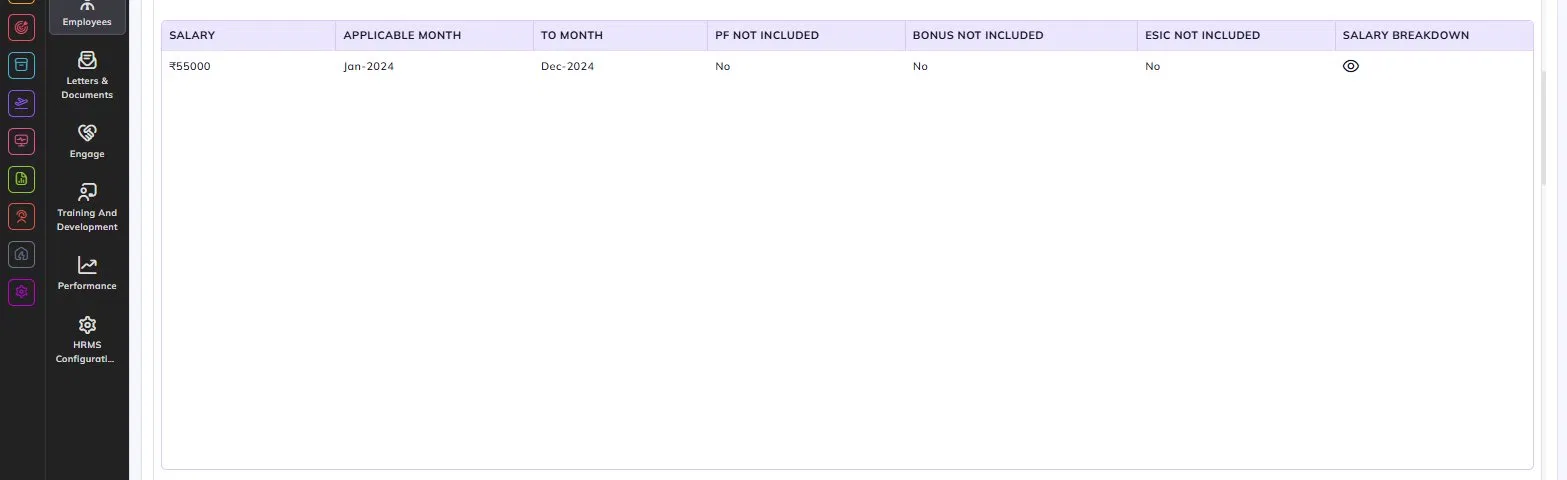
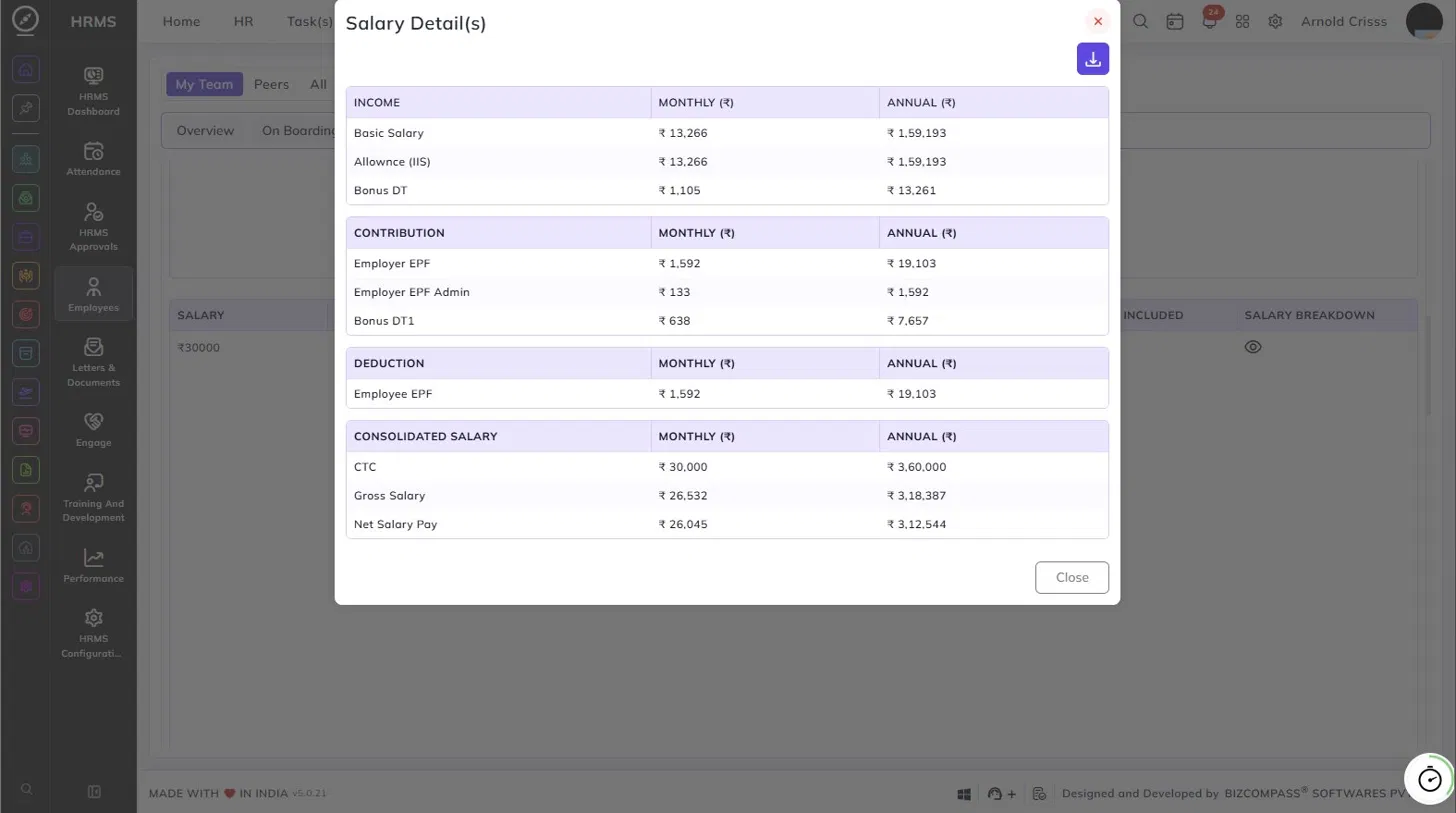
Salary History:
The salary history table shows all salary revisions for the employee, with each row displaying the salary amount, the applicable from month, the to month, whether PF, bonus, and ESIC are included or excluded, and a view icon to see the full salary breakdown for that period.

Clicking the view icon in the Salary History table opens the Salary Detail(s) dialog, which shows a full breakdown of the employee's salary structure for that revision. The breakdown is divided into four sections, each showing monthly and annual figures:
- Income – Earnings components such as Basic Salary, Allowances, and Bonus.
- Contribution – Employer-side contributions such as Employer EPF, Employer EPF Admin, and Bonus DT.
- Deduction – Employee-side deductions such as Employee EPF.
- Consolidated Salary – The summary showing CTC, Gross Salary, and Net Salary Pay.
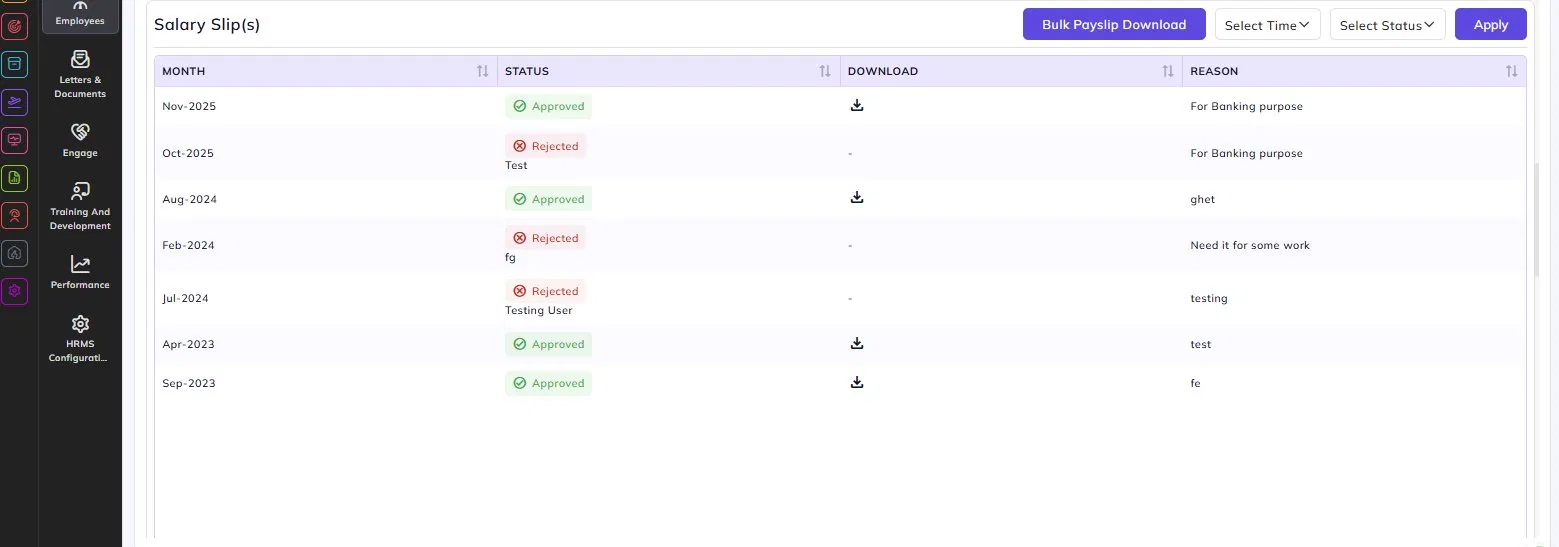
Salary Slips:
The Salary Slips section lists all salary slip requests made by the employee, showing the month, approval status (Approved or Rejected), a download link for approved slips, and the reason provided for the request. Use the Select Time and Select Status filters to narrow down the list, and click Bulk Pay Slip Download to download multiple salary slips at once.
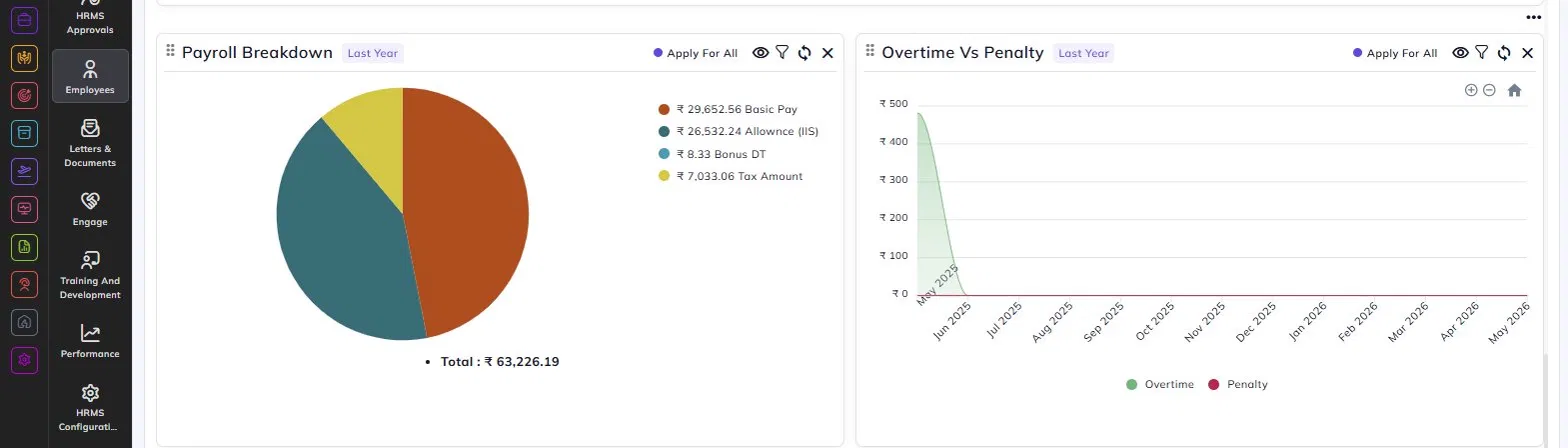
Payroll Breakdown:
A pie chart showing the distribution of the employee's total salary across components such as Basic Pay, Allowances, Bonus, and Tax Amount, along with the total salary figure.
Overtime Vs Penalty:
A line chart comparing the employee's overtime earnings against any penalties applied over the selected time period.
Cost of Employee:
An area chart showing the month-wise comparison of the employee's payable salary versus actual salary over time.
Payroll Cost Summary:
A stacked bar chart showing the month-wise breakdown of payroll cost components including Basic Salary, Allowances, Incentive, Employee Referral Bonus, Tax Amount, and Bonus.
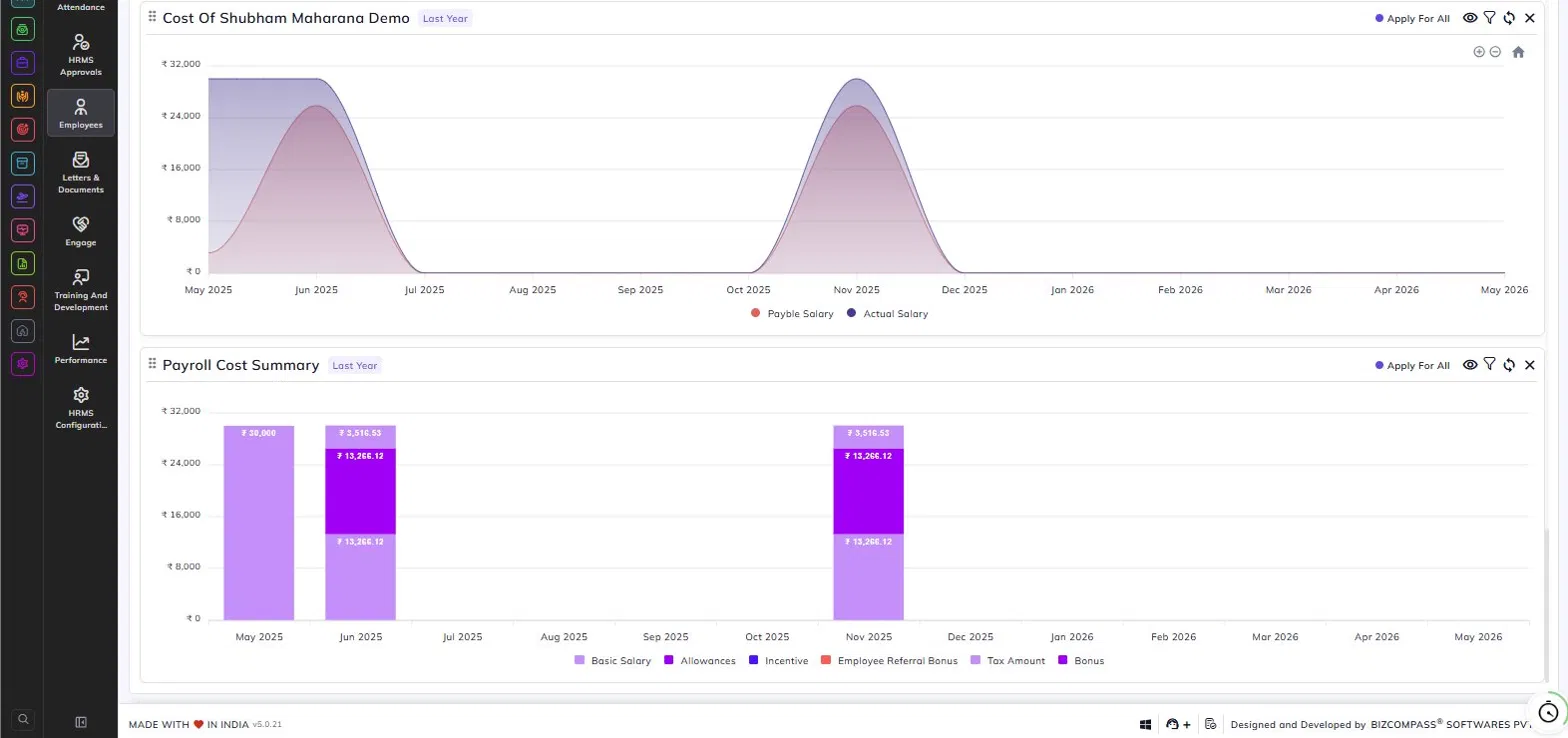
Each chart defaults to showing data for the last year and can be filtered, refreshed, or removed using the icons at the top right of each widget. The Apply For All option applies the selected time filter across all payroll charts simultaneously.
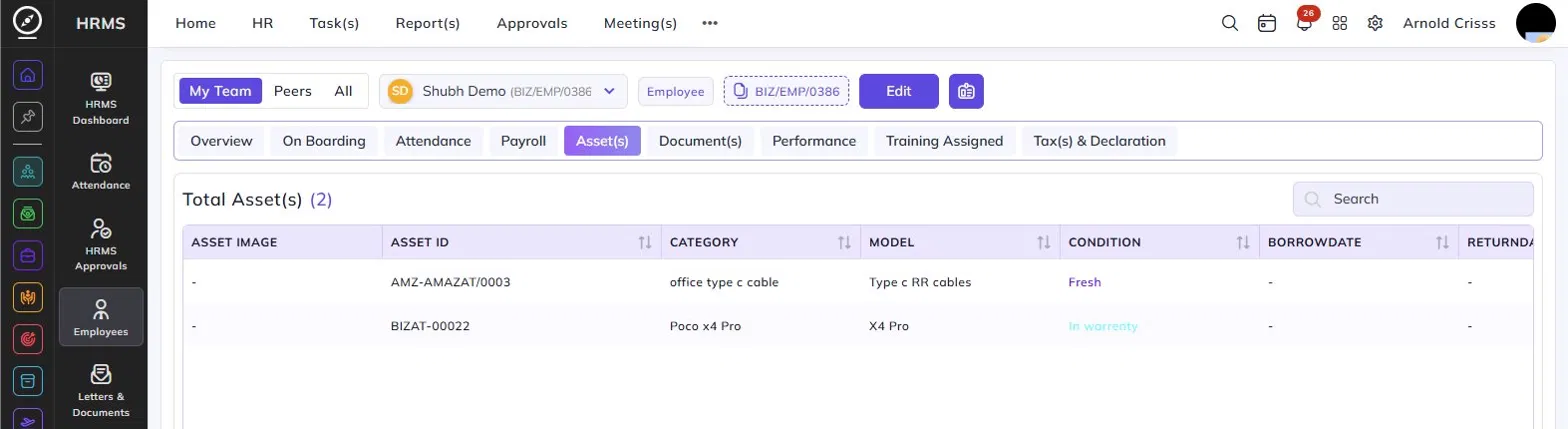
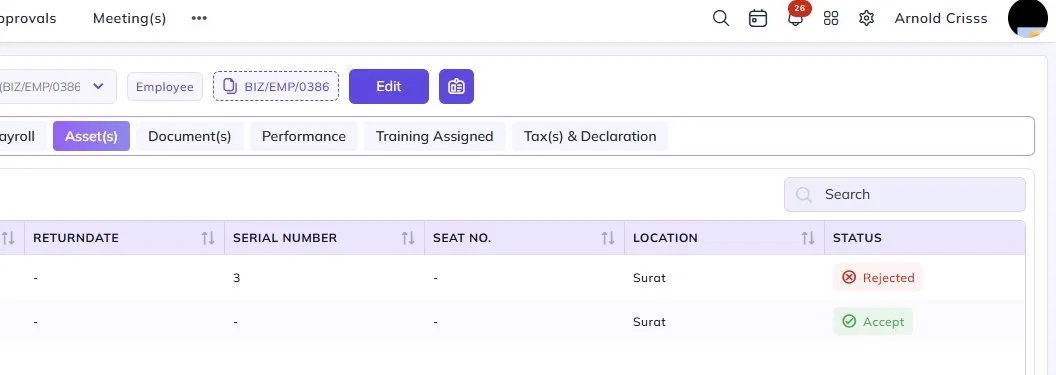
Asset(s) Tab:
The Asset(s) tab displays all company assets currently assigned to the selected employee. The total number of assets is shown in the section header.
The table lists each asset with the following details:
- Asset Image – A photo of the asset, if uploaded.
- Asset ID – The unique identifier assigned to the asset.
- Category – The type or category of the asset (e.g., office type c cable, Poco x4 Pro).
- Model – The model name of the asset.
- Condition – The current condition of the asset (e.g., Fresh, In Warranty).
- Borrow Date – The date on which the asset was issued to the employee.
- Return Date – The date on which the asset was or is expected to be returned.
- Serial Number – The serial number of the asset, if available.
- Seat No. – The seat number associated with the asset, if applicable.
- Location – The location where the asset is being used.
- Status – The current assignment status of the asset — Accept (asset assignment accepted by the employee) or Rejected (asset assignment rejected by the employee).
Use the Search bar at the top right to filter assets by any detail.
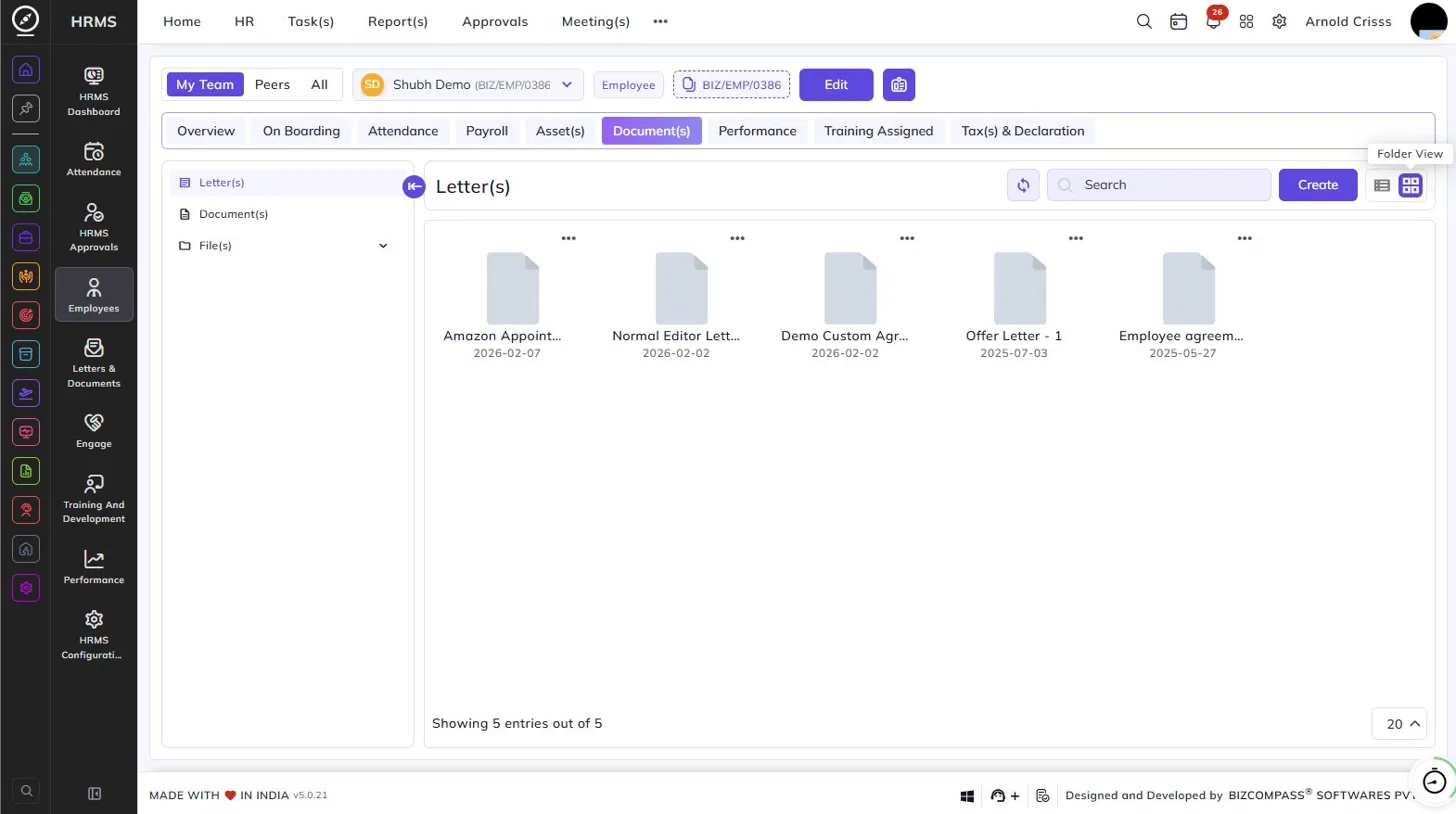
Document(s) Tab:
The Document(s) tab is organized into three sections accessible from the left panel: Letter(s), Document(s), and File(s).
Letter(s):
The Letter(s) section lists all letters generated for the employee, such as appointment letters, agreement letters, and offer letters. Click Create to generate a new letter for the employee.
The table displays each letter with the following details:
- Type – The category of the letter (e.g., Appointment Letter, Agreement Letter, Offer Letter).
- Letter Name – The name of the letter along with its unique ID. Click the external link icon to open the letter.
- Date – The date the letter was generated.
- Preview – A preview option for the letter, if available.
- Print – Icons to view, download, regenerate, upload, and send the letter. If the letter is still being generated, a Generating Letter status is shown.
- Letter Approval Status – Shows whether the letter is Approved or Pending, along with the name of the approver.
- Letter Acknowledgement – Shows whether the employee has acknowledged the letter (Pending if not yet acknowledged).
- Letter Acknowledgement Expiry – Shows whether the acknowledgement link is active or expired, along with the expiry date.
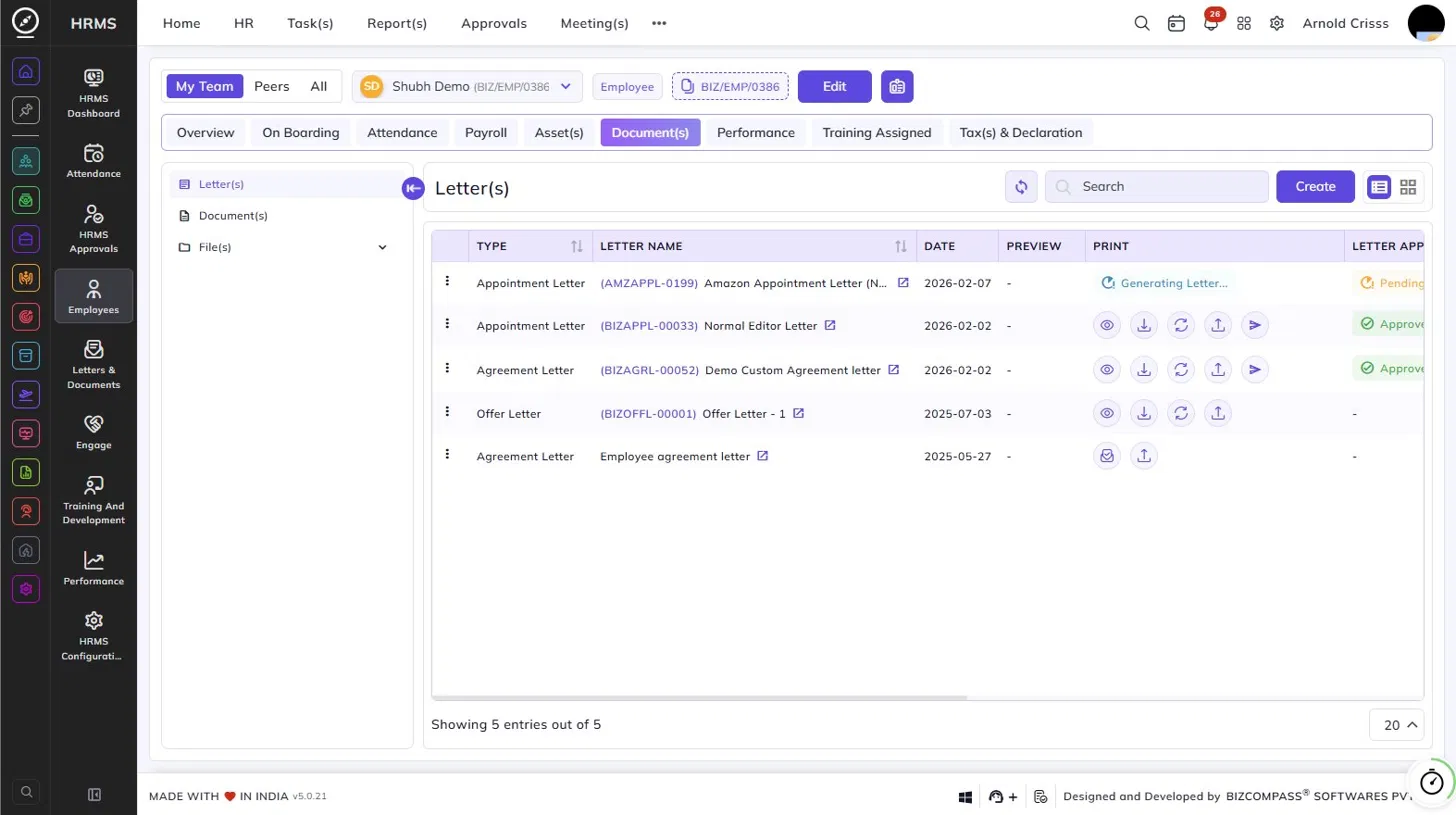
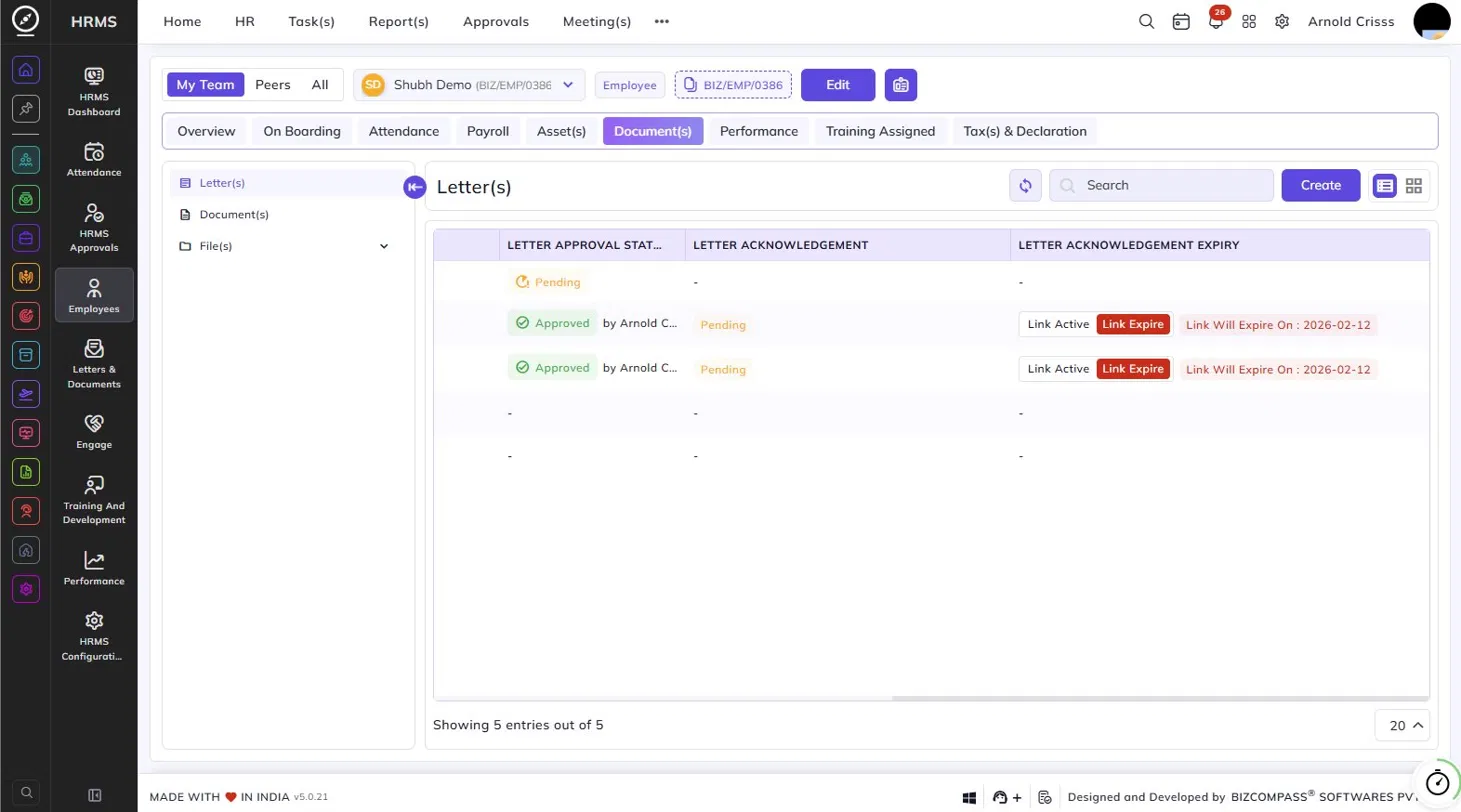
You can toggle between list view and folder view using the icons at the top right of the section.
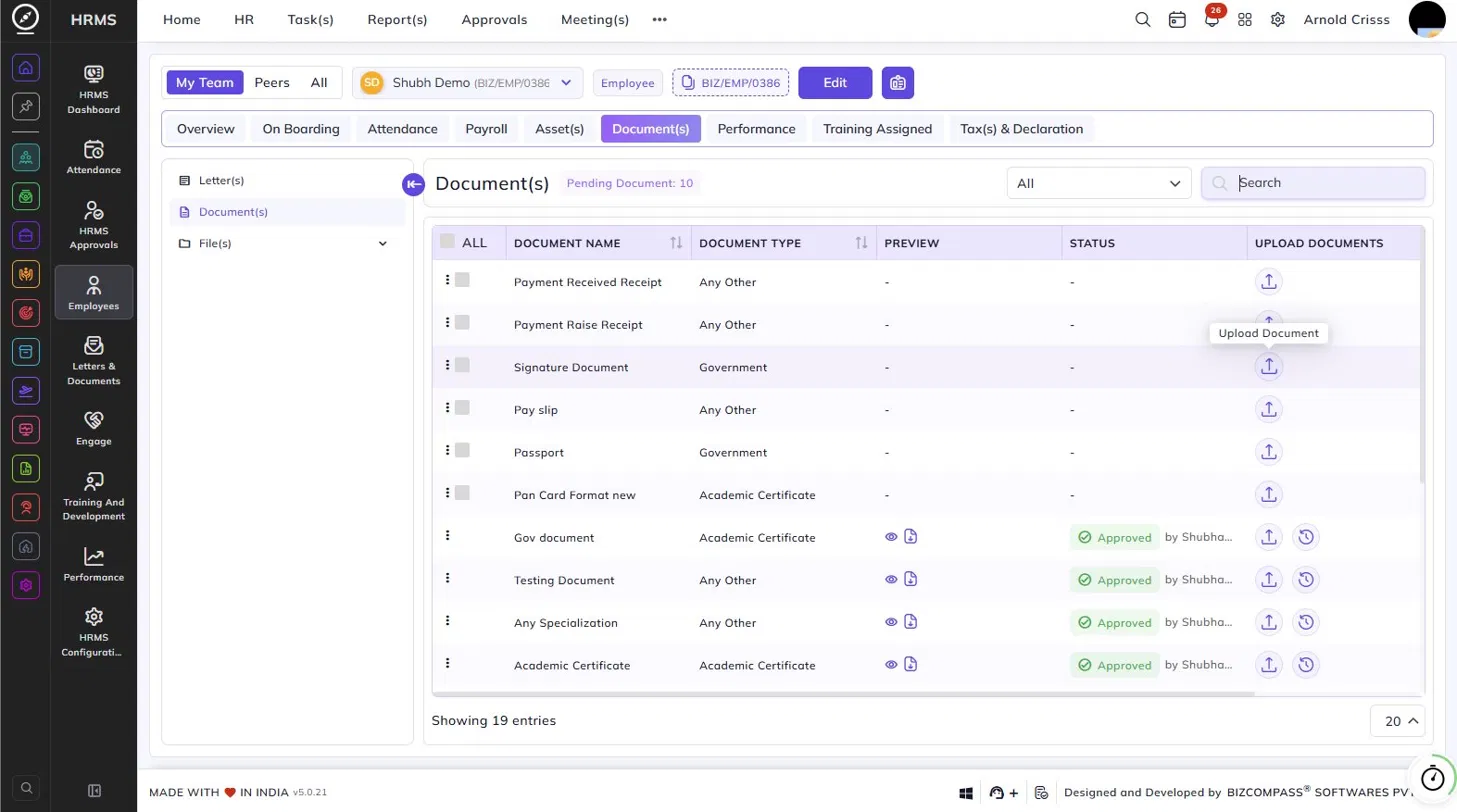
Document(s):
The Document(s) section lists all documents required from or submitted by the employee. The header shows the count of Pending Documents that have not yet been uploaded.
Use the All dropdown to filter documents by type, and the Search bar to find specific documents.
The table displays each document with the following details:
- Document Name – The name of the required document.
- Document Type – The category of the document (e.g., Government, Academic Certificate, Any Other).
- Preview – View and download icons for uploaded documents.
- Status – The approval status of the uploaded document — Approved along with the approver's name, or blank if not yet uploaded.
- Upload Documents – Click the upload icon to upload the document for that entry. For approved documents, a history icon is also available to view previous uploads.
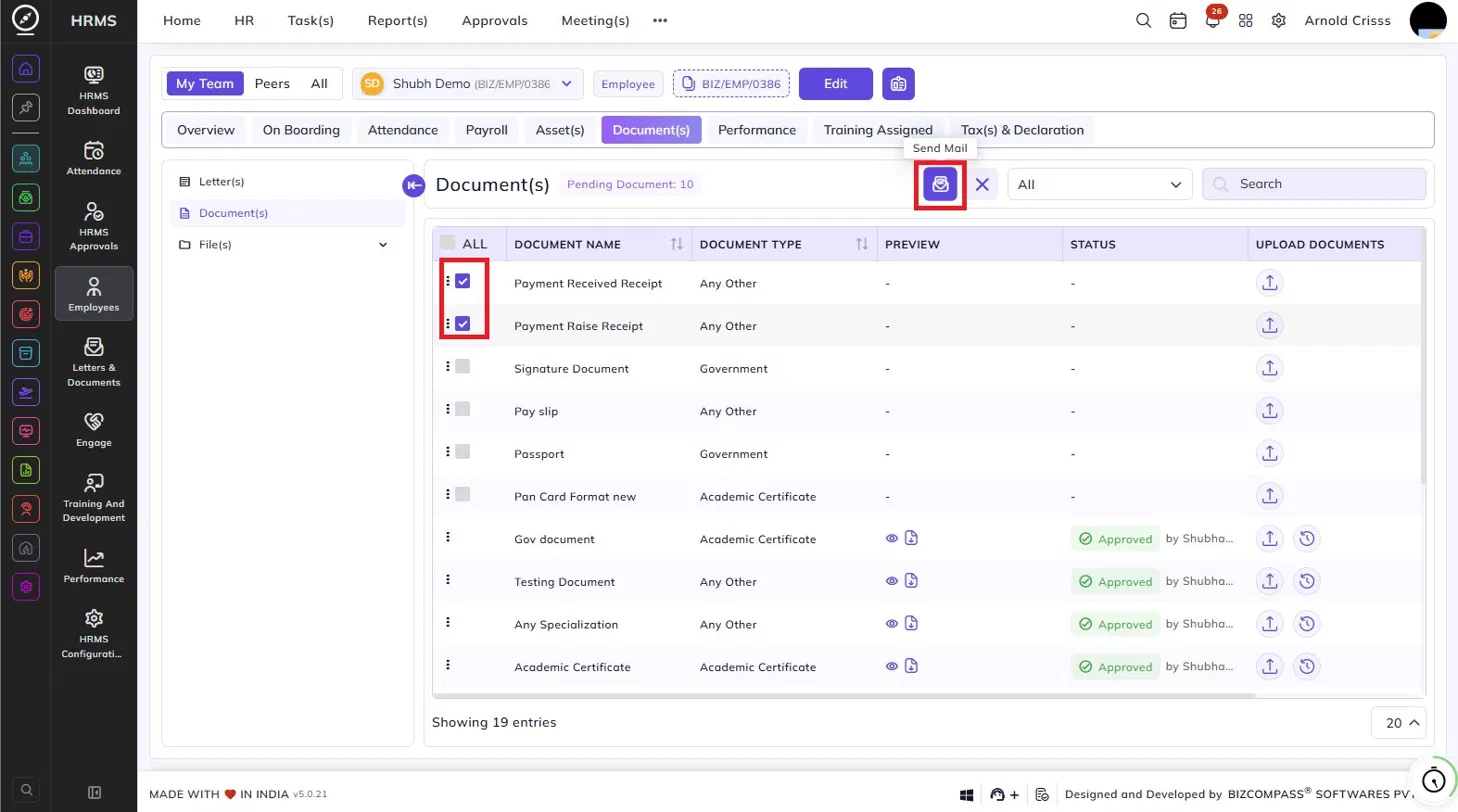
To send a document reminder to the employee, select the relevant documents using the checkboxes and click the Send Mail icon that appears at the top.
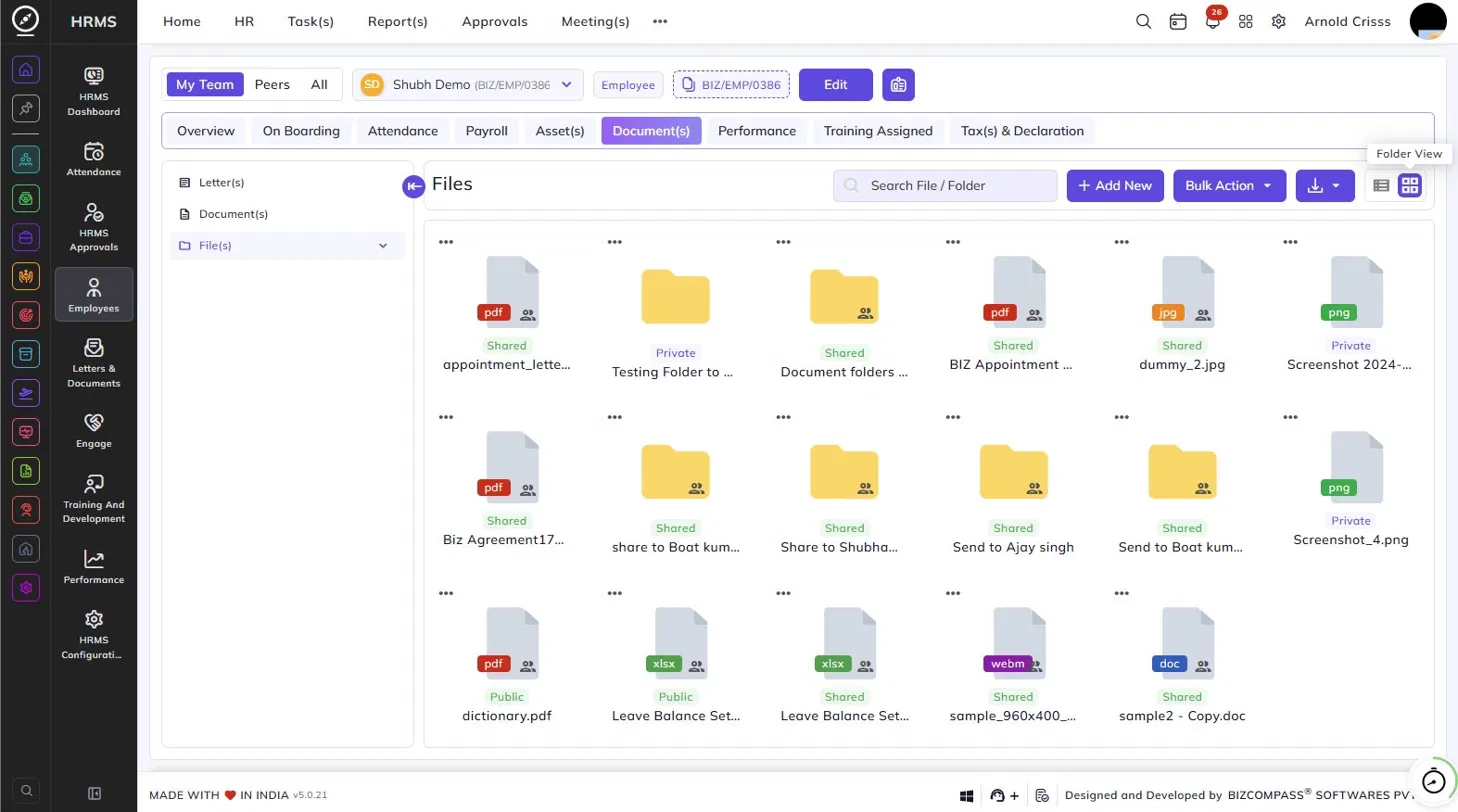
File(s):
The File(s) section is a document storage area where files and folders related to the employee can be managed. Files can be Shared, Private, or Public, as indicated by the label on each file or folder in the folder view.
The table displays each file and folder with its name, last modified date and time, the person who last modified it, and the file size or item count for folders.
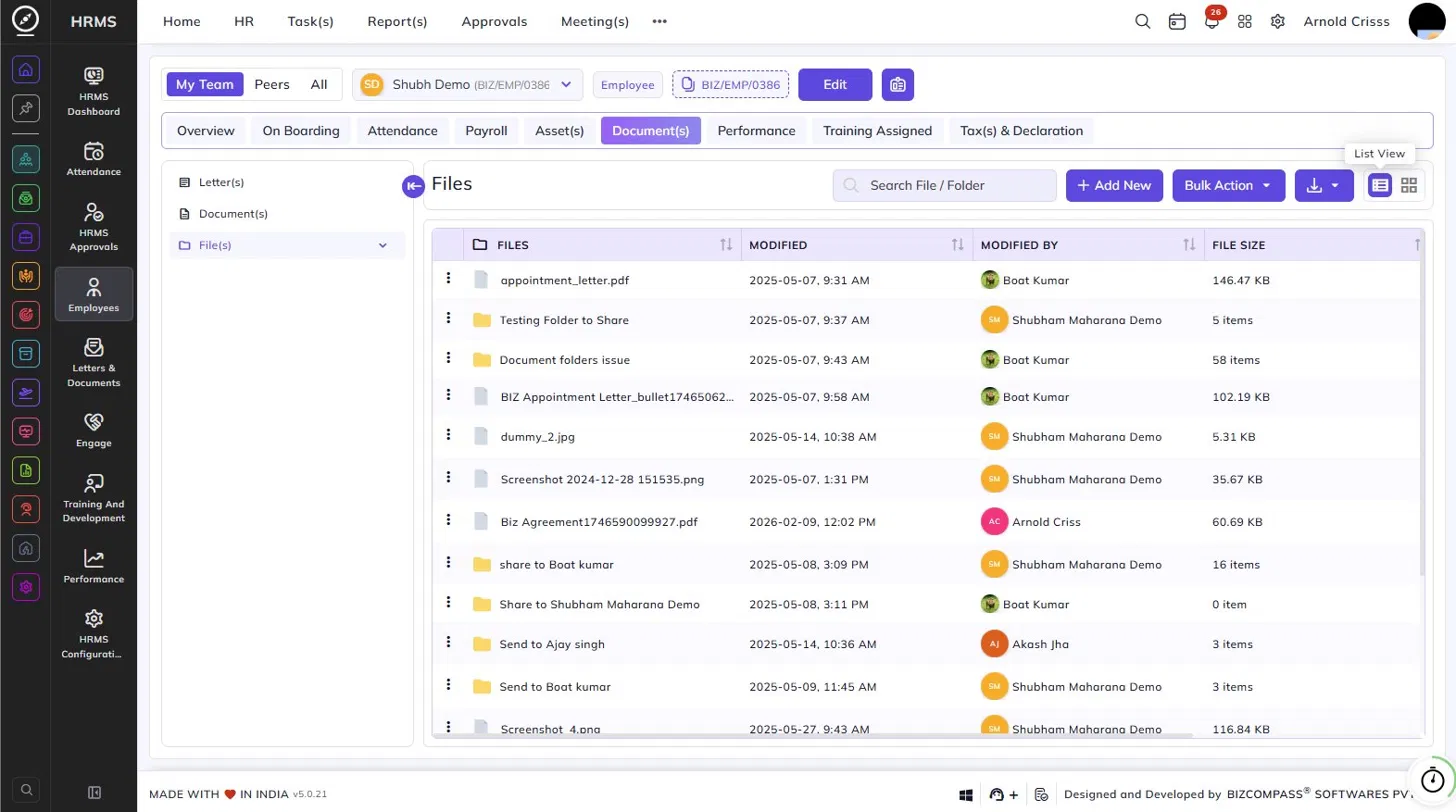
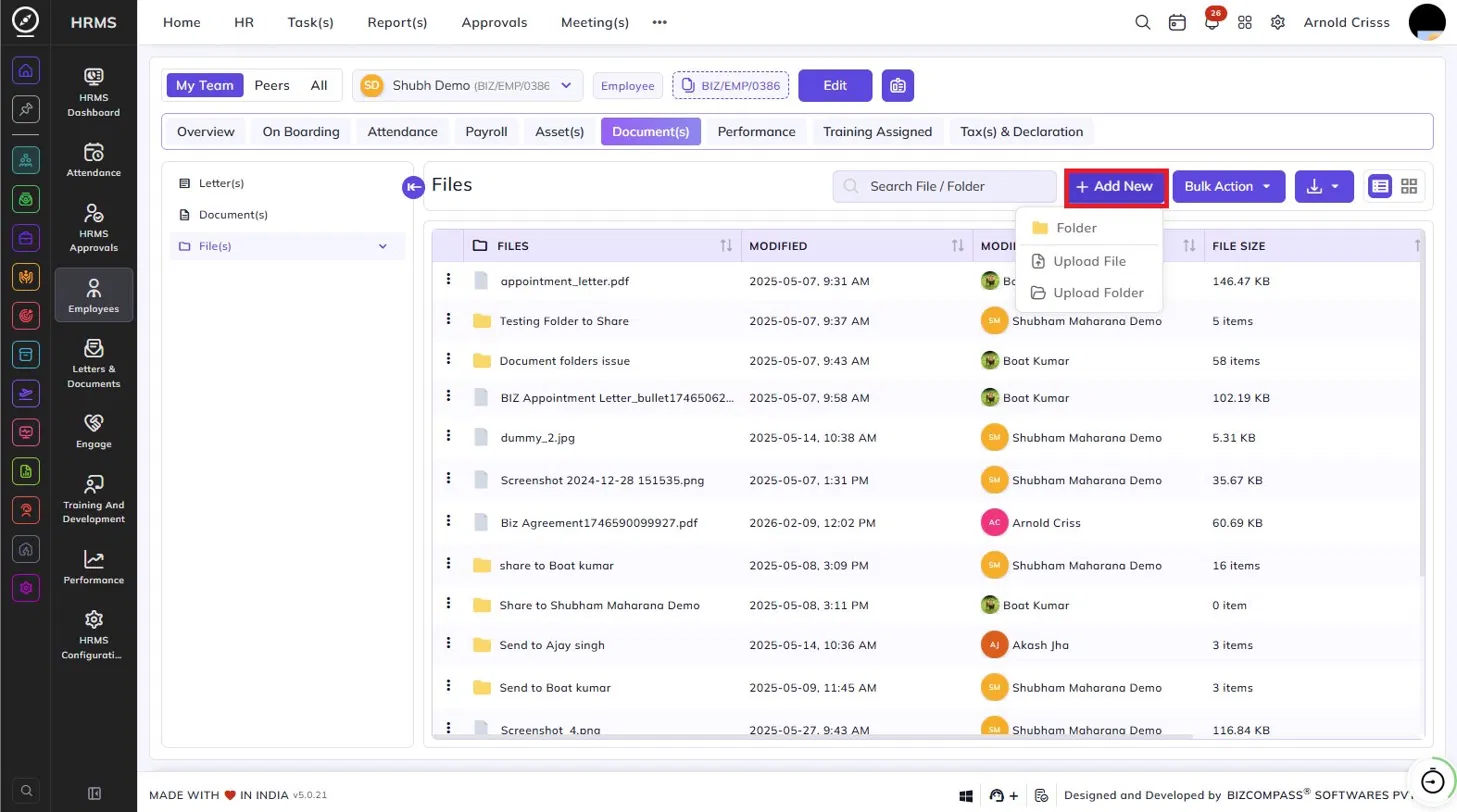
Adding Files and Folders:
Click + Add New to expand the options:
- Folder – Creates a new folder.
- Upload File – Uploads a single file.
- Upload Folder – Uploads an entire folder.
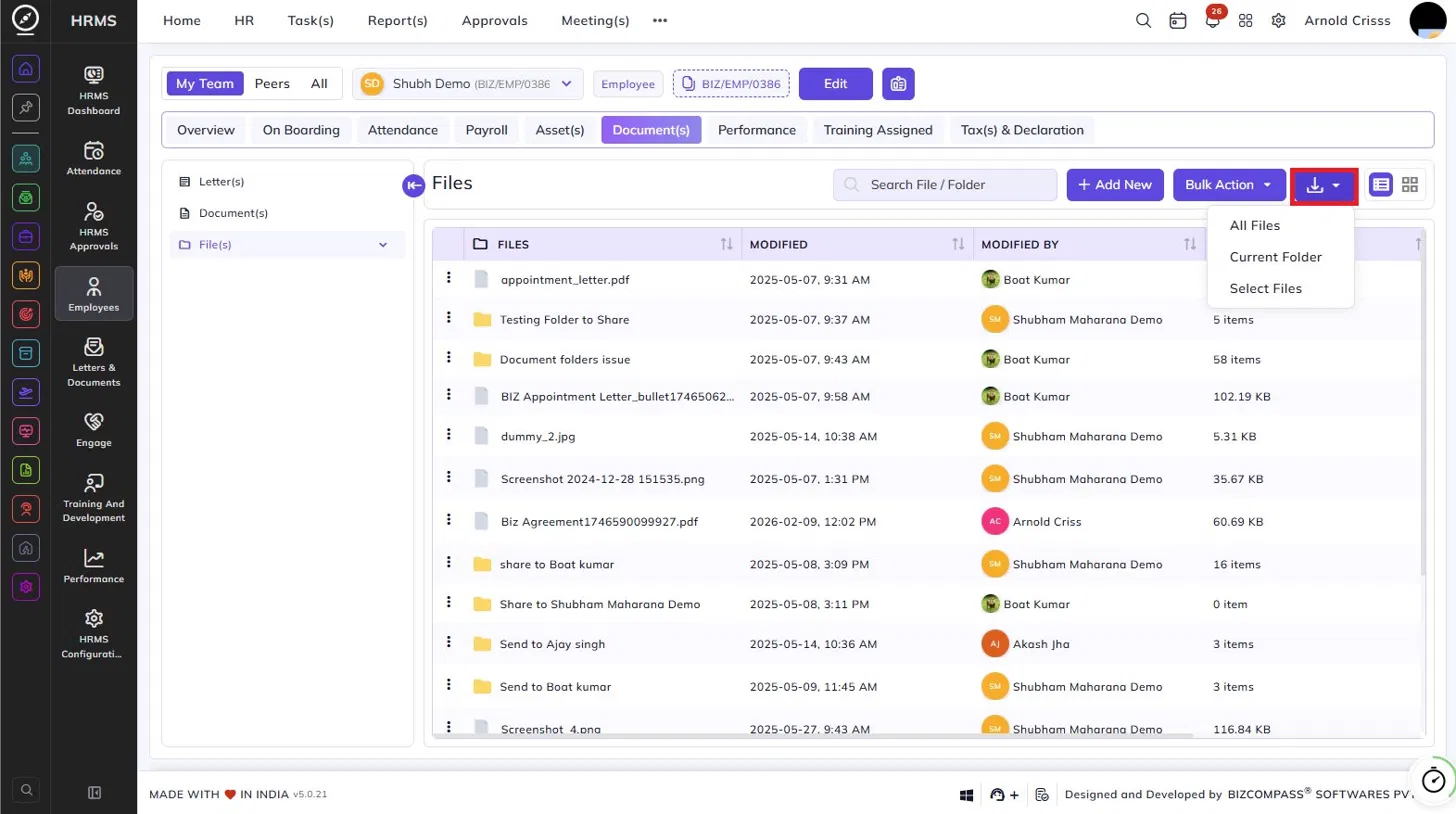
Downloading Files:
Click the Download button and select from:
- All Files – Downloads all files in the section.
- Current Folder – Downloads all files in the currently open folder.
- Select Files – Allows you to choose specific files to download.
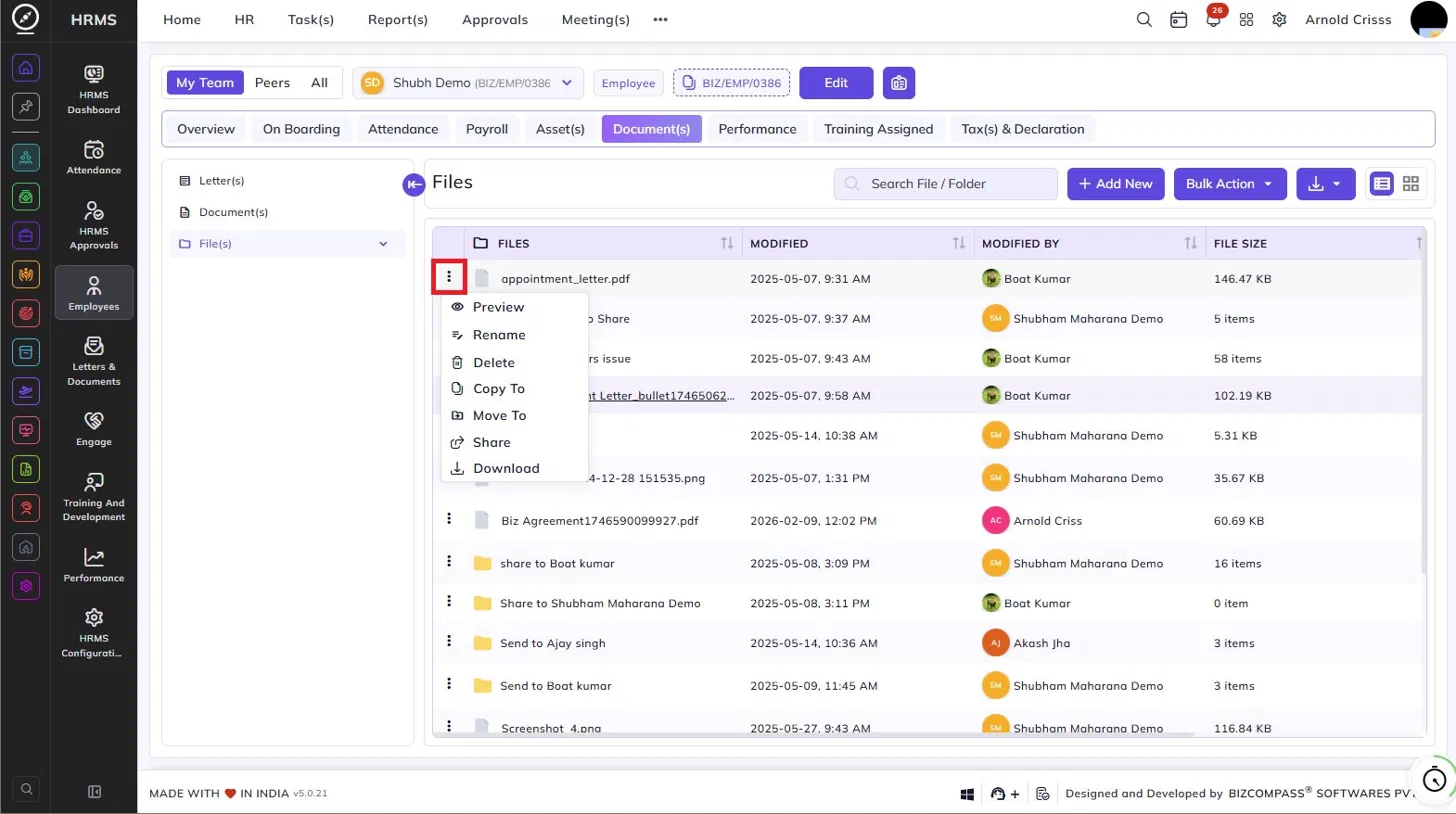
File Actions:
Click the three-dot menu on any file or folder to access the following options:
- Preview – Opens a preview of the file.
- Rename – Renames the file or folder.
- Delete – Deletes the file or folder.
- Copy To – Copies the file to another location.
- Move To – Moves the file to another location.
- Share – Shares the file with other users.
- Download – Downloads the file directly.
You can toggle between list view and folder view using the icons at the top right of the section.
Performance Tab:
The Performance tab provides a comprehensive view of the employee's performance across four sub-sections accessible from the sub-navigation bar: MIS Reports, Manager Review, Performance Review, KRAs / KPIs Review, and Review Performance.
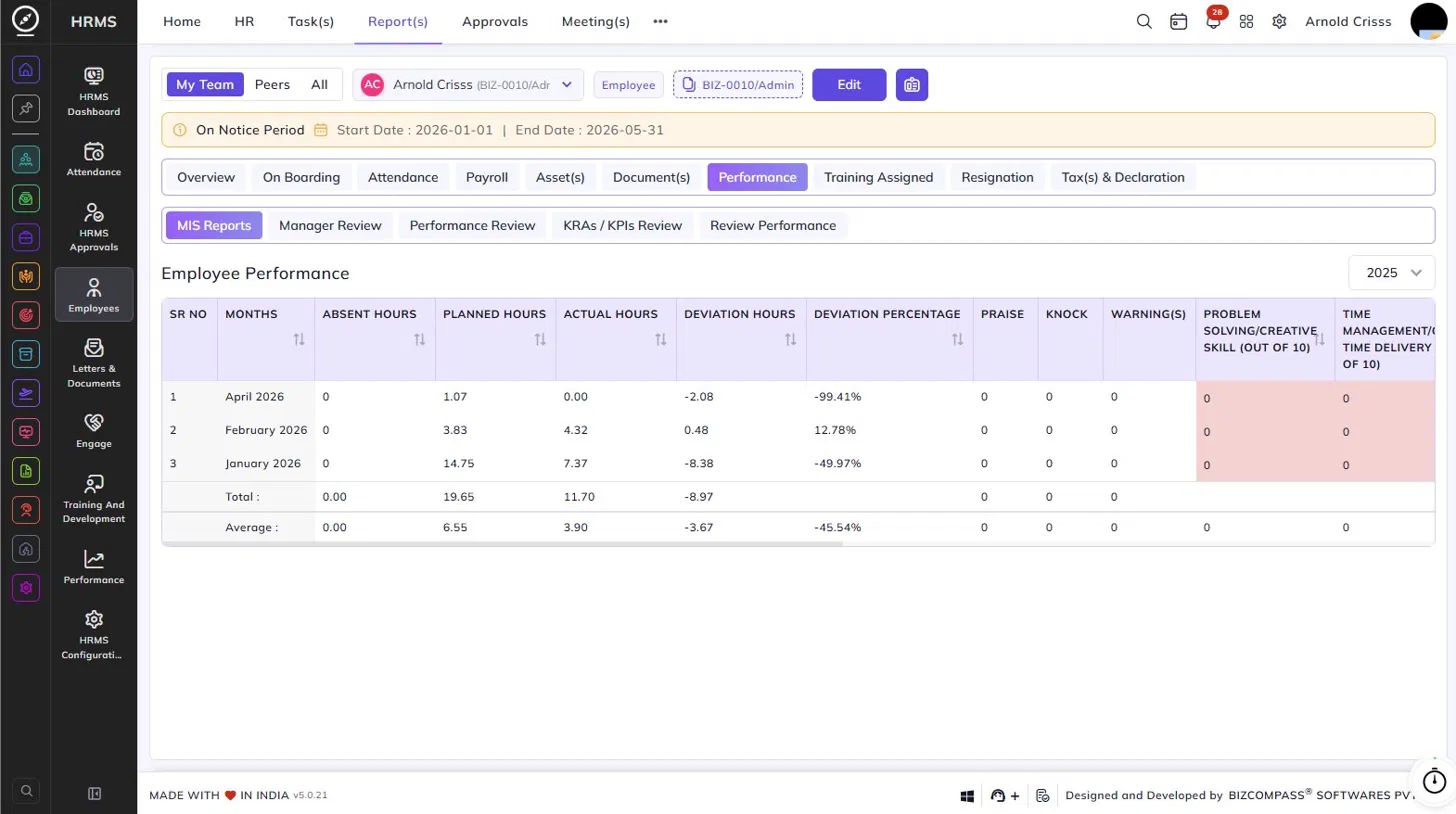
MIS Reports:
The MIS Reports sub-section displays the Employee Performance table, showing a month-wise breakdown of the employee's performance metrics for the selected year. Use the year dropdown at the top right to change the year.
The table includes the following columns for each month:
- Absent Hours – Total hours the employee was absent.
- Planned Hours – The total hours planned for the employee.
- Actual Hours – The actual hours worked.
- Deviation Hours – The difference between planned and actual hours.
- Deviation Percentage – The deviation expressed as a percentage.
- Praise – The number of praises received.
- Knock – The number of knocks (negative feedback) received.
- Warning(s) – The number of warnings issued.
- Problem Solving / Creative Skill (Out of 10) – Score for problem solving and creativity.
- Time Management / On Time Delivery (Out of 10) – Score for time management.
- Repetitive Mistakes (Out of 10) – Score for repetitive mistakes.
- Collaboration with Team (Out of 10) – Score for team collaboration.
- Accountability (Out of 10) – Score for accountability.
- All Over Average (Out of 10) – The overall average score across all skill metrics.
- Remark – Any remarks added for that month.
The table also shows Total and Average rows at the bottom for a summary across all listed months.
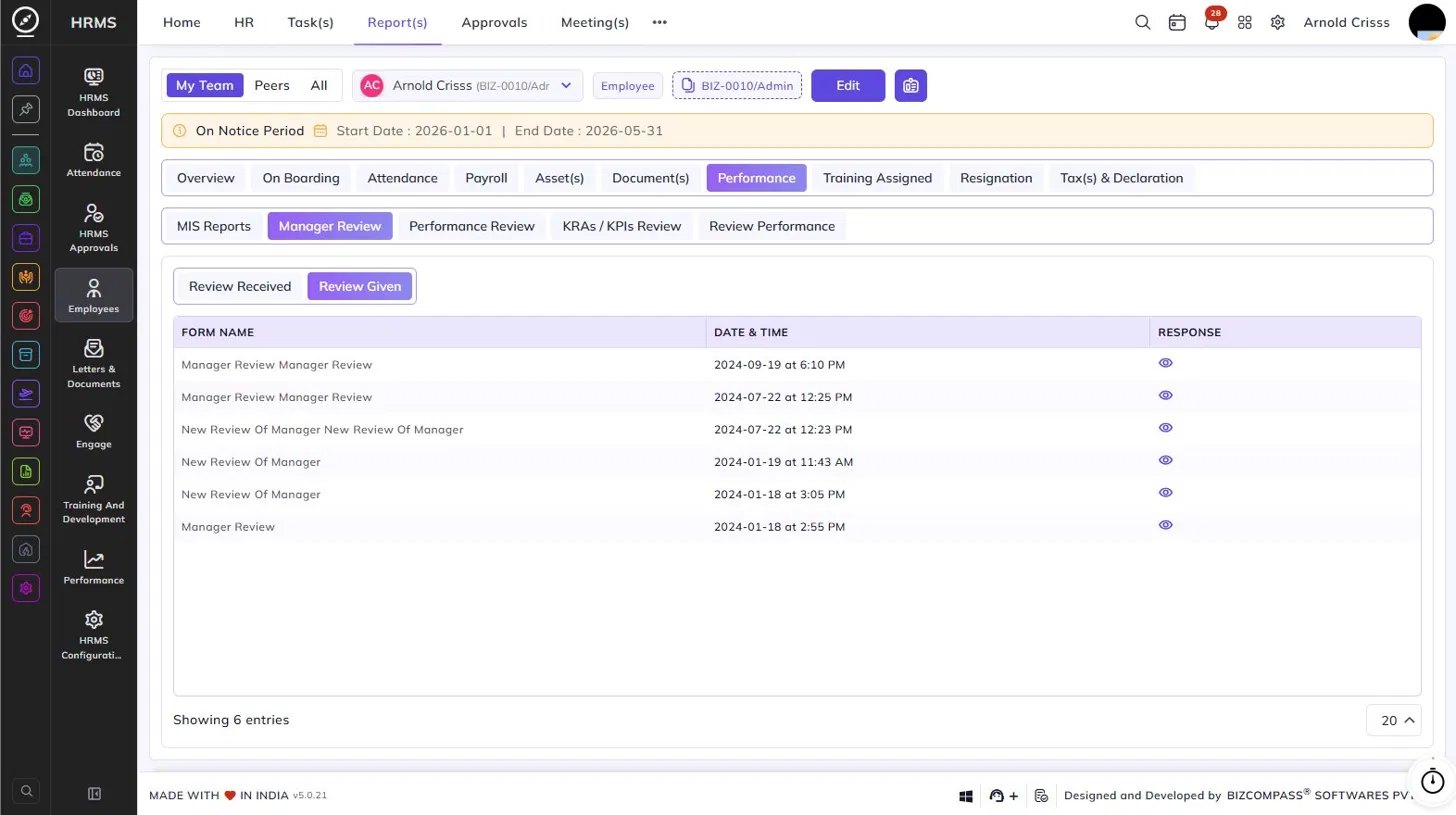
Manager Review:
The Manager Review sub-section shows all manager review forms associated with the employee. Toggle between Review Received (reviews the employee received) and Review Given (reviews the employee gave to others).
Each entry shows the form name, date and time of submission, and a view icon to open the response.
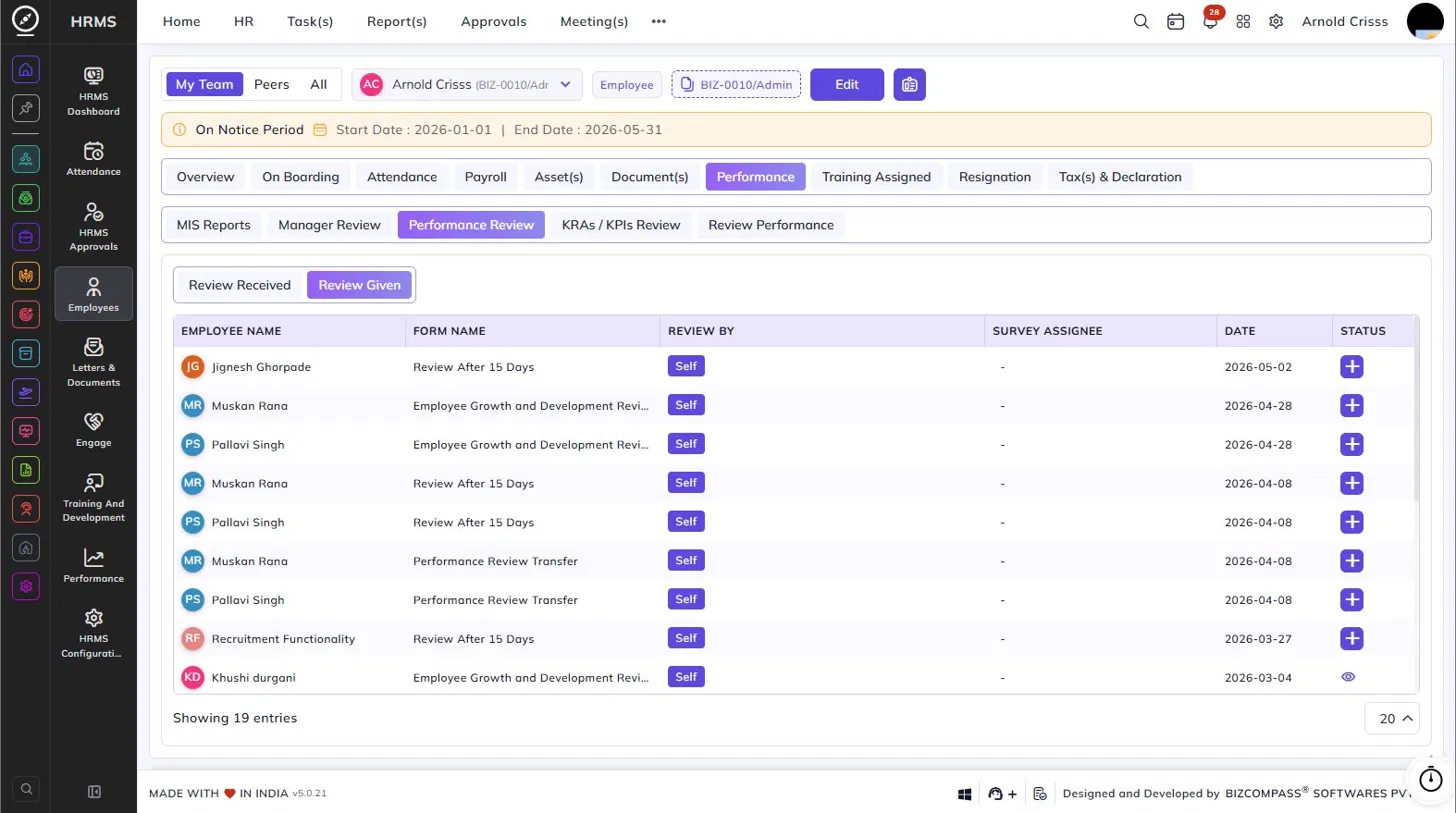
Performance Review:
The Performance Review sub-section shows all performance review forms linked to the employee. Toggle between Review Received and Review Given.
The table displays the employee name, form name, review type (e.g., Self), survey assignee, date, and a status icon to fill in or view the review response.
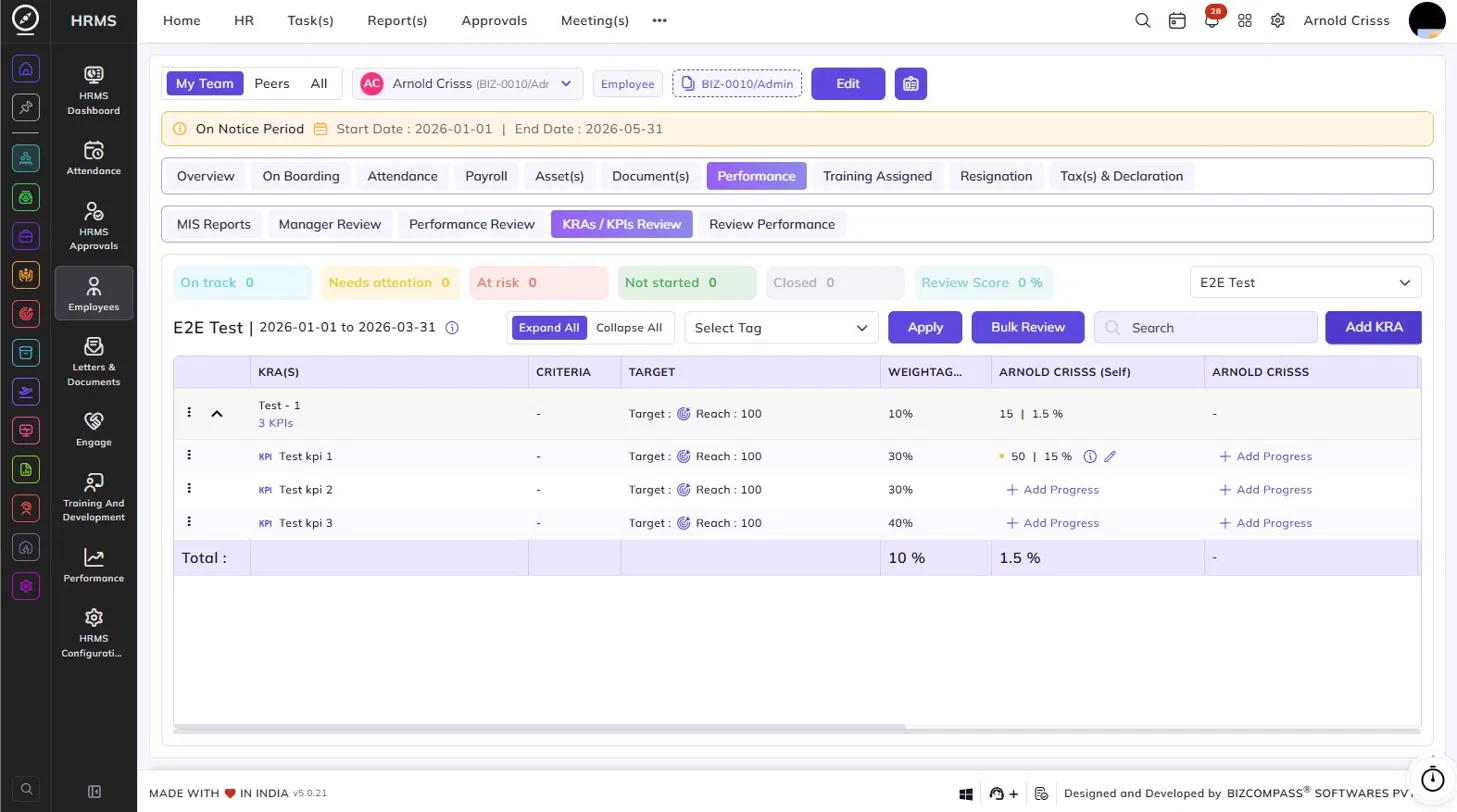
KRAs / KPIs Review:
The KRAs / KPIs Review sub-section shows the employee's Key Result Areas (KRAs) and Key Performance Indicators (KPIs) for the selected review cycle and period.
The summary bar at the top shows the count of KRAs by status: On Track, Needs Attention, At Risk, Not Started, Closed, and the overall Review Score percentage. Use the dropdown to switch between review cycles.
The table lists each KRA along with its associated KPIs, showing the criteria, target, weightage, self-assessed progress, and manager-assessed progress. Click + Add Progress to add progress against a KPI. Use Expand All or Collapse All to manage the view, and Add KRA to add a new KRA. Bulk Review allows reviewing multiple KPIs at once.
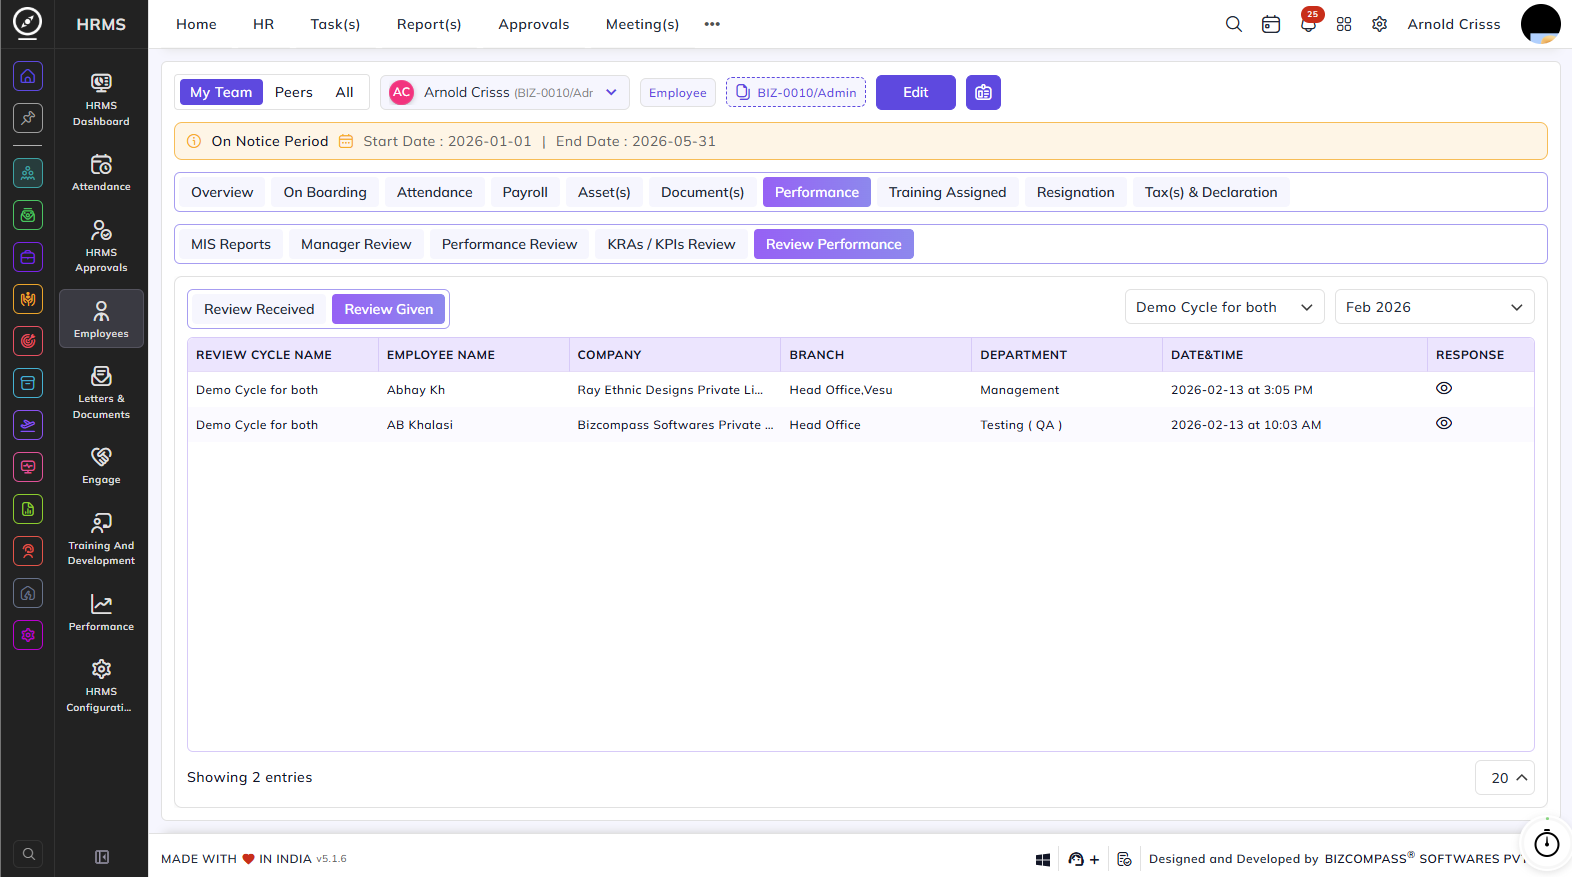
Review Performance:
The Review Performance sub-section shows performance reviews the employee has given to others. Toggle between Review Received and Review Given. Use the review cycle and month dropdowns to filter the results.
The table displays the review cycle name, employee name, company, branch, department, date and time of submission, and a view icon to open the response.
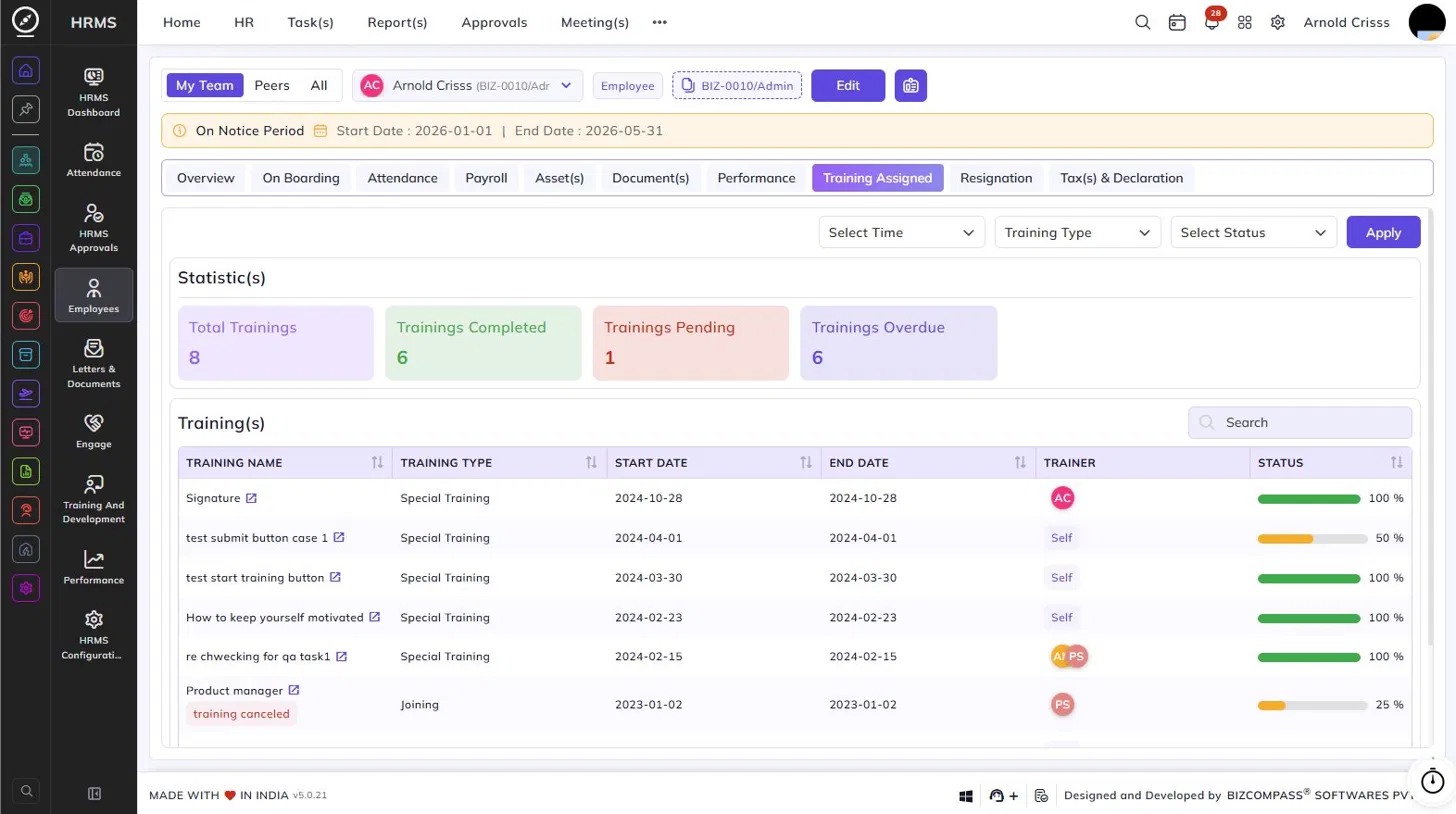
Training Assigned Tab:
The Training Assigned tab provides a summary of all trainings assigned to the employee.
Use the Select Time, Training Type, and Select Status filters to narrow down the list and click Apply.
The Statistics section at the top shows four metrics:
- Total Trainings – The total number of trainings assigned.
- Trainings Completed – The number of trainings the employee has completed.
- Trainings Pending – The number of trainings yet to be completed.
- Trainings Overdue – The number of trainings that have passed their end date without completion.
The Training(s) table below lists each training with its name, training type, start date, end date, trainer, and a progress bar showing the completion percentage. Cancelled trainings are labeled accordingly. Click the external link icon next to a training name to open its details.
Resignation Tab:
The Resignation tab shows the employee's resignation details, exit procedure progress, and full resignation history. This tab only appears if the employee has applied for resignation.
Details:
The Details section at the top displays:
- Resign Type – The type of resignation (e.g., Resign).
- Resign Reason – The reason given for resigning (e.g., Lack of Job Satisfaction).
- Status – The current approval status of the resignation (e.g., Approved), along with the approver's name and timestamp.
- Description – A view icon to read the resignation description.
- Applied Date and Time – When the resignation was submitted.
- Notice Period Start Date and End Date – The notice period duration.
Exit Procedure:
The Exit Procedure section shows the offboarding checklist steps that need to be completed before the employee's last working day. Each step includes its name, completion timestamp, the person responsible, and relevant details such as the number of documents returned or assets assigned. Steps include items such as Work Handover, Document Collection, and Asset Collection.

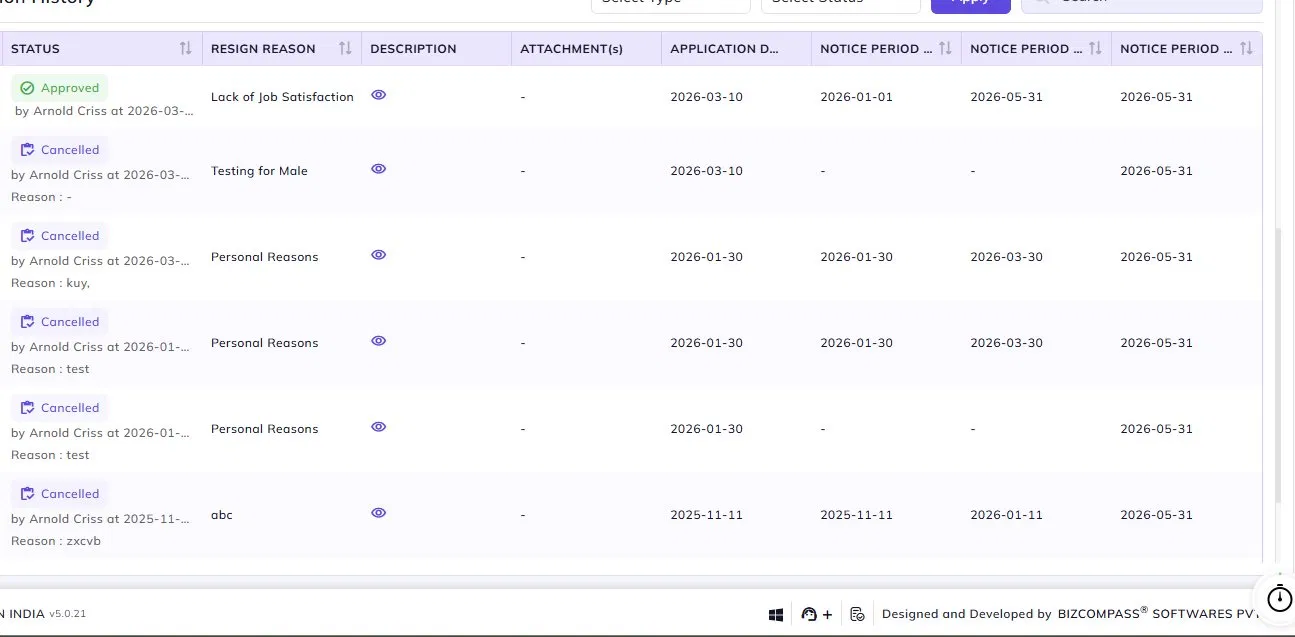
Resignation History:
The Resignation History table below shows all past resignation submissions for the employee. Use the Select Type and Select Status filters to narrow down the list.
Each row displays the resignation type, meeting details (if a meeting was taken), status with approver name and timestamp and cancellation reason if applicable, resign reason, description view icon, attachments, application date, notice period start date, notice period end date, and notice period policy end date.

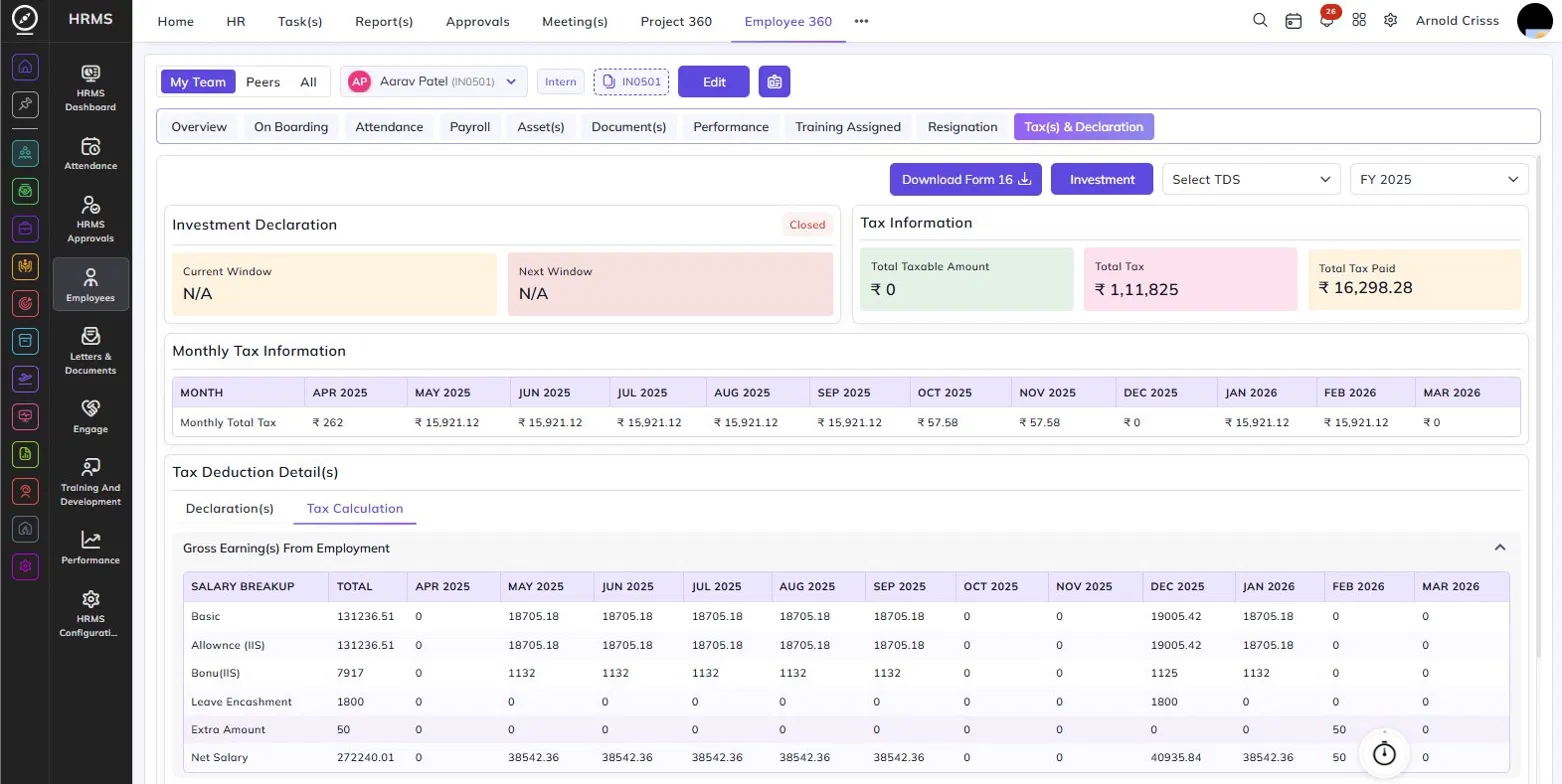
Tax(s) & Declaration Tab:
The Tax(s) & Declaration tab provides a complete view of the employee's tax information, investment declarations, and detailed tax calculations for the selected financial year.
Use the FY dropdown at the top right to select the financial year. The Select TDS dropdown allows filtering by TDS type. Click Download Form 16 to download the employee's Form 16 for the selected year. Click Investment to view or manage the employee's investment declarations.
Investment Declaration:
The Investment Declaration section shows the status of the employee's current investment declaration window. It displays the Current Window and Next Window dates during which the employee can submit or update their investment declarations. If no window is active, both fields show N/A. The status badge (e.g., Closed) indicates whether the declaration window is currently open or closed.
Tax Information:
The Tax Information section shows three summary metrics for the selected financial year:
- Total Taxable Amount – The total amount of income that is subject to tax.
- Total Tax – The total tax liability calculated for the year.
- Total Tax Paid – The total tax already deducted and paid so far.
Monthly Tax Information:
The Monthly Tax Information table shows the Monthly Total Tax deducted for each month of the financial year, from April through March, giving a month-wise view of the employee's TDS deductions.
Tax Deduction Details:
The Tax Deduction Details section is divided into two sub-tabs:
Declarations – Shows the employee's declared investments and exemptions that have been considered for tax calculation.
Tax Calculation – Shows the full tax computation broken down into the following sections:
- Gross Earnings from Employment – A month-wise salary breakup table showing each salary component (Basic, Allowances, Bonus, Leave Encashment, Extra Amount, Net Salary, etc.) with their total and individual monthly values across the financial year.
- Deductions Summary – Shows applicable deductions and adjustments including:
- Standard Deduction
- Professional Tax
- Rebate Amount
- Surge Amount
- Cess Amount
- Total Tax Amount