Create Task & Task Kanban
From this page, you can create and manage all tasks within a project. The Tasks page is the primary workspace for tracking work across different stages of the project lifecycle. It supports multiple views and provides powerful filtering, bulk action, and task management capabilities.
The tasks created here represent the actual units of work being tracked and delivered within a project.
Use the project selector in the top right to switch between projects.
Creating a Task:
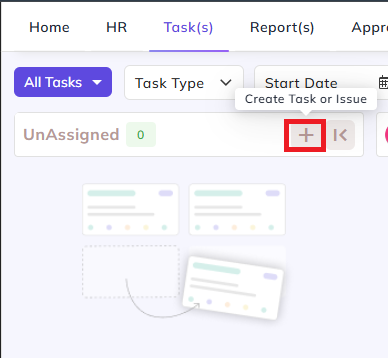
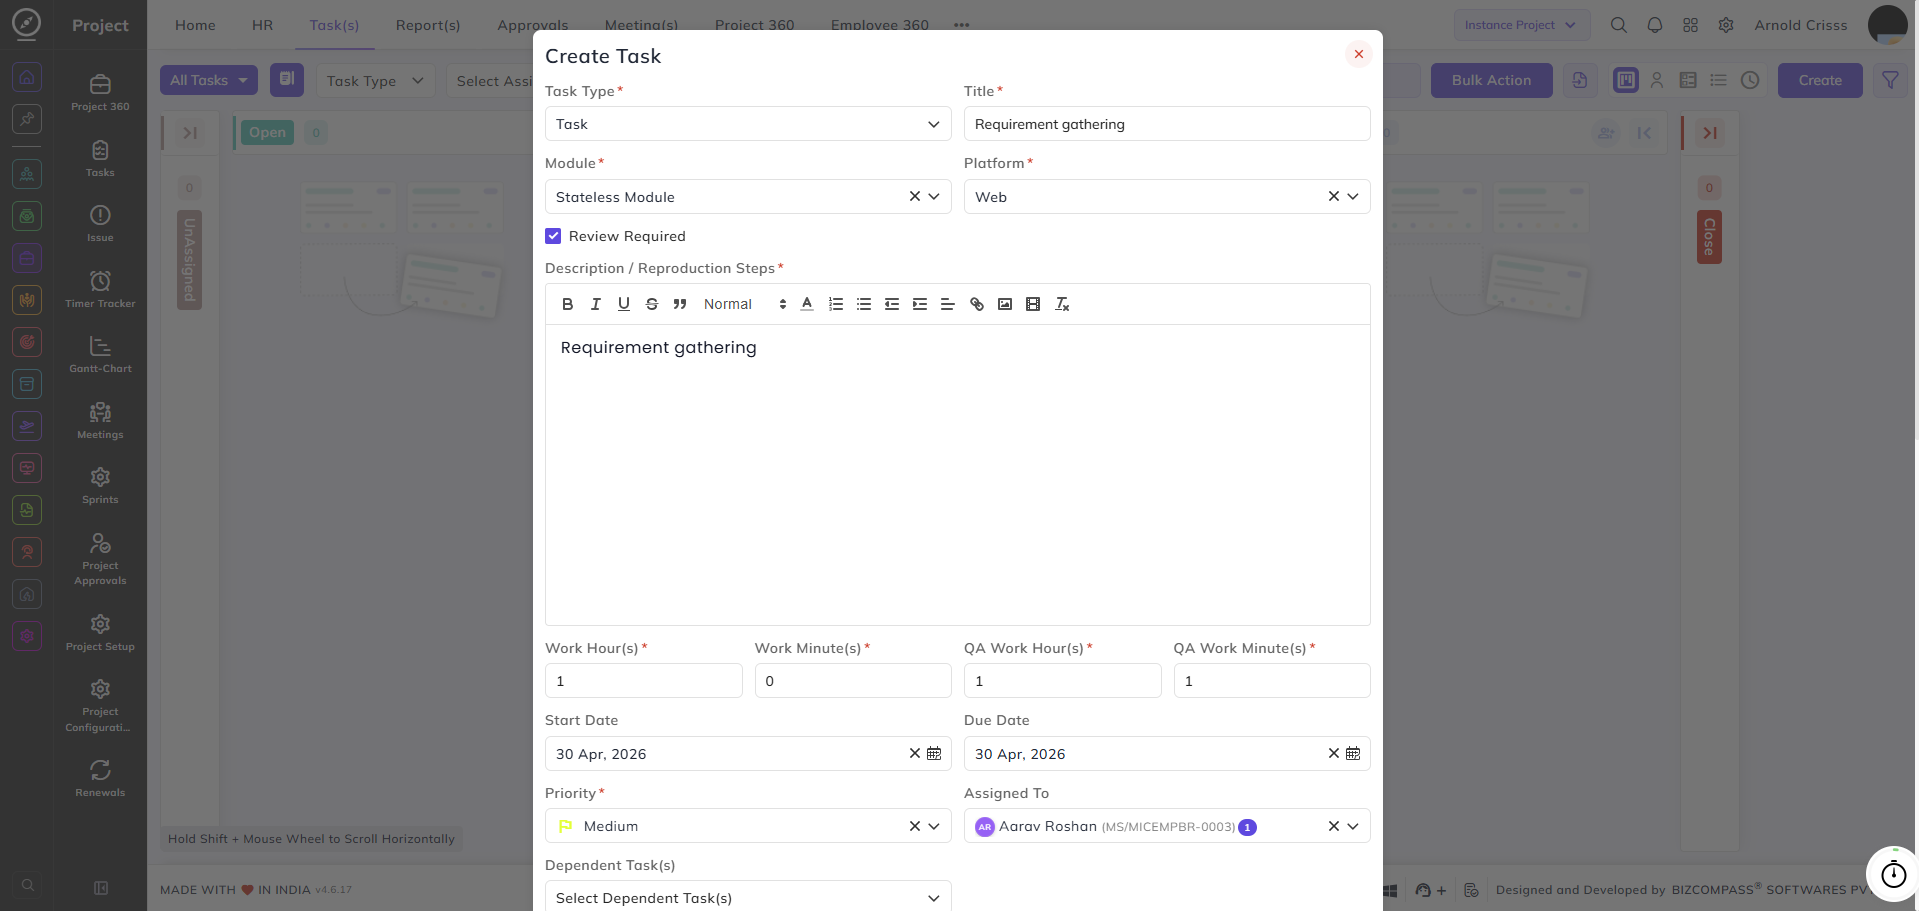
Click the Create button to open the Create Task form.
The task can also be created from the Unassigned stage.
Task Type:
Select the type — Task, Issue, or Suggestion.
Title:
Enter the title of the task. This is the only mandatory field — a task created with only a title will be placed in the Unassigned stage until more details are added.
Module:
Select the module this task belongs to. A task must have a module assigned to move to the Open stage.
Platform:
Select the platform for this task. Along with Module, this field is required for a task to move out of the Unassigned stage.
Review Required:
Enable this checkbox if this task requires a review before it can be progressed further.
Description / Reproduction Steps:
Add a detailed description or reproduction steps using the rich text editor.
Work Hour(s) / Work Minute(s):
Enter the estimated development time for this task.
QA Work Hour(s) / QA Work Minute(s):
Enter the estimated QA time for this task.
Start Date / Due Date:
Set the start and due dates for the task.
Priority:
Select the priority level for this task — for example, Medium or High.
Assigned To:
Select the team member(s) this task is assigned to.
Dependent Task(s):
Select any tasks that this task depends on. The task cannot be progressed until the dependent tasks are completed (unless Ignore Task Dependency is enabled for the relevant stage in the task flow).
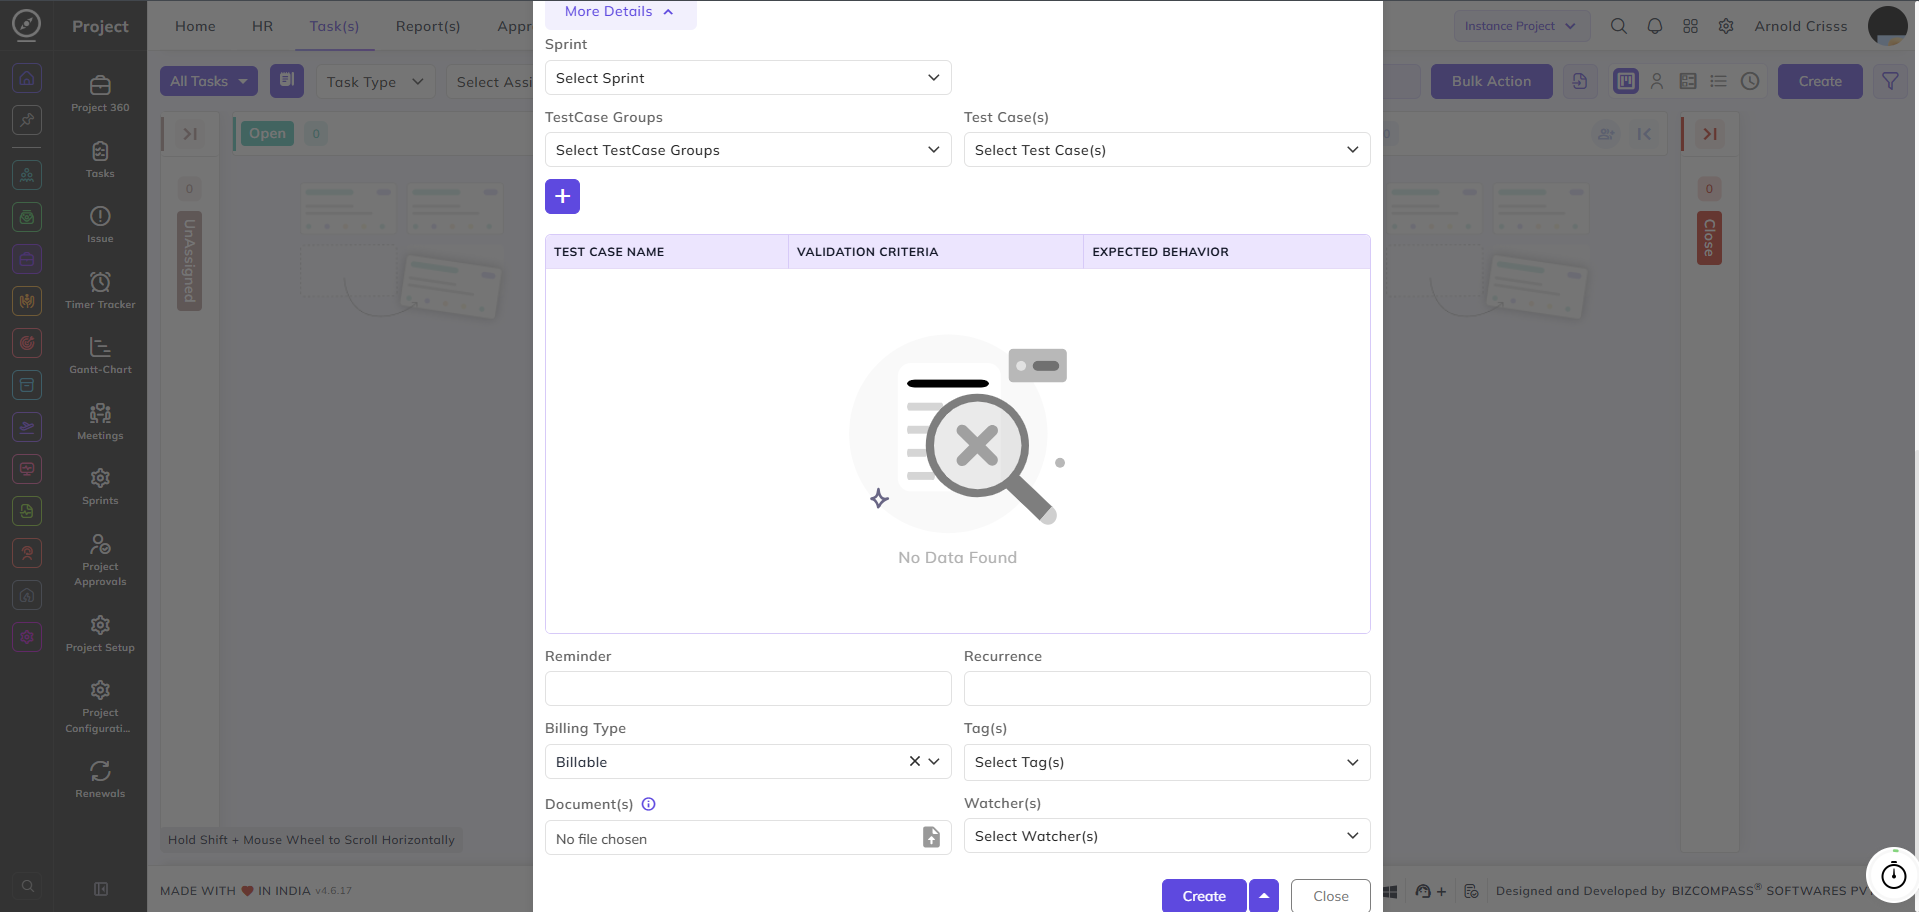
Sprint:
Select the sprint this task belongs to, if applicable.
Test Case Groups / Test Case(s):
Select the test case groups and individual test cases to be linked to this task. The linked test cases will be displayed with their Test Case Name, Validation Criteria, and Expected Behavior. Click the + button to add multiple test case group and test case combinations.
Reminder:
Click to set a reminder for this todo. Two reminder types are available:
- Specific Date — set a reminder on a fixed date and time:
- Reminder Date — select the date for the reminder
- Time — enter the time for the reminder
- Notify Users — select the users who will receive the reminder notification
- Start Before Time — enter how early the reminder should trigger before the set time, and select Hours or Minutes
- Duration — enter how long the reminder notification should last, and select Hours or Minutes
- Send Reminder after reminder Time — enable this to send the reminder again after the set reminder time has passed
- Custom — set a recurring reminder:
- Reminder Type — select the recurrence pattern: Daily or Weekly
Click Set Reminder to save the reminder configuration.
Recurrence:
Click to set this todo as a recurring task:
- Recurring Frequency — select how often this todo recurs
- End Date — select the date on which the recurrence ends
- Create next recurrence after closing the current task — when enabled, the next occurrence of this todo is only created once the current one is closed
- Click Done to save the recurrence configuration.
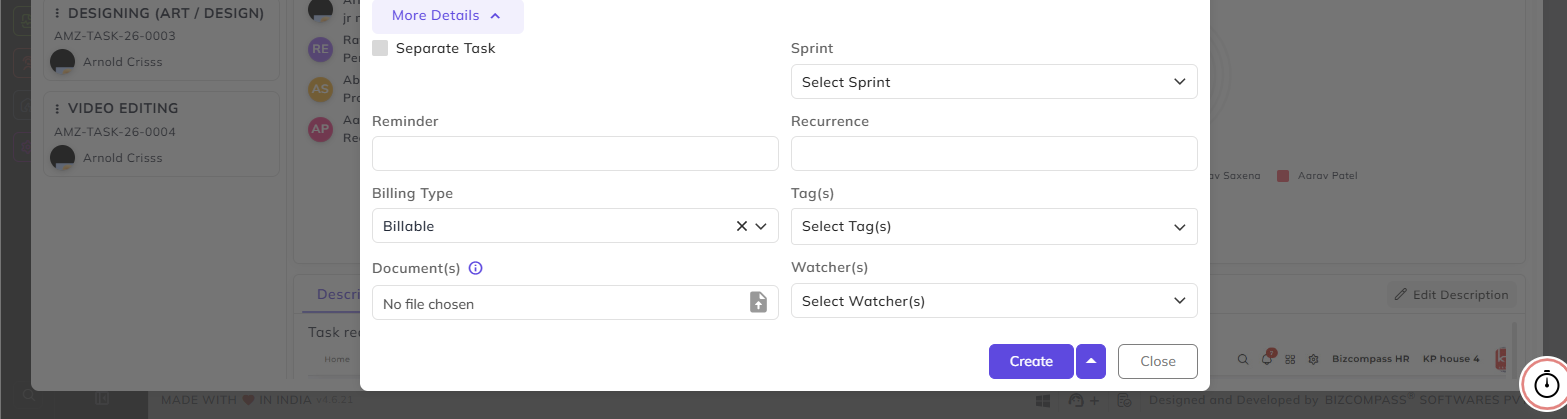
Billing Type:
Select whether this task is Billable or Non-Billable.
Tag(s):
Document(s):
Upload any relevant documents or attachments for this task.
Watcher(s):
Select team members who should be notified of updates to this task without being directly assigned.
Note: All people in
thea project can see the Unassigned tasks of other people in the same project.
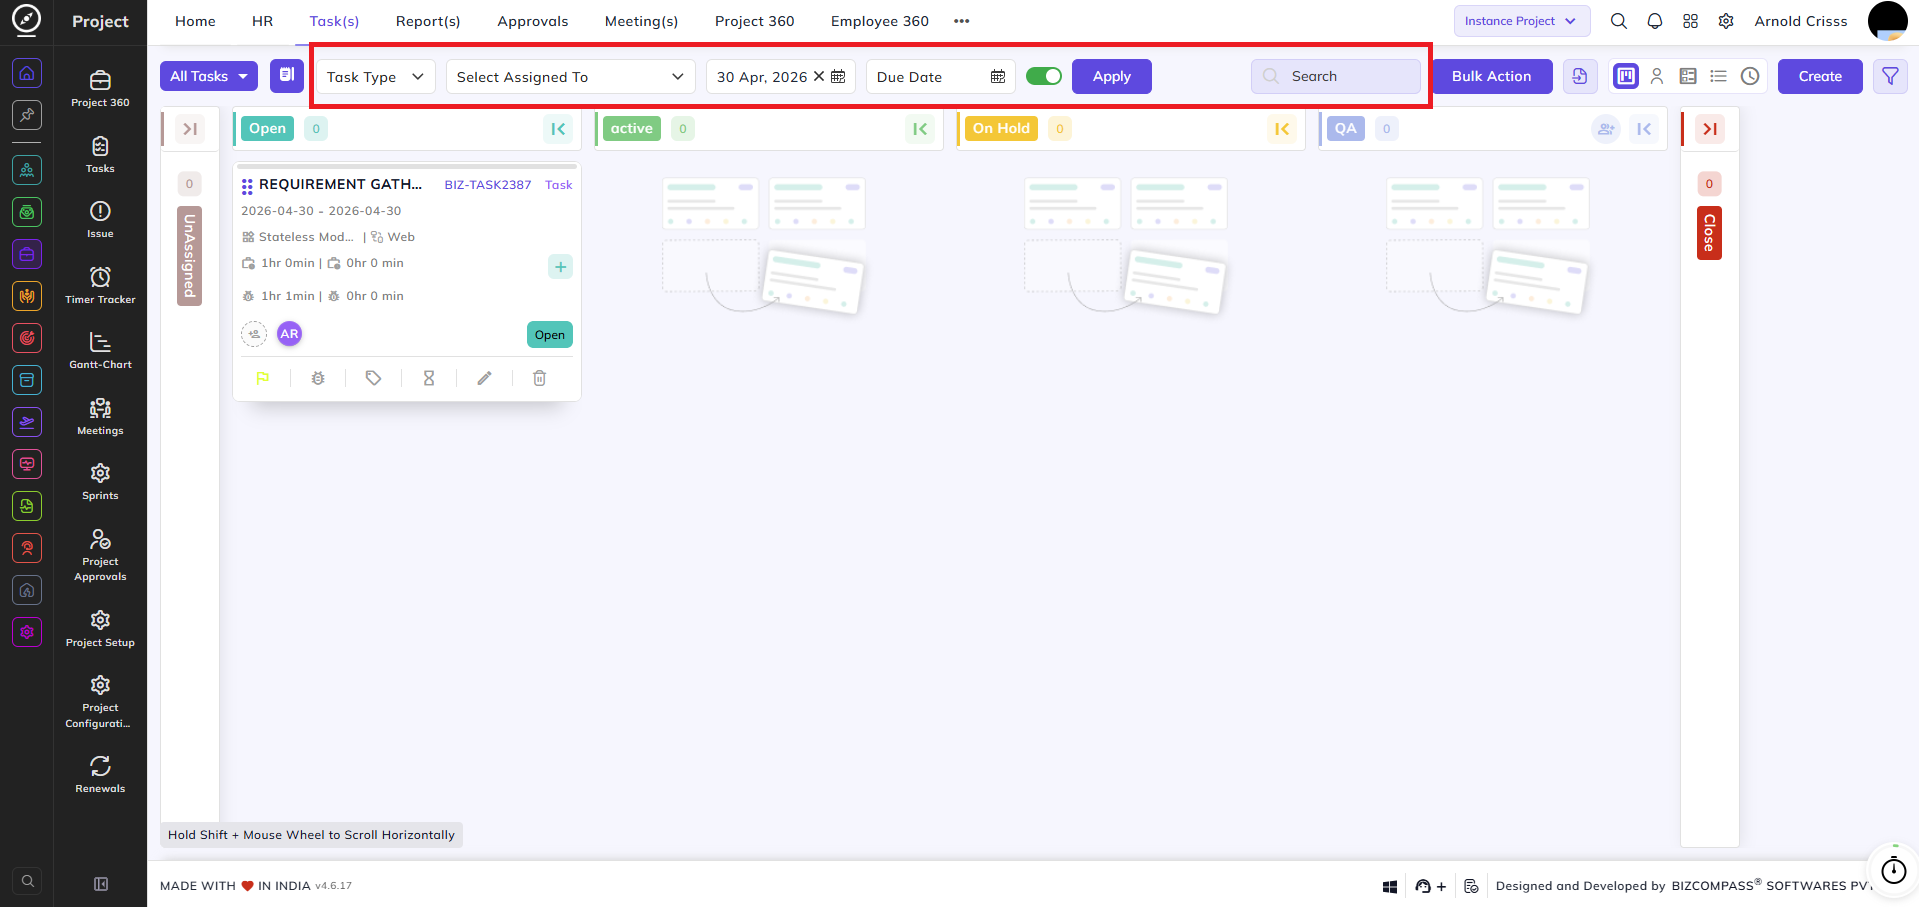
Filters:
All Tasks / Task Type:
Filter tasks by type — for example, Task, Subtask, Issue, or Suggestion.
Select Assigned To:
Filter tasks by the assigned team member.
Start Date / Due Date:
Filter tasks within a specific date range.
Project Filter:
Filter tasks by one or more projects.
Toggle (Active Filter):
Toggle to show tasks without start date.
Search:
Search for a specific task by name or ID.
Detailed Task View:
Clicking on any task opens its detailed view, where you can view and manage all aspects of the task.
You can create a task from here also by clicking on Create Task on the top left.
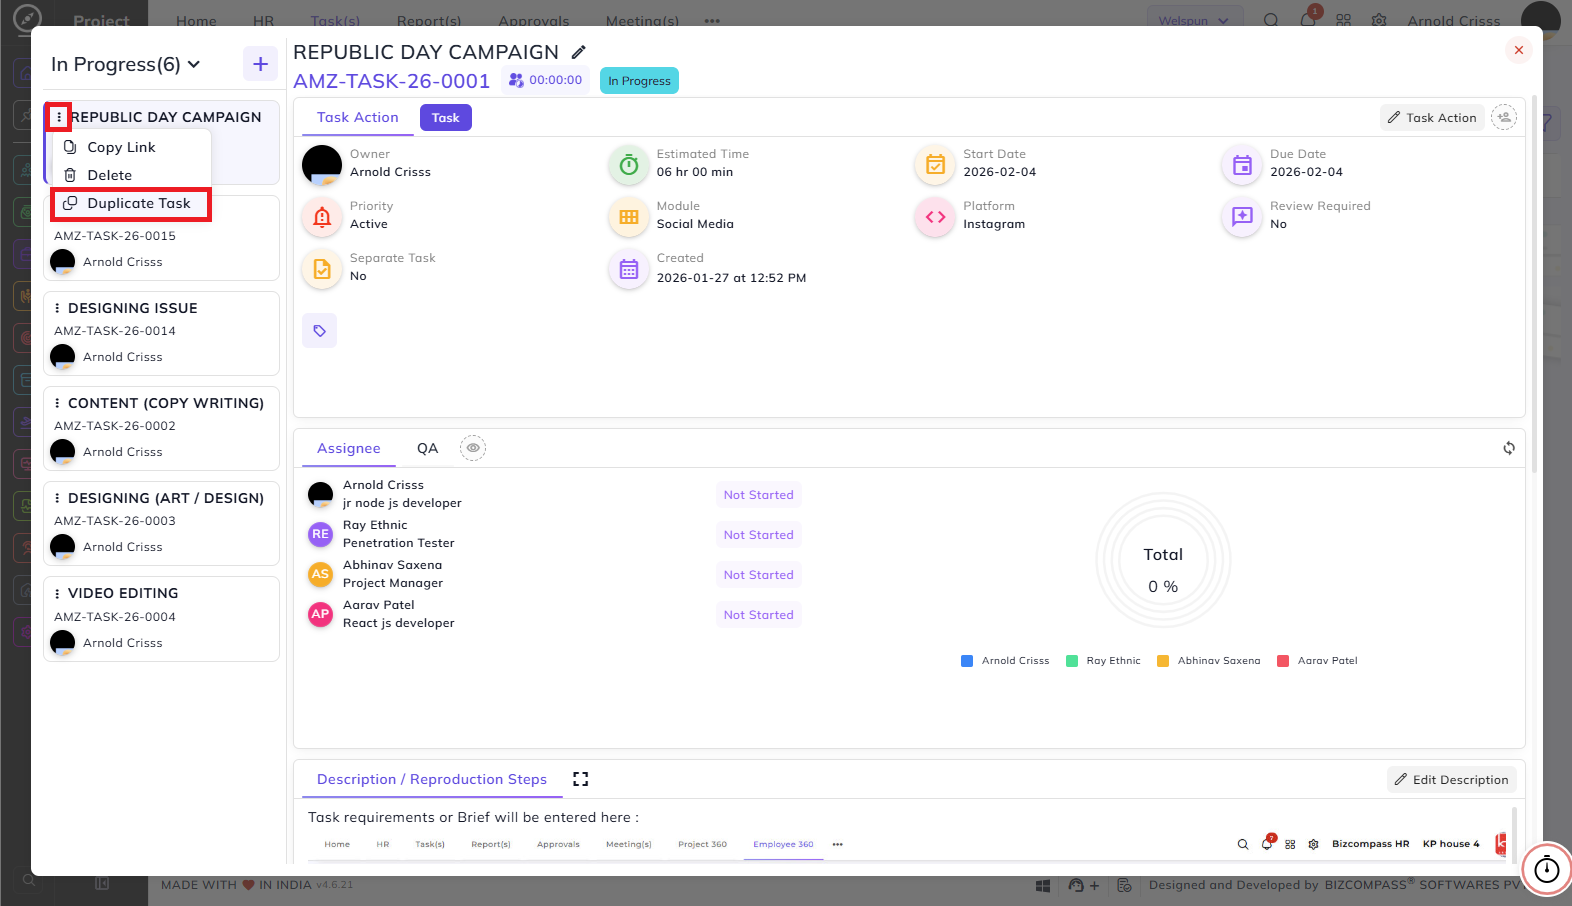
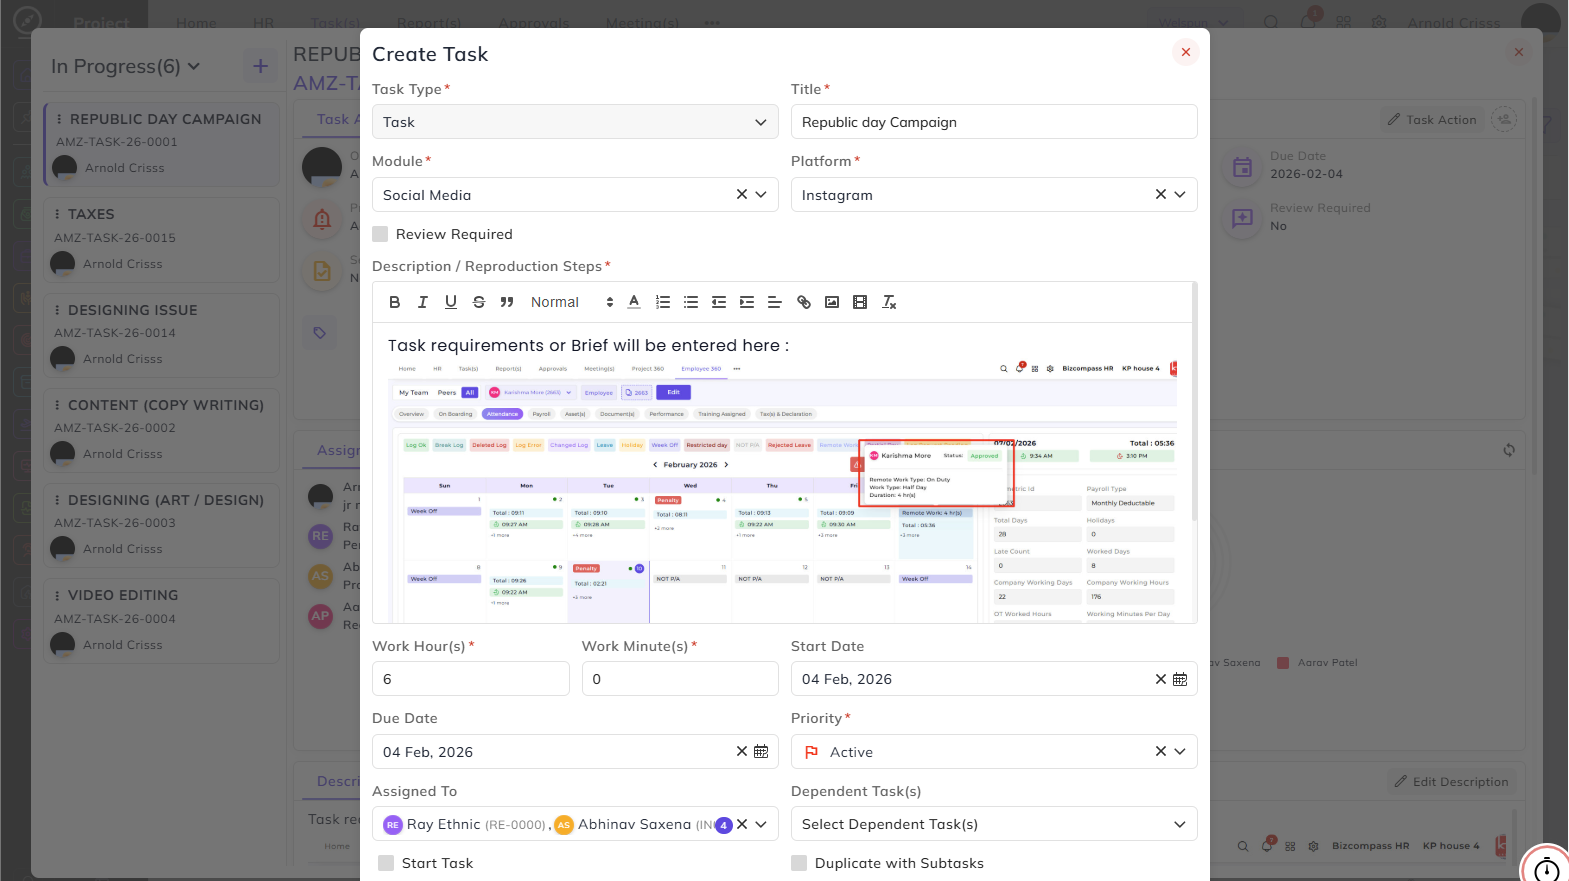
Duplicate Task:
Clicking the three-dot menu on any task in the list reveals the option to Duplicate Task. This opens the Create Task form pre-filled with all the details of the original task, allowing you to quickly create a similar task without re-entering all the information.
The duplicate form includes two additional options:
Start Task:
Enable this checkbox to automatically start the timer for the duplicated task as soon as it is created.
Duplicate with Subtasks:
Enable this checkbox to duplicate the task along with all its subtasks. When this option is enabled, the Separate Task option will not appear.
Separate Task:
When enabled, the duplicated task will be created as an independent task not linked to the original. This option is only available when Duplicate with Subtasks is not enabled.
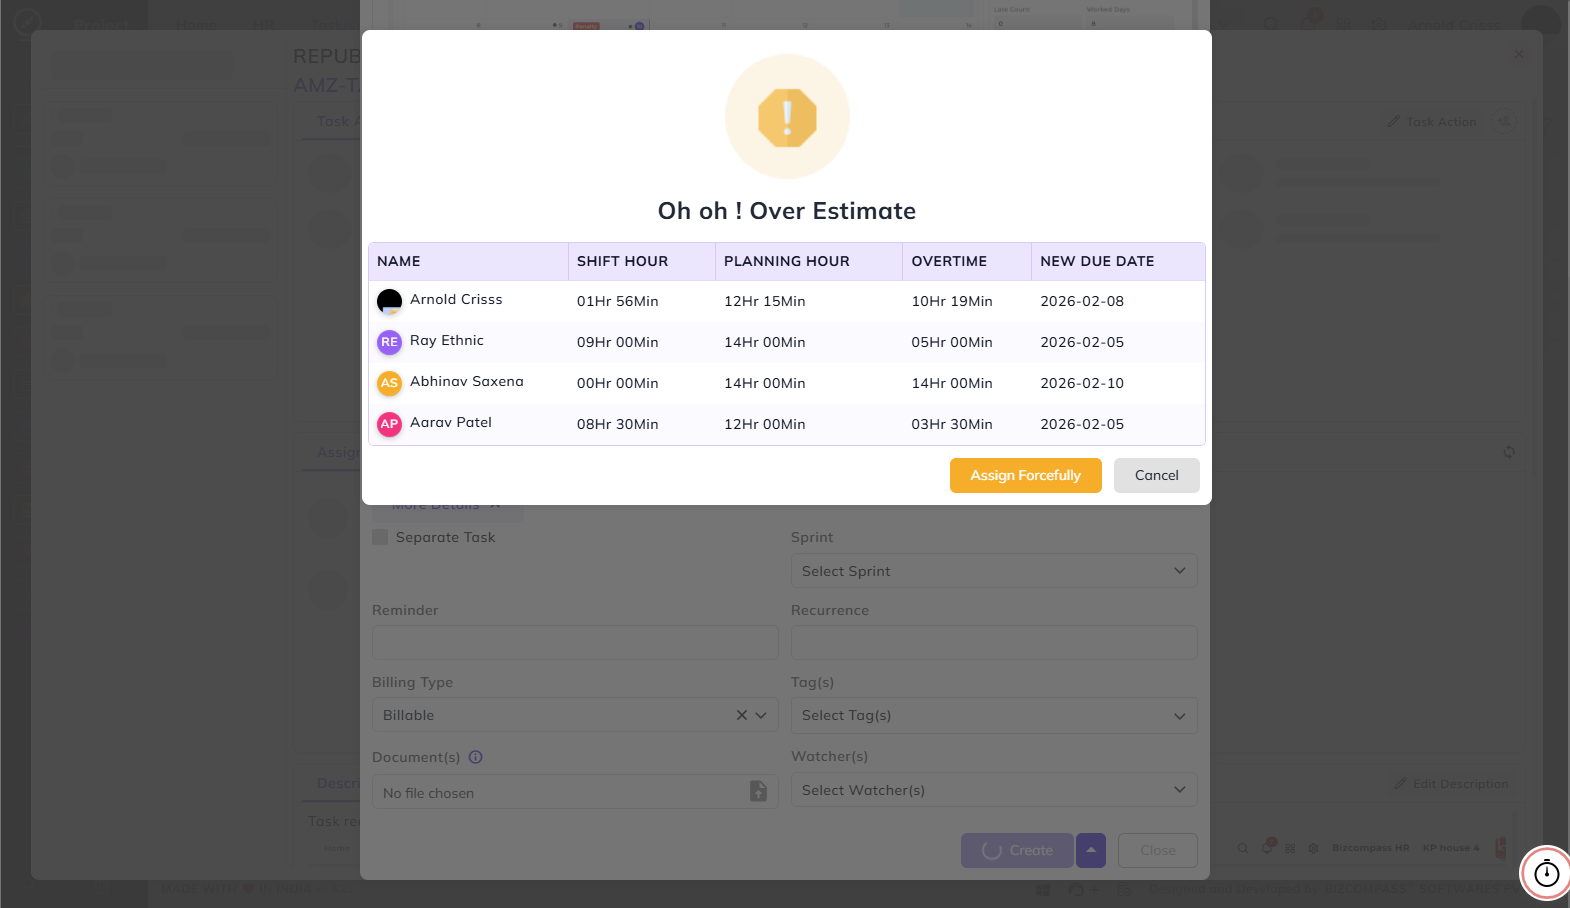
Over Estimate Popup:
When a task is assigned to one or more employees and the planned hours exceed their available shift hours, the system displays an "Over Estimate" warning popup. This alert helps managers identify scheduling conflicts before confirming the assignment.
The popup displays a table with the following details for each assignee:
- Name — the assigned employee.
- Shift Hour — the number of hours available in the employee's shift.
- Planning Hour — the total hours planned for this task.
- Overtime — the number of hours that exceed the employee's shift capacity.
- New Due Date — the suggested revised due date based on the employee's availability.
From here, you can either click Assign Forcefully to proceed with the assignment despite the overestimation, or click Cancel to go back and adjust the task details.
Note: This popup only appears if the Show Overestimation Popup setting is enabled in the project's Configuration(s) tab.
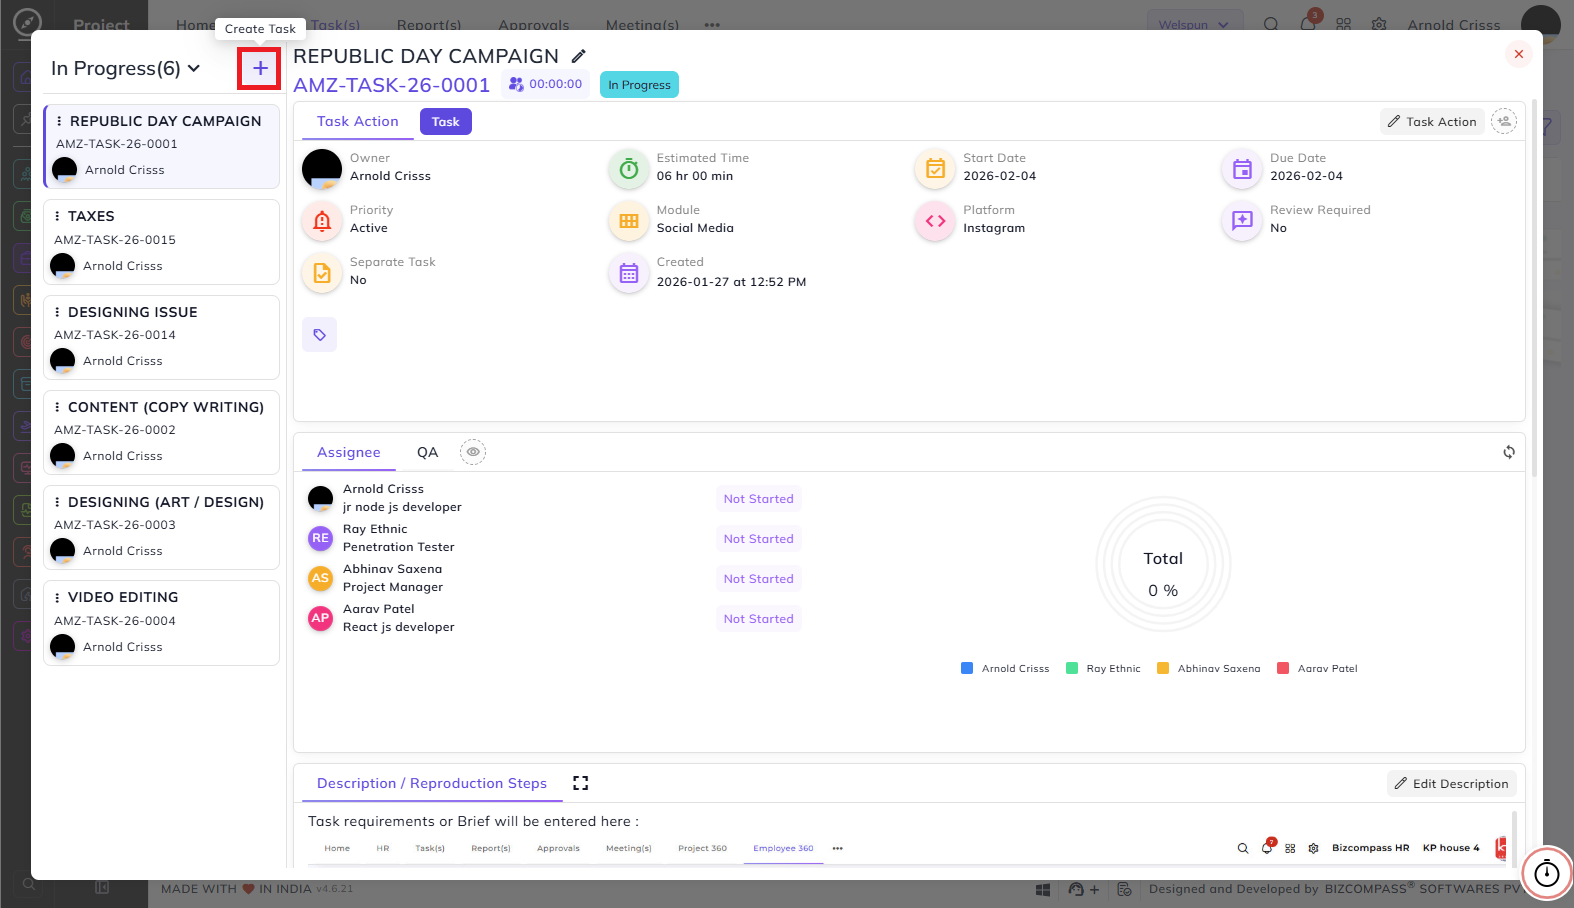
Header:
- Title — displays the task title. Click the edit icon next to it to rename it.
- Task ID — the unique identifier for this task — for example, AMZ-TASK-26-0001.
- Total Worked Time — displays the total time logged on this task so far.
- Current Stage — displays the current stage of the task — for example, In Progress. Click it to change the stage.
Task Action Tab:
Displays the key details of the task:
- Owner — the person who created or owns the task.
- Estimated Time — the total estimated time set for this task.
- Start Date — the date this task starts.
- Due Date — the date by which this task should be completed.
- Priority — the current priority level. Click to change it.
- Module — the module this task belongs to.
- Platform — the platform this task is associated with.
- Review Required — indicates whether this task requires a review before progressing.
- Separate Task — indicates whether this task is tracked separately.
- Created — the date and time this task was created.
- Tags — displays the tags attached to this task. Click to add or remove tags.
The Task Action button at the top right allows you to perform additional actions on the task. The assignee icon next to it allows you to add or change the employee(s) assigned to this task.
Assignee Tab — displays all assignees for this task along with their designation and individual timer status — for example, Not Started or In Progress. A donut chart on the right shows the total completion percentage across all assignees with a color-coded legend.
QA Tab — displays the QA reviewers assigned to this task and their respective progress and timer status.
Description / Reproduction Steps Tab — Displays the full description or reproduction steps entered when the task was created. The description supports rich text formatting and can include images, screenshots, videos, and other embedded content — making it easy to share detailed task briefs or requirements visually. Click Edit Description to update the content, then click Update to save the changes or Close to discard. The expand icon at the top right opens the description in a larger full-screen view for easier reading and editing.
Attachment(s) — upload and manage files attached to this task directly from the task detail view by dragging and dropping or clicking to upload.
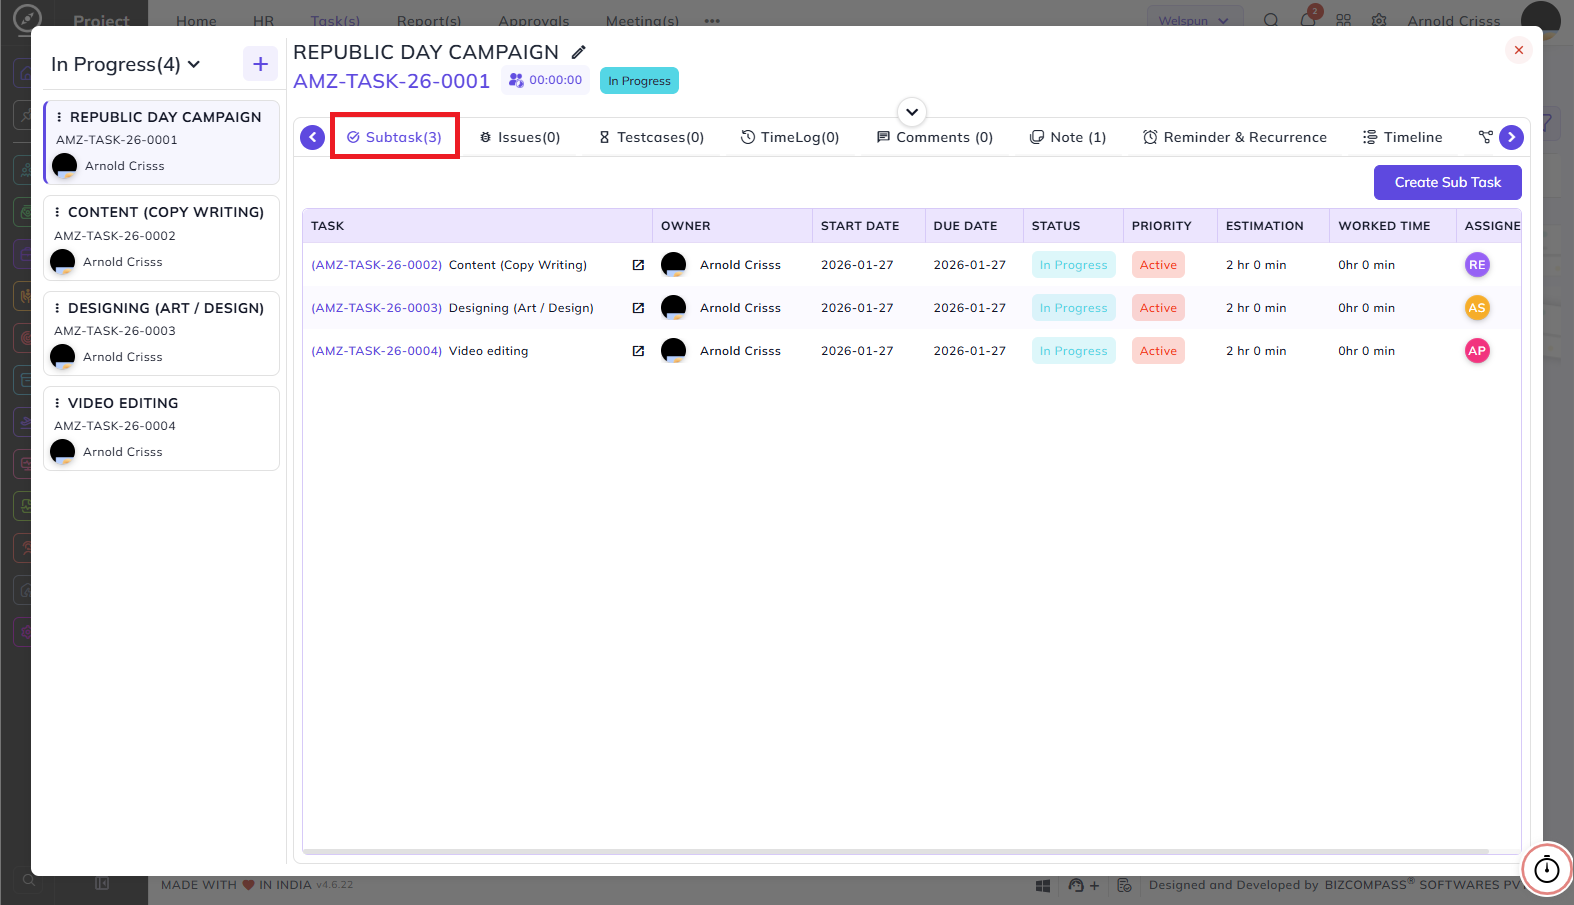
Subtask Tab:
Displays all subtasks linked to this task in a table showing Task, Owner, Start Date, Due Date, Status, Priority, Estimation, Worked Time, and Assignee. Click Create Sub Task to add a new subtask directly from here. Clicking on any subtask ID or name opens that subtask's own detail view.
Note:
- Subtask can only be added by the Task Owner, Project Manager, and Assignee (if Can Add Subtask If Assignee is enabled from the Projects page).
- For the Free Mode, the permissions for creating, updating, and deleting tasks are defined based on user roles and rights.
- For the Restricted Mode, the Project Mode Template should have the Sub Task type enabled for Assignee in the Create/Update/Delete section.
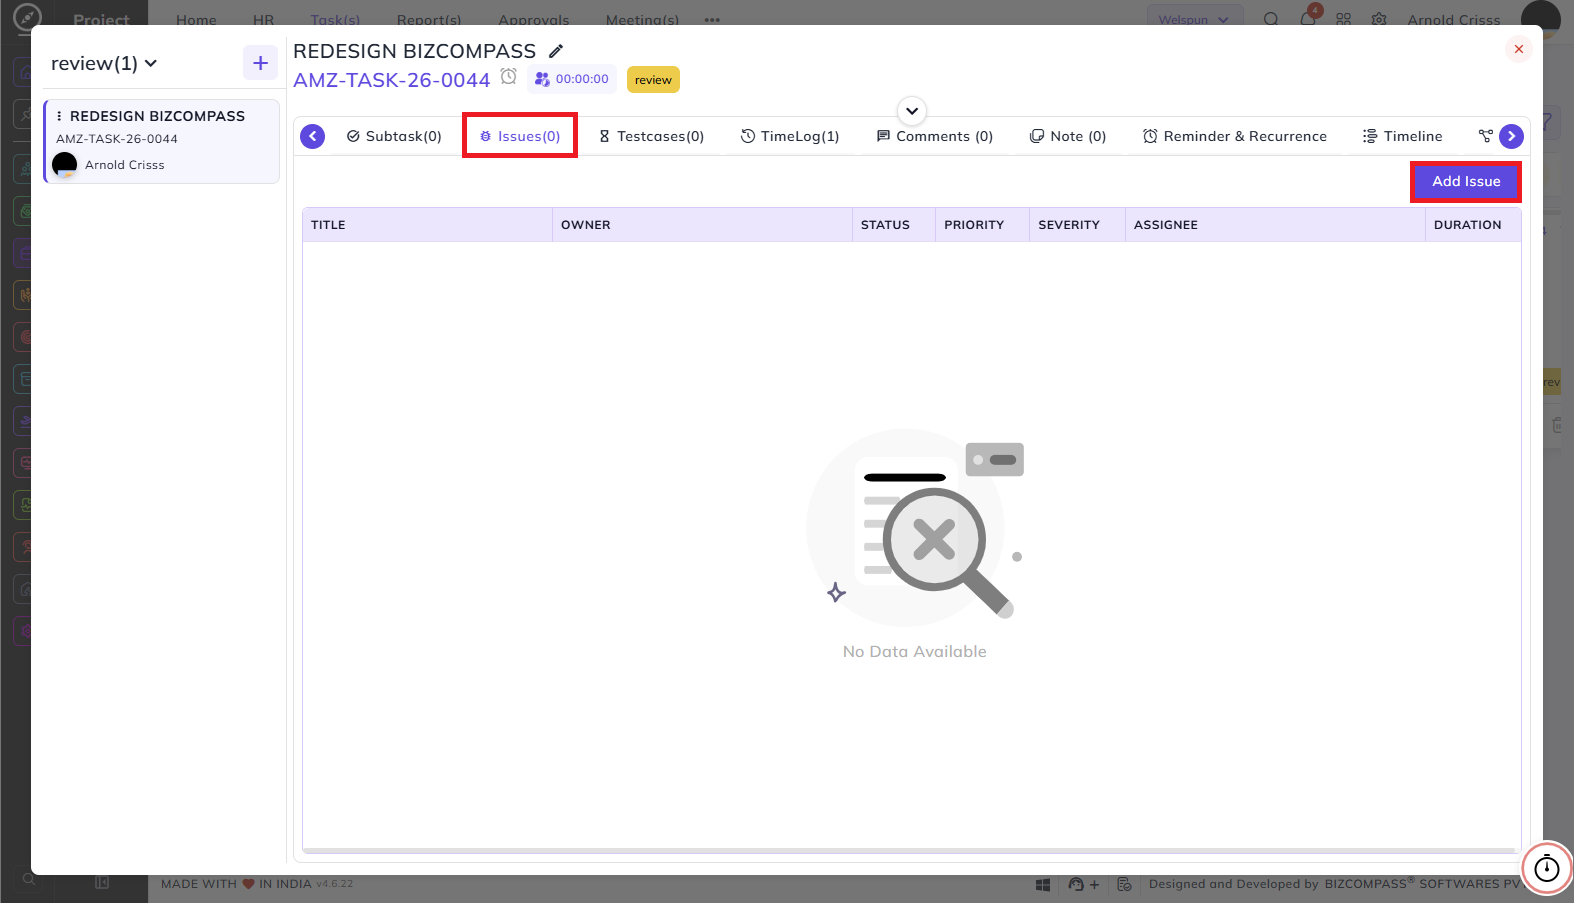
Issues Tab:
Displays all issues raised against this task in a table showing Title, Owner, Status, Priority, Severity, Assignee, and Duration. Issues can be viewed and added directly from this tab.
The Add Issue option will only appear for the stage which has the Review Required flag enabled.
After adding an issue, you can be redirected to the issue by clicking on the issue title as shown below.

After starting the timer for the issue, the developer can mark it as Not A Bug.
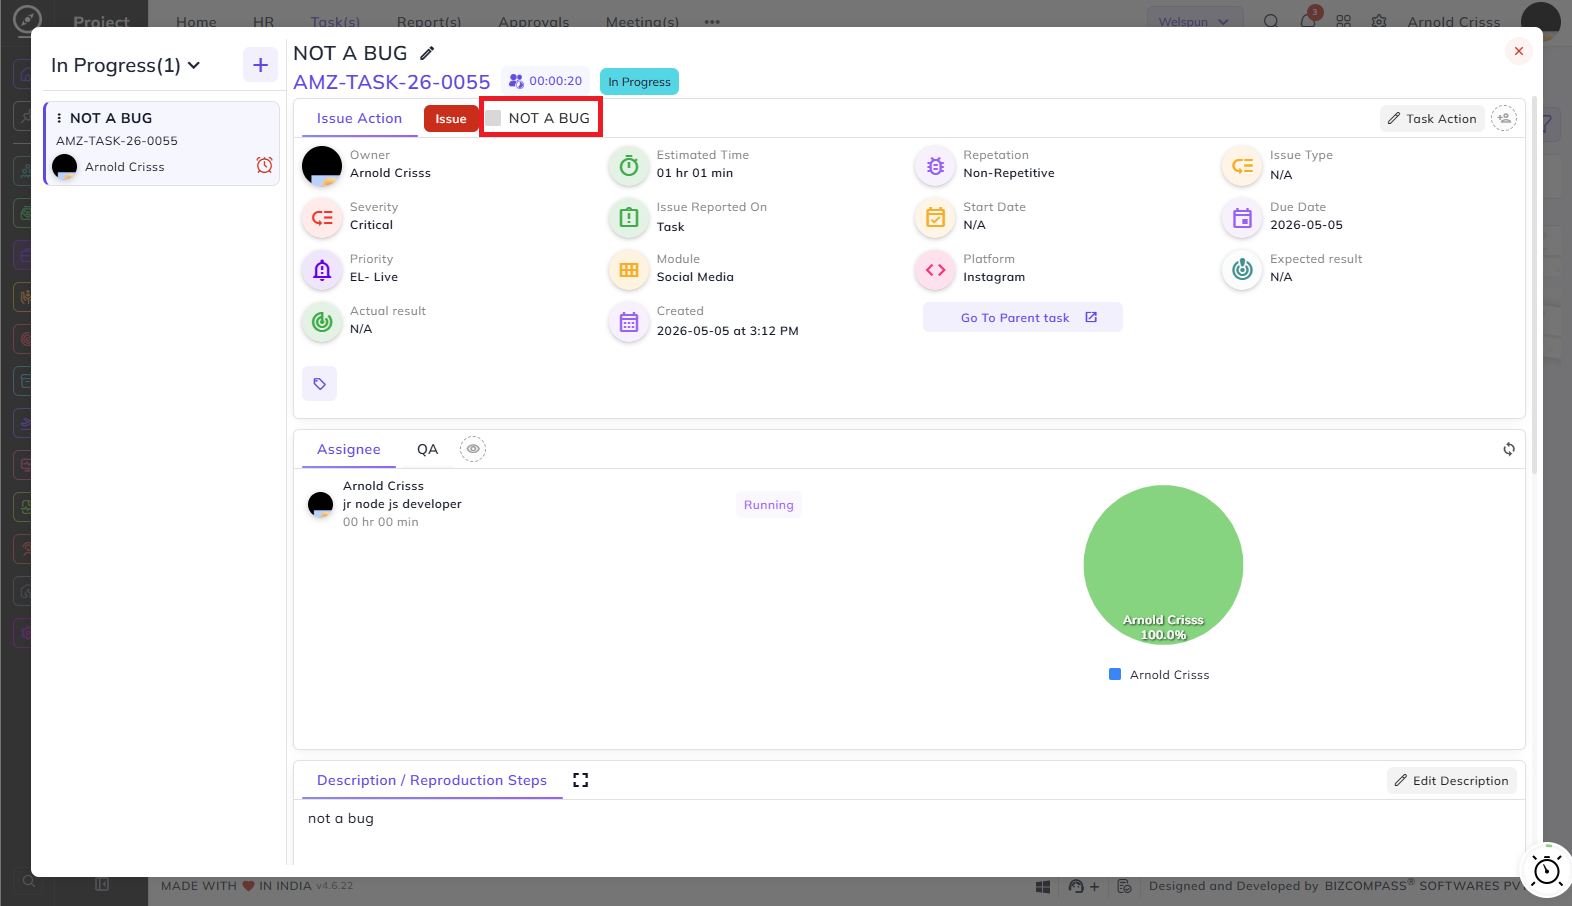
The issue is then automatically moved to the stage which has the flag Review Required enabled (i.e., QA stage).
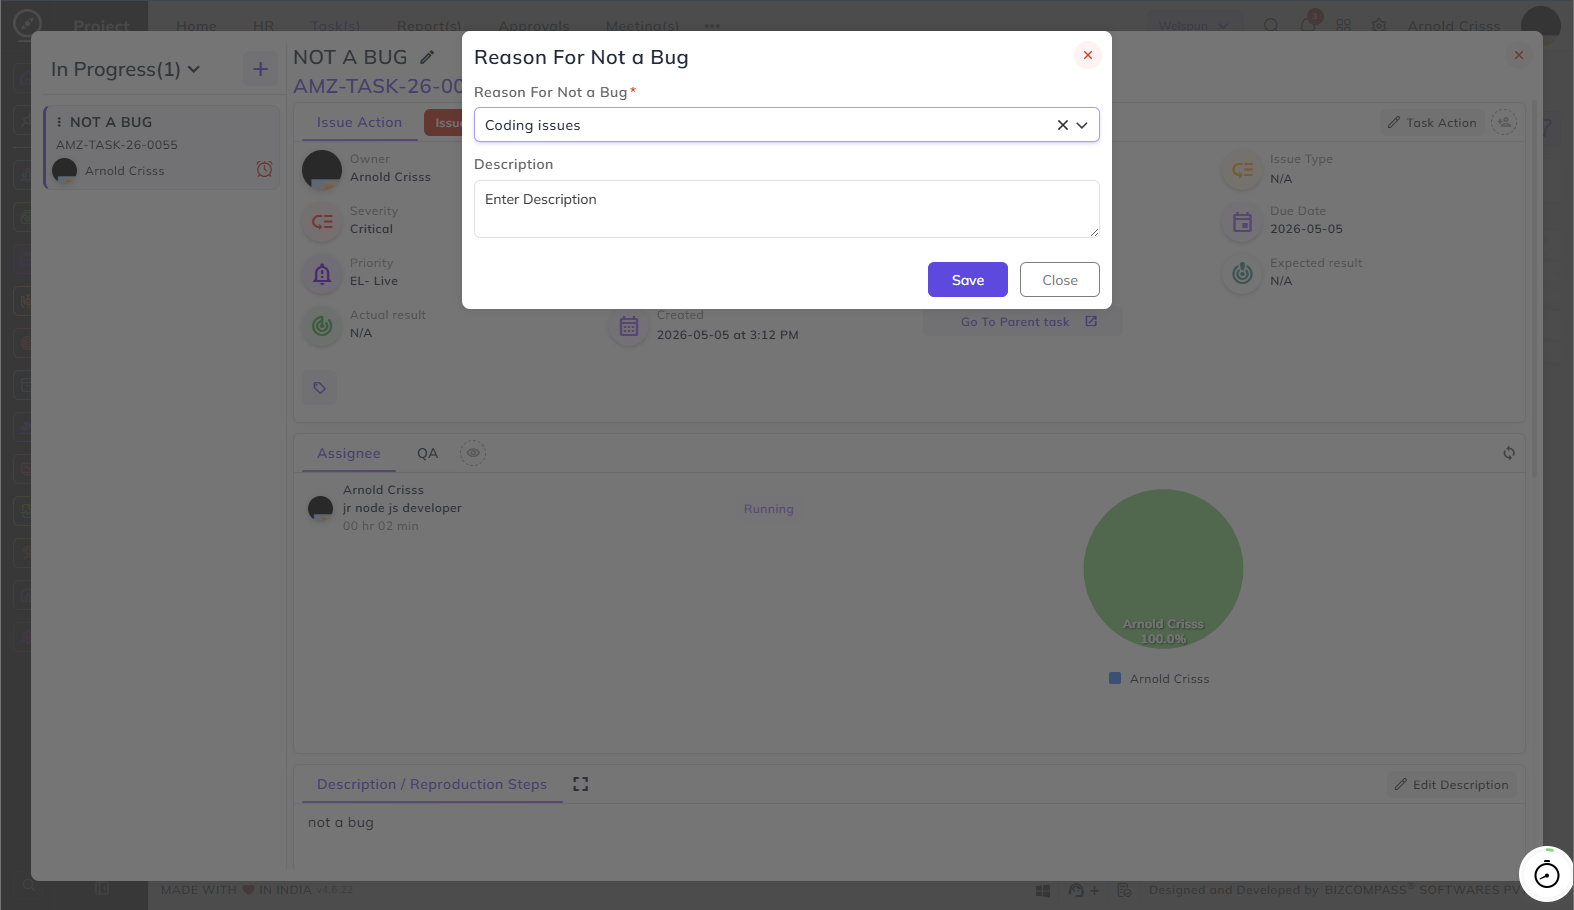
The QA can then Close (If the issue was not a bug) or Reopen (if the issue was a bug) this issue by adding the Not A Bug reason.
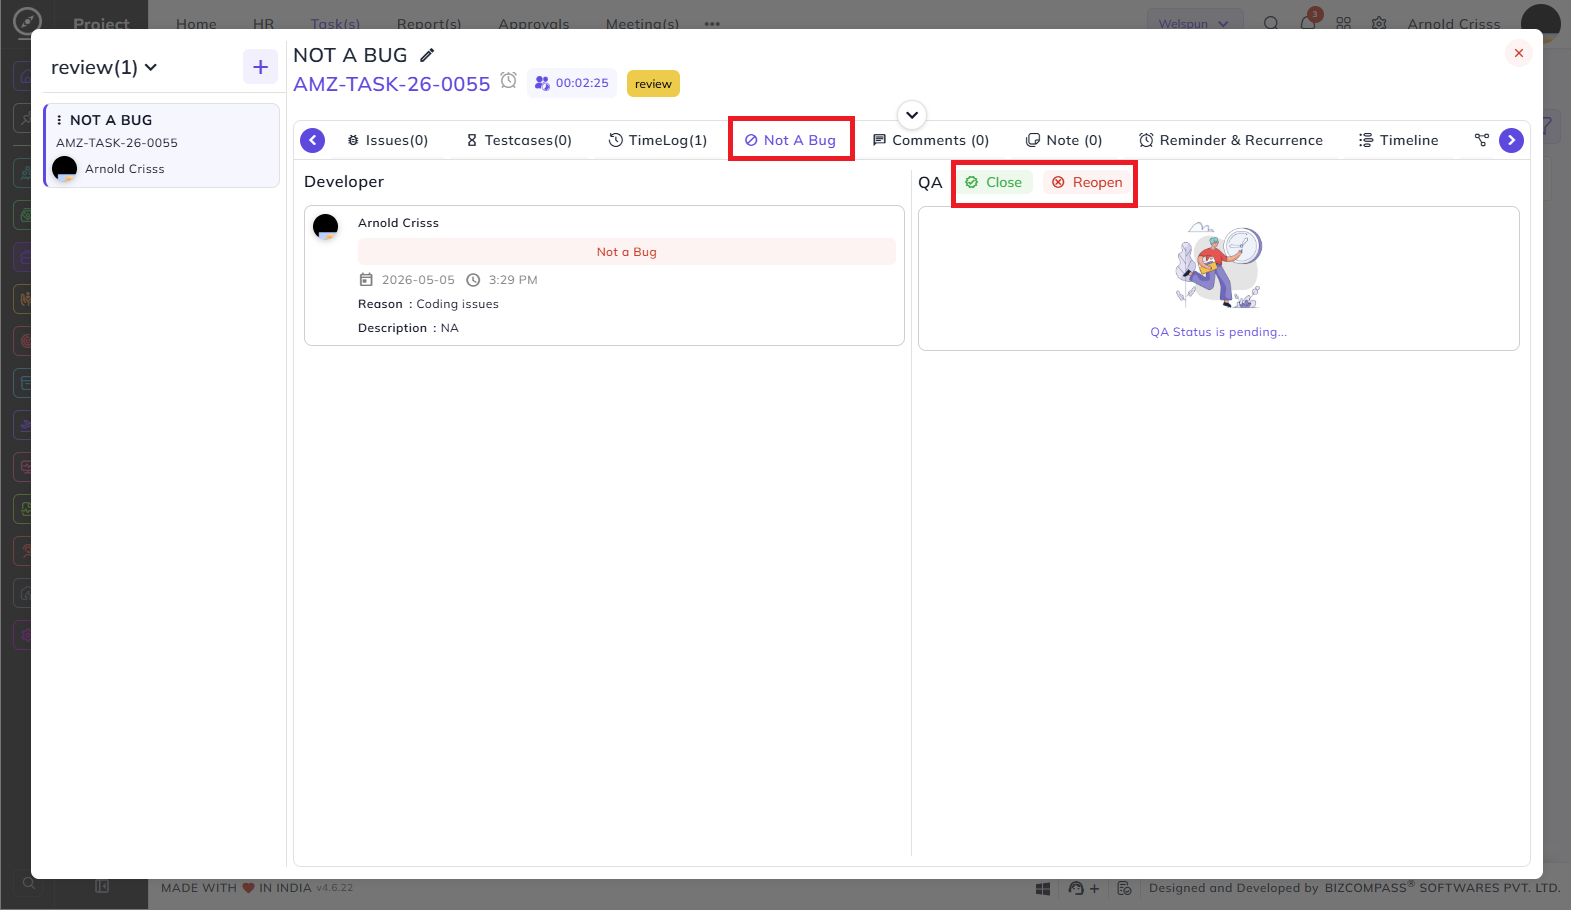
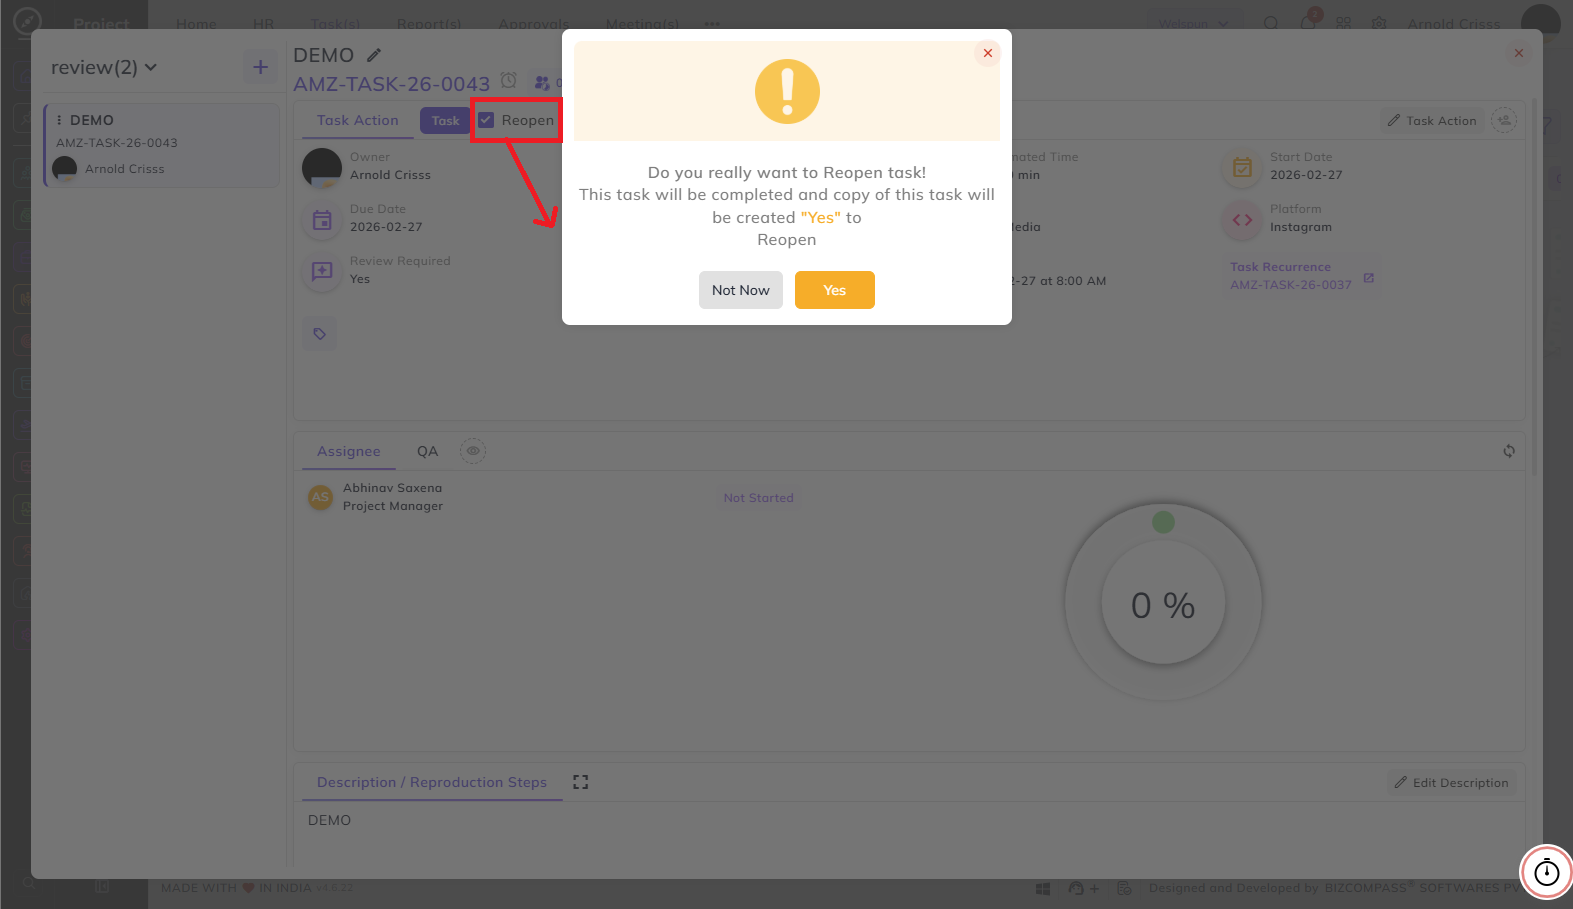
If Review Required is enabled, a stage cannot be directly moved to the Completed stage. It will first go to the QA (or any stage where assignees are added to review) stage and then it can be closed.
A task can also be Reopened in a stage in which Review Required is enabled.
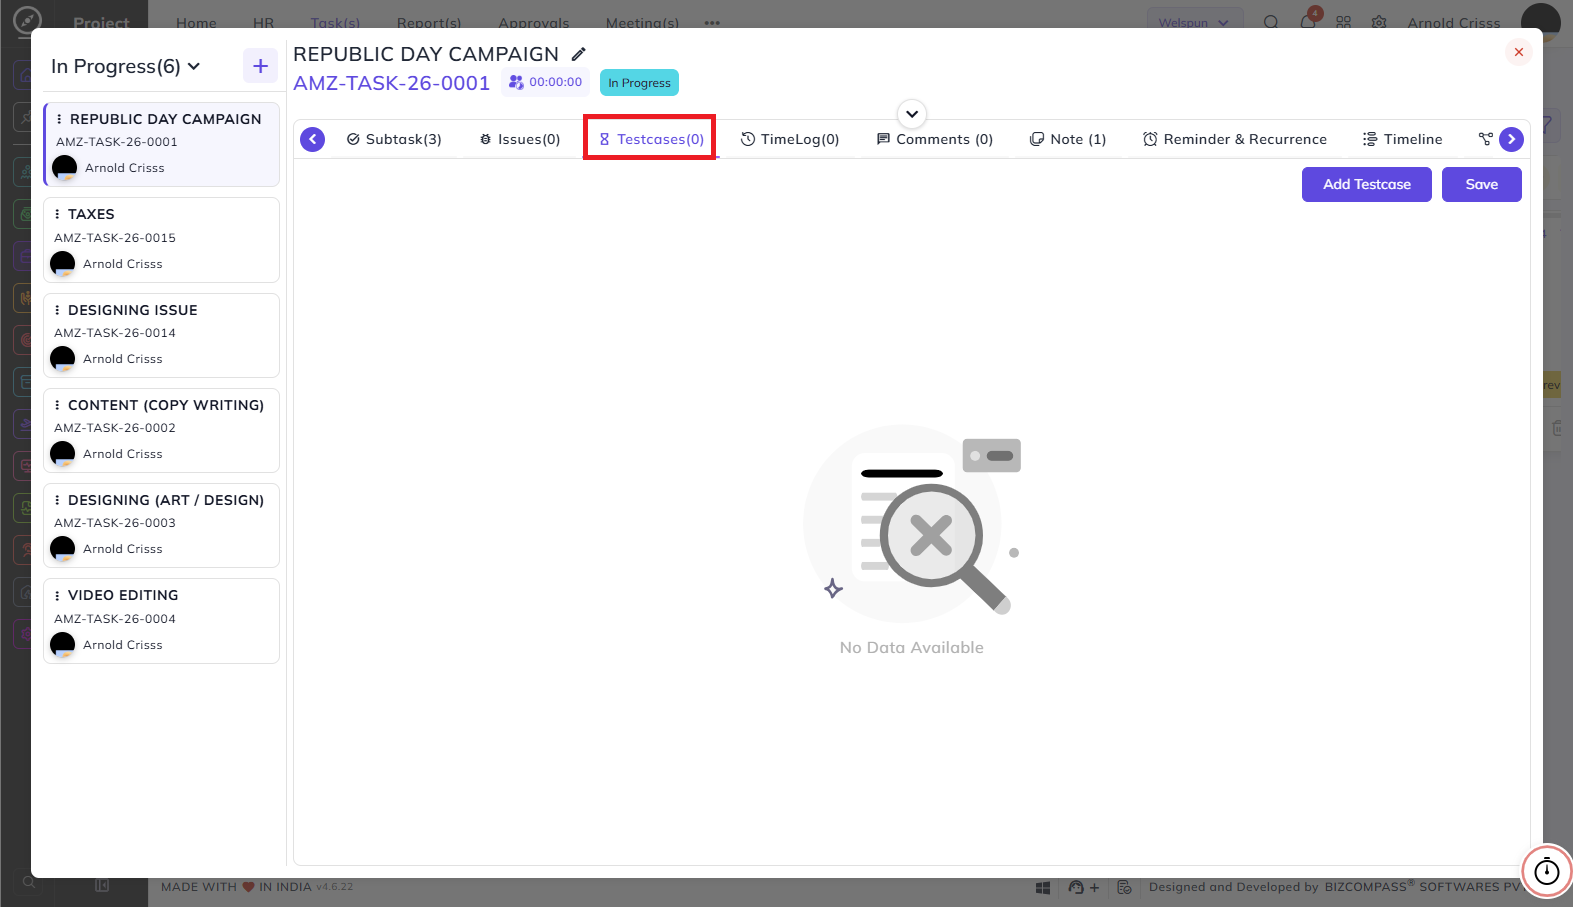
Testcases Tab:
Displays all test cases linked to this task. Click Add Testcase to link additional test cases to this task, then click Save to confirm. Each linked test case shows its Test Case Name, Validation Criteria, and Expected Behavior.

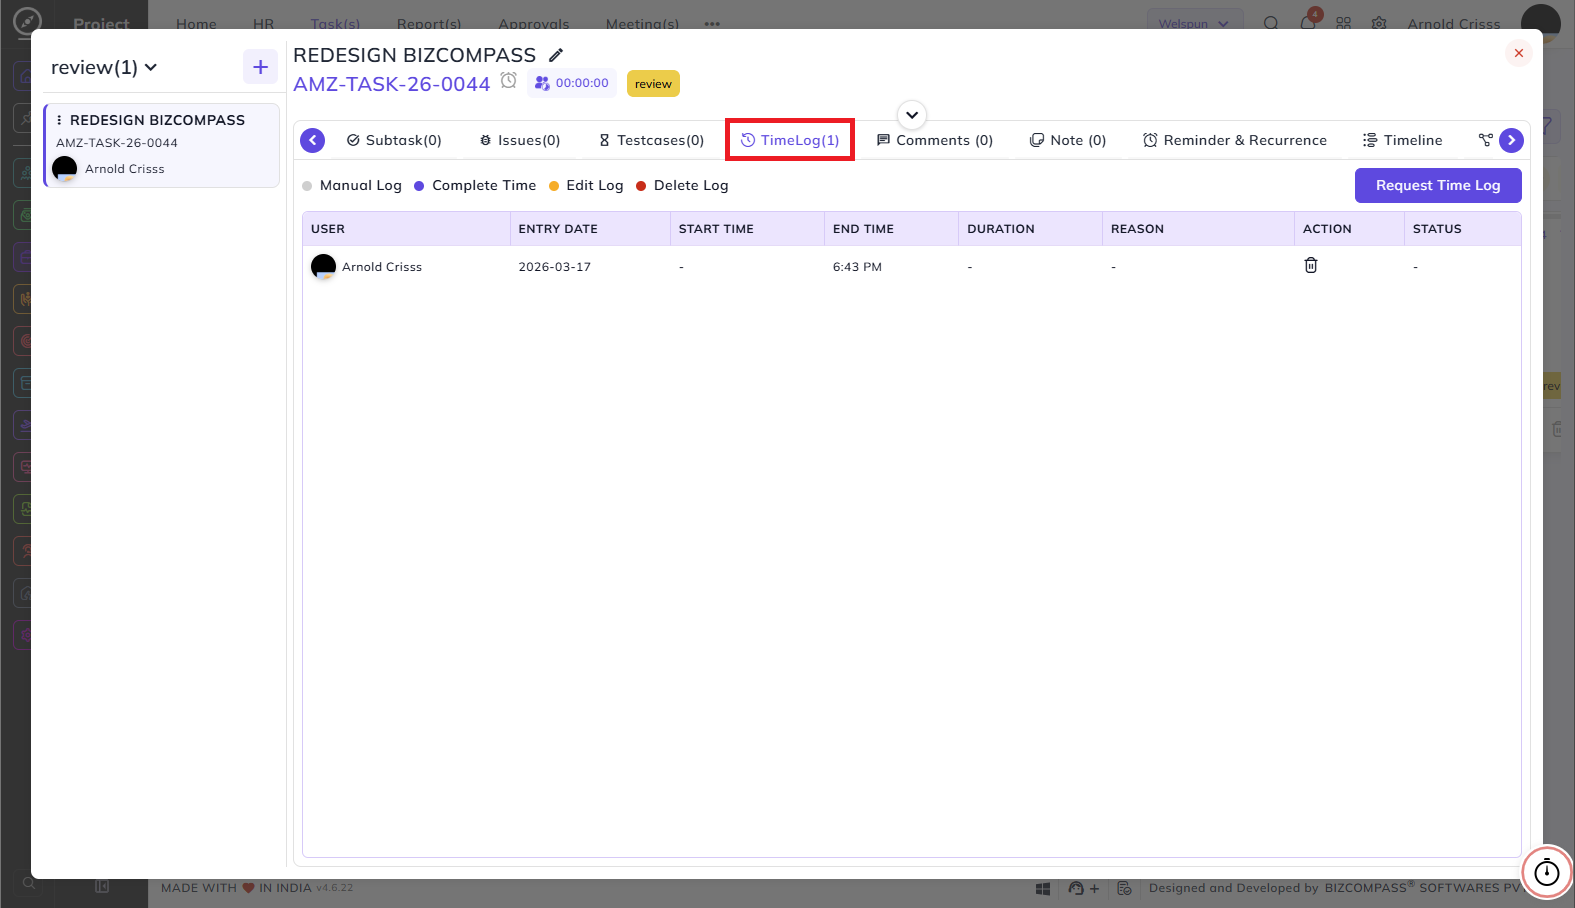
TimeLog Tab:
Displays a log of all time entries recorded for this task. Each entry shows:
- User — the person who logged the time.
- Entry Date — the date the time was logged.
- Start Time — when the time entry started.
- End Time — when the time entry ended.
- Duration — total time logged for that entry.
- Reason — reason for the time log entry if provided.
- Action — edit or delete the time log entry.
- Status — the status of the time log entry.
The legend at the top indicates entry types: Manual Log, Complete Time, Edit Log, and Delete Log.
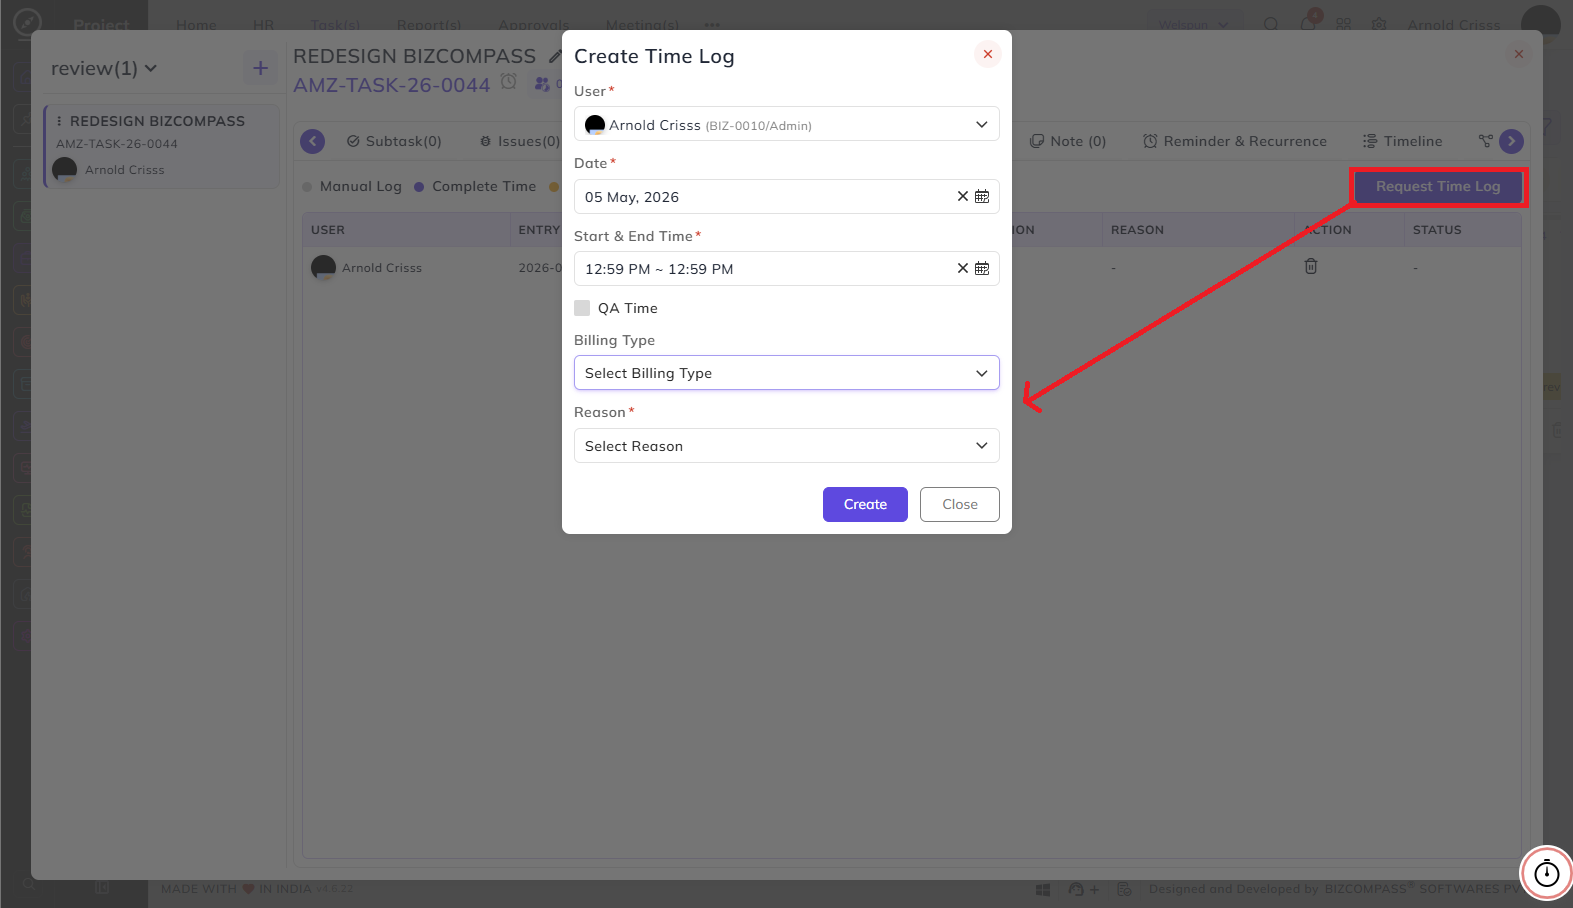
Click Request Time Log to manually create a time log entry. The Create Time Log form includes the following fields:
- User — select the user for whom the time is being logged.
- Date — select the date of the time entry.
- Start & End Time — select the start and end time for the entry.
- QA Time — enable this checkbox if the logged time is for QA work.
- Billing Type — select whether the time is Billable or Non-Billable.
- Reason — select the reason for this manual time log entry from the preconfigured list.
Click Create to save the time log entry. This entry will be shown under Manual Log.
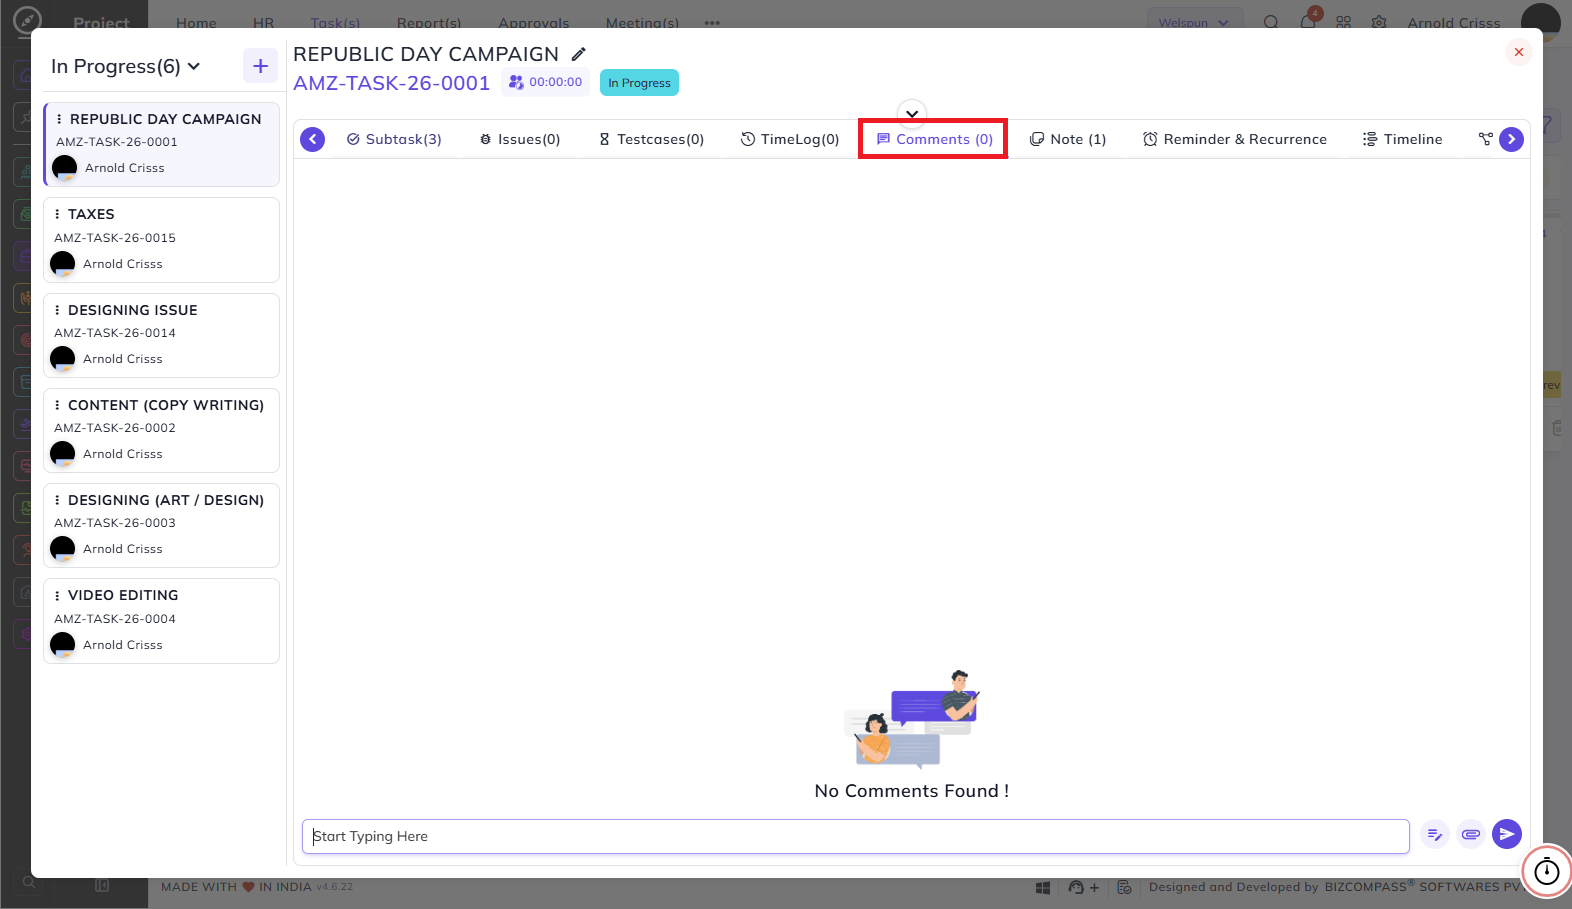
Comments Tab:
Displays all comments added to this task. Type in the comment box at the bottom and click the send button to post a comment. Comments support rich text formatting and file attachments.
The task owner and assignee can chat in this tab. When either of them adds a comment, the other person will get notified.
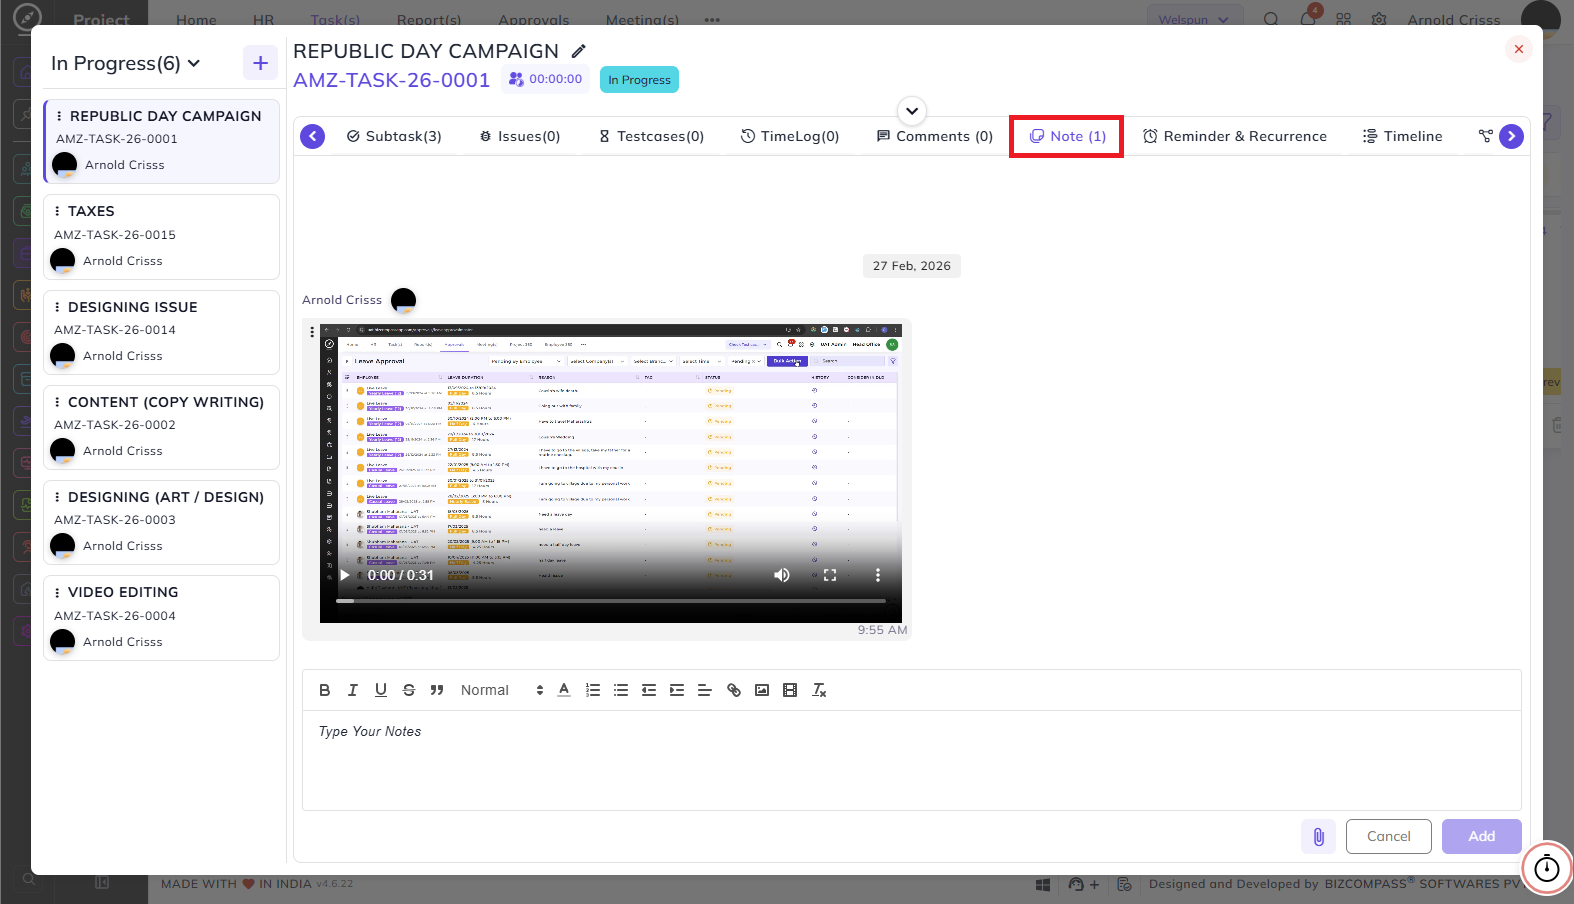
Note Tab:
Add internal notes to this task using the rich text editor. Notes support text formatting as well as media attachments such as images and videos. Click Add to save the note. All previously added notes are displayed above the editor, each showing the author's name and the date and time it was added.
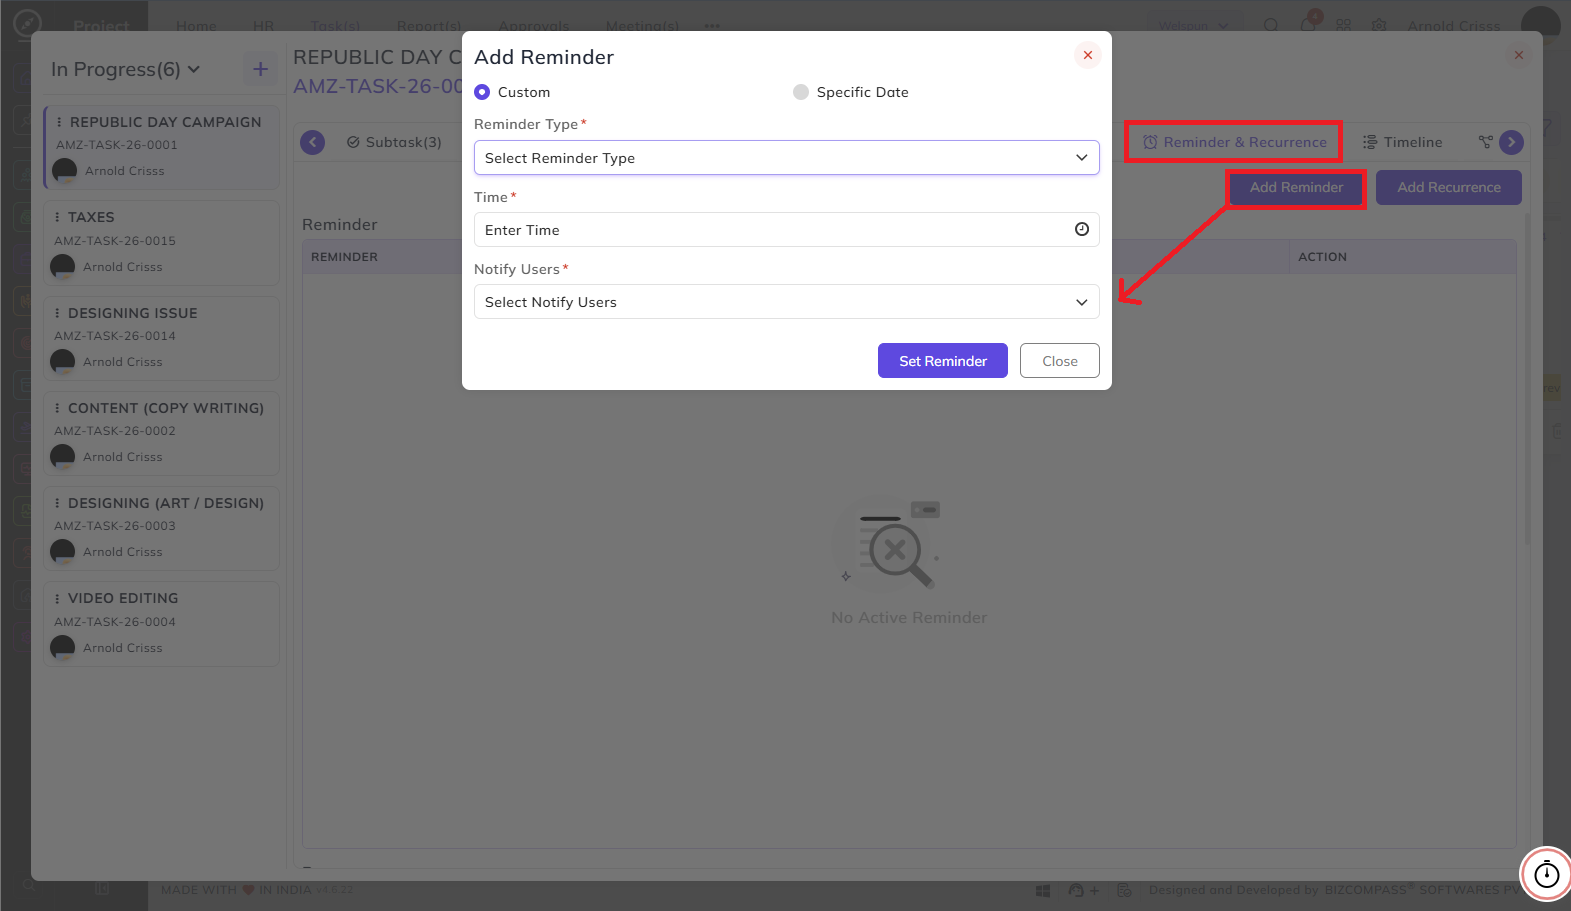
Reminder & Recurrence Tab:
Displays all active reminders and recurrence settings for this task.
Click Add Reminder to set a new reminder. The Add Reminder form offers two reminder modes:
- Custom — set a reminder with a specific Reminder Type (Daily or Weekly), a Time, and Notify Users (all people associated with the task are available for selection).
- Specific Date — set a one-time reminder for a specific date and time.
Click Set Reminder to save.
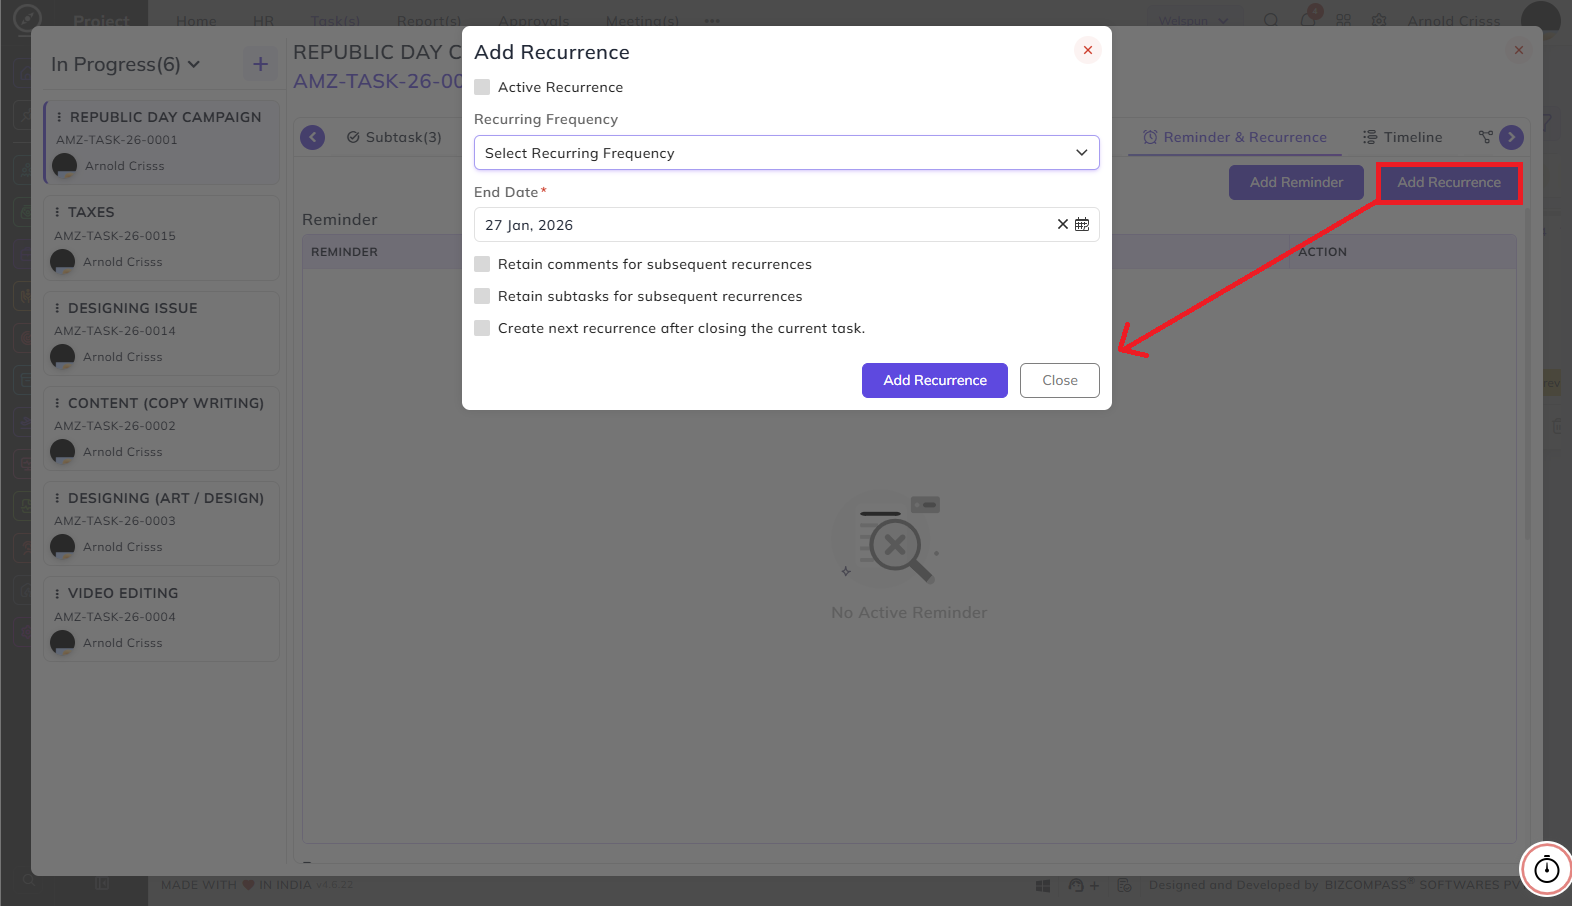
Click Add Recurrence to configure a recurring task. The Add Recurrence form includes:
- Active Recurrence — enable this checkbox to activate the recurrence.
- Recurring Frequency — select how often the task should recur.
- End Date — set the date on which the recurrence should stop.
- Retain comments for subsequent recurrences — when enabled, comments from the current task will carry over to the next recurrence.
- Retain subtasks for subsequent recurrences — when enabled, subtasks will carry over to the next recurrence.
- Create next recurrence after closing the current task — when enabled, the next recurring task will only be created once the current one is closed.
Click Add Recurrence to save.
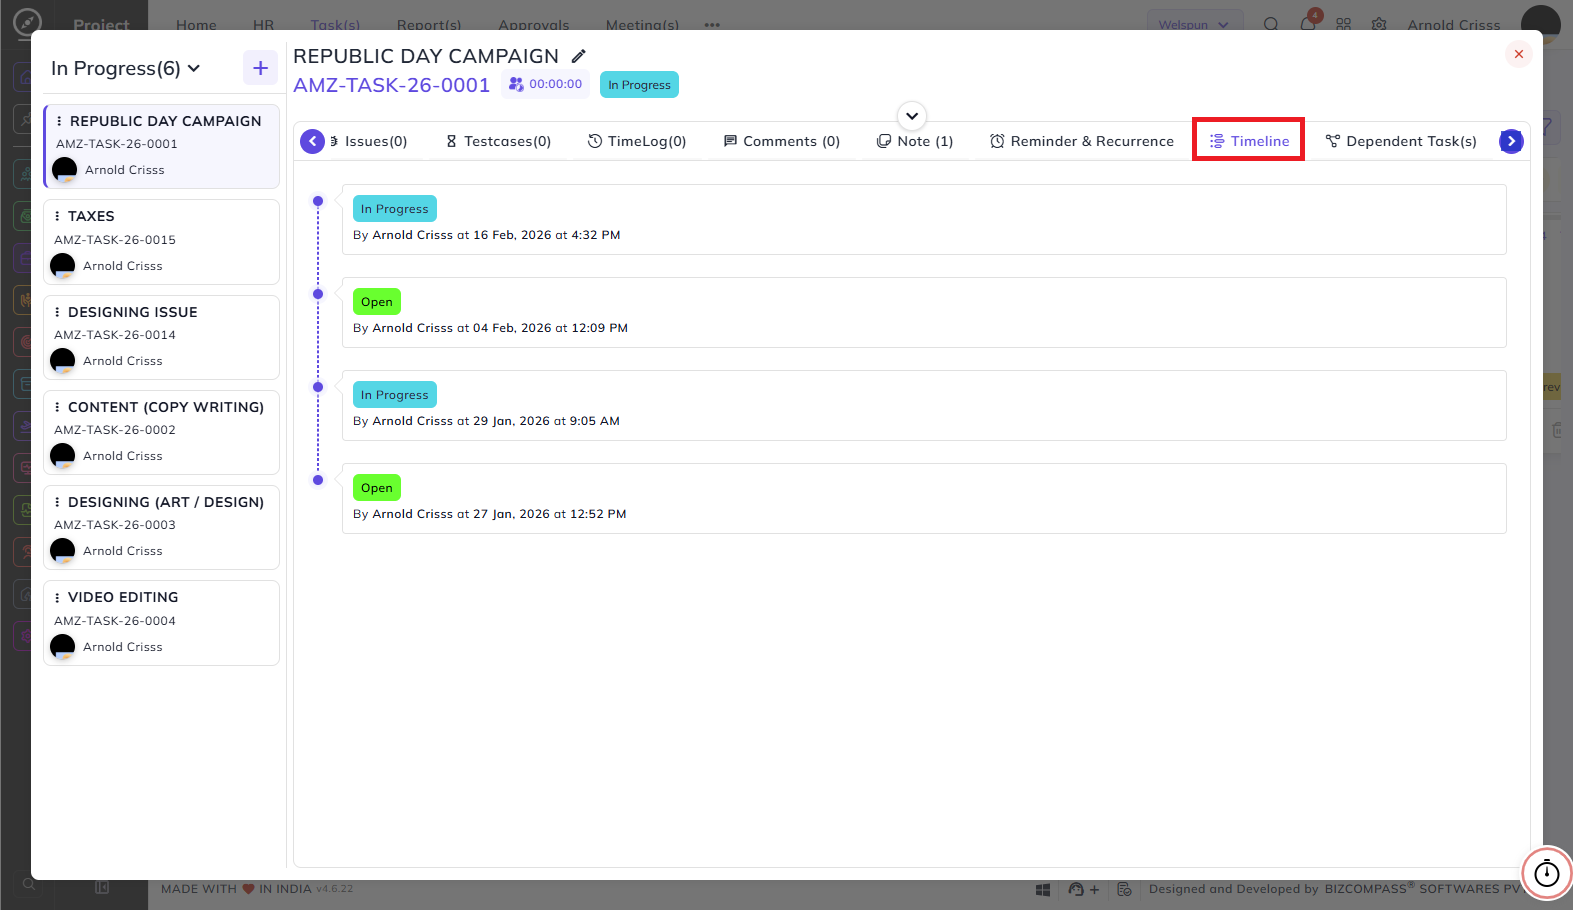
Timeline Tab:
Displays a full chronological history of all stage changes made to this task. Each entry shows the stage name, the person who made the change, and the exact date and time of the change. This provides a complete audit trail of how the task has progressed through its lifecycle.
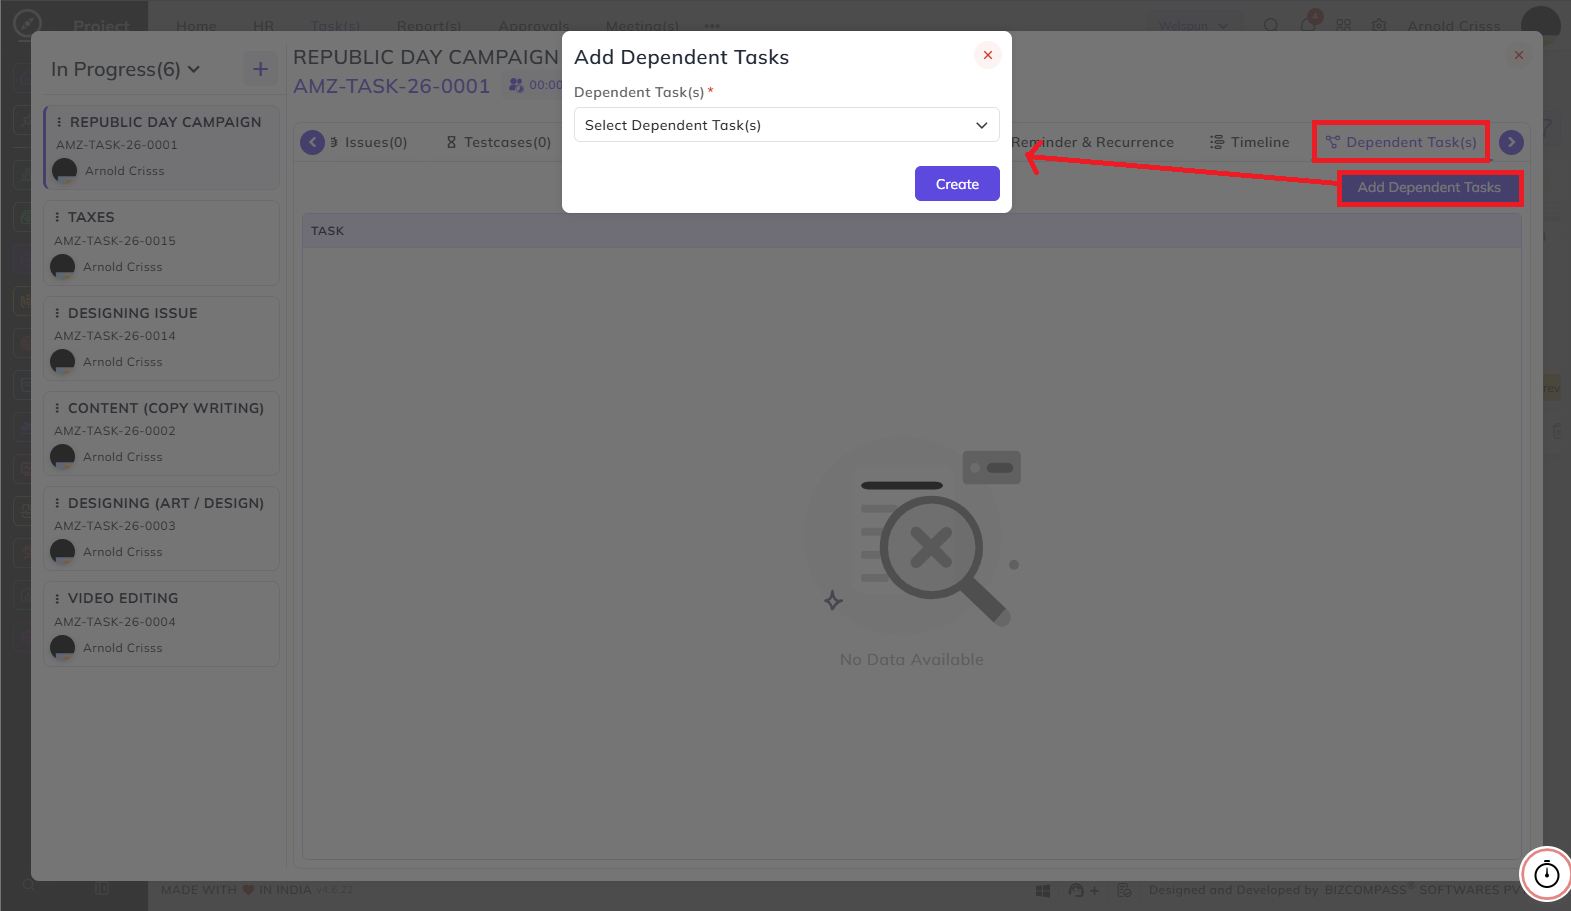
Dependent Tasks Tab:
Displays all tasks that the current task depends on. A task with dependencies cannot progress to the next stage until its dependent tasks have been completed (unless the Ignore Task Dependency flag is enabled for the relevant stage in the task flow).
Click Add Dependent Tasks to open the Add Dependent Tasks dialog and add them.
Views:
The Tasks page supports multiple views, accessible from the view icons in the top right:
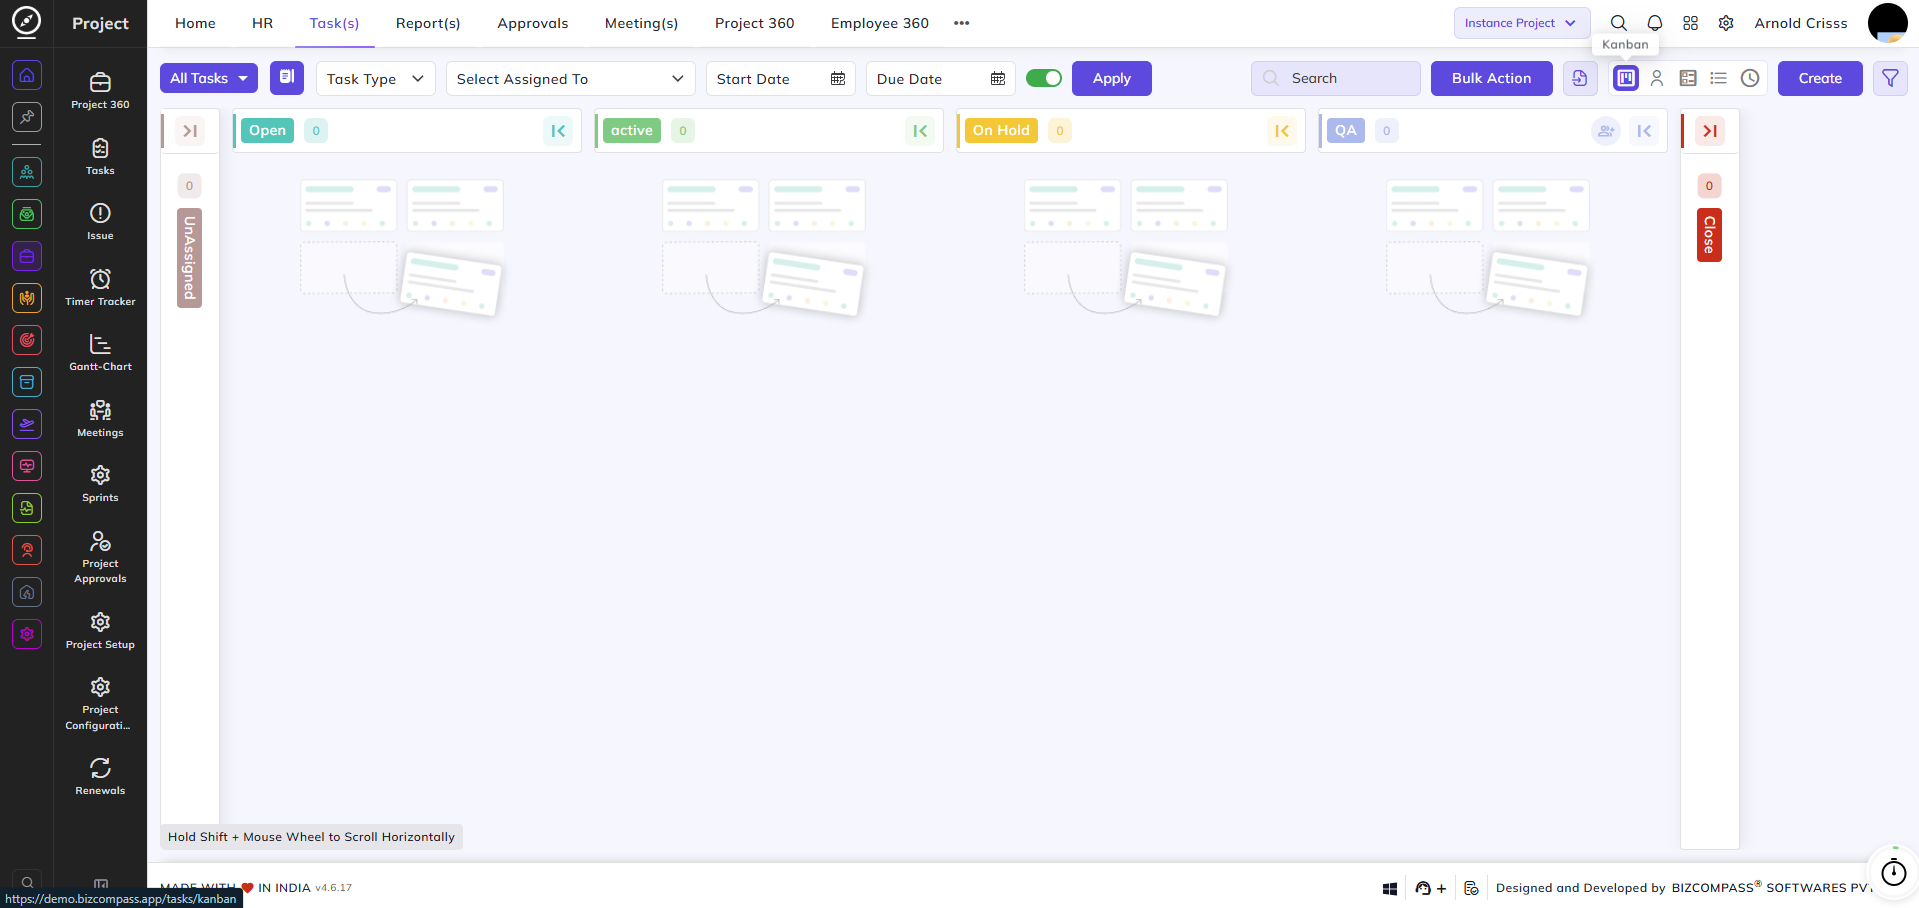
Kanban View (Stage Wise):
The default view. Tasks are displayed as cards organized in columns by their current stage — for example, Open, Active, On Hold, QA, and Closed. Each stage column shows the count of tasks in that stage. The Unassigned column on the left shows tasks that have only a title and no module or platform assigned yet — these tasks automatically move to the Open stage once a module and platform are added.
Tasks can be dragged and dropped between stages to update their status. Each task card displays the task title, task ID, task type, date range, module, platform, estimated time, logged time, assignee avatar, and current status badge. Quick action icons are available at the bottom of each card for Priority, Settings, Tags, Assignee, Edit, and Delete.

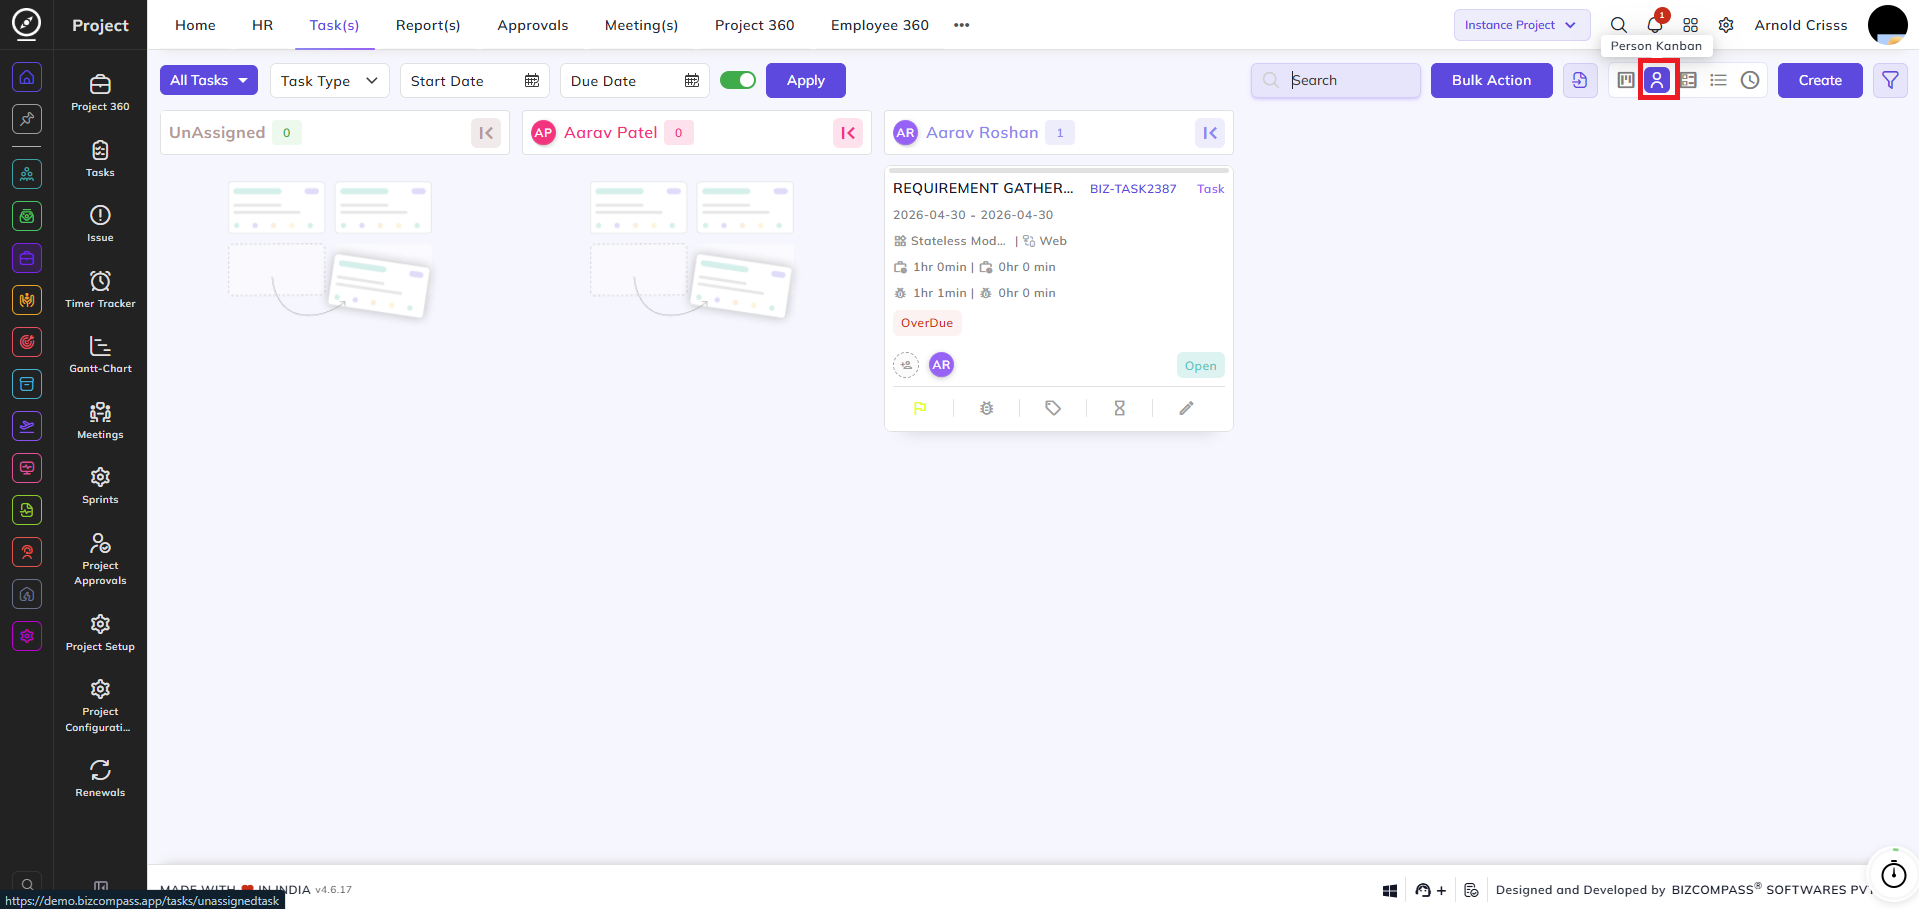
Person Kanban View:
This view organizes tasks by assigned person rather than by stage. Each column represents a team member, showing all tasks assigned to them. This view is only visible to users who have the Can Assign permission enabled in the project's user configuration.
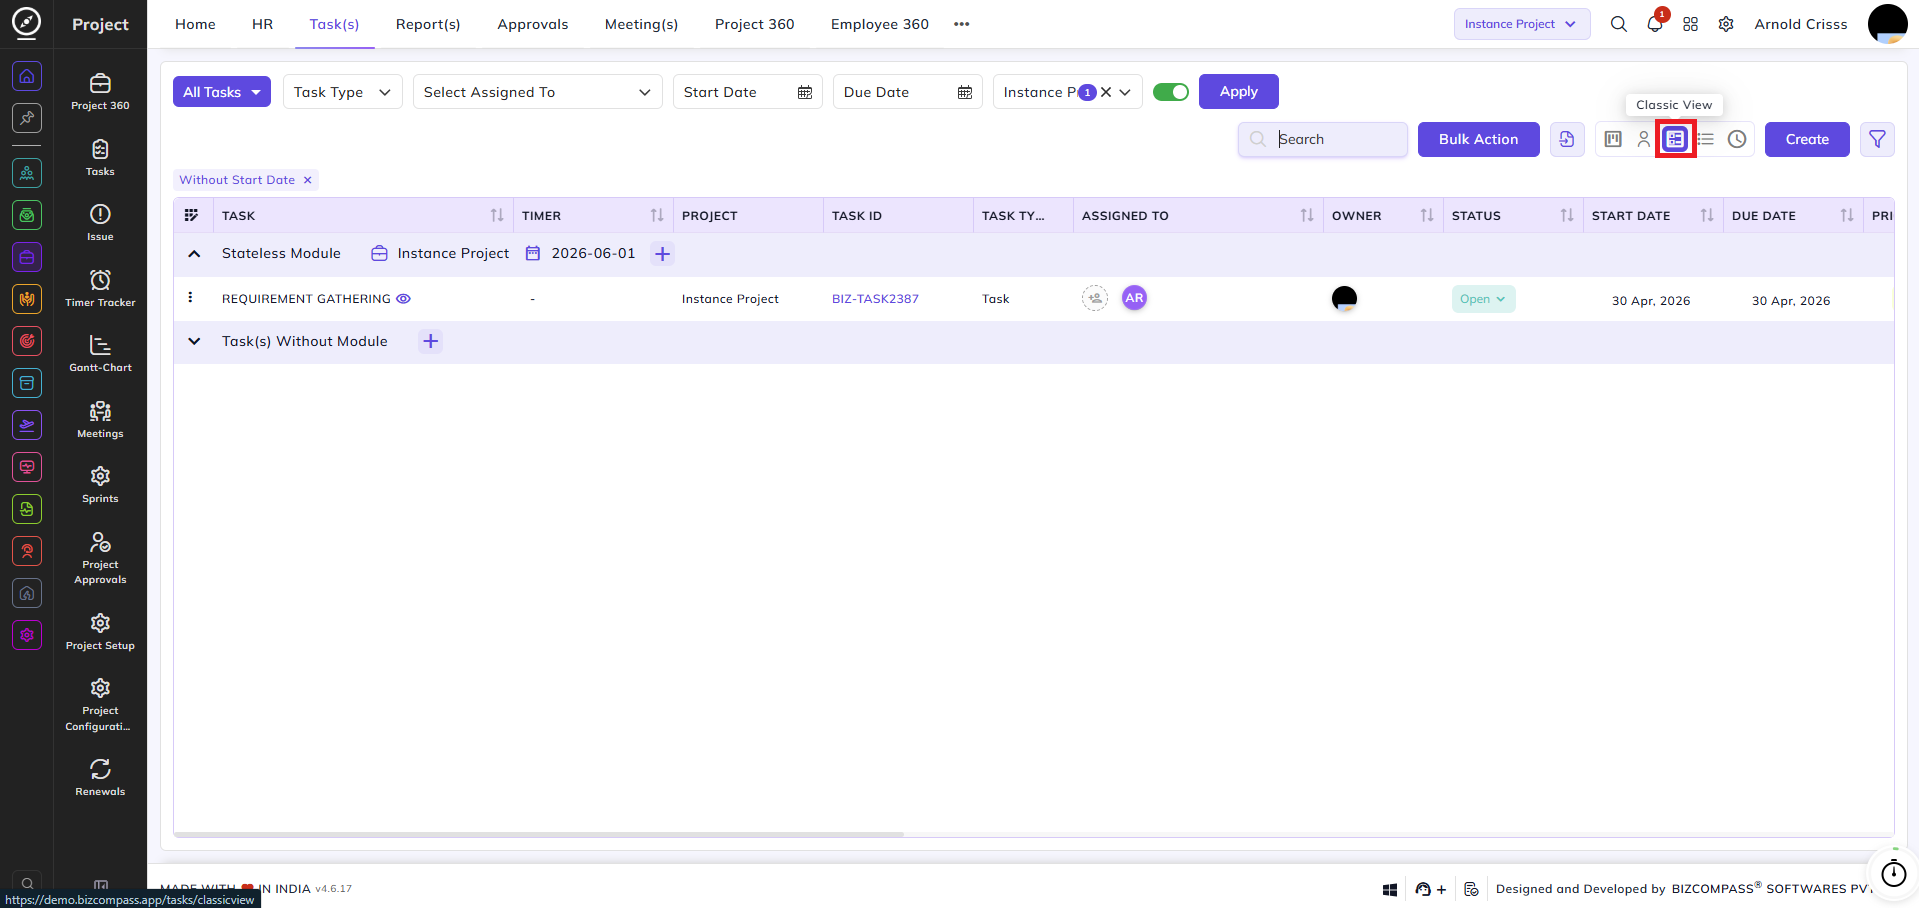
Classic View:
The Classic View displays tasks grouped by their module in a structured, collapsible list. Each module appears as a header row showing the module name, associated project, and end date. Tasks under each module can be expanded or collapsed using the arrow on the left. A + button next to each module header allows you to quickly add a new task directly under that module. Tasks without a module are grouped under a separate Task(s) Without Module section.
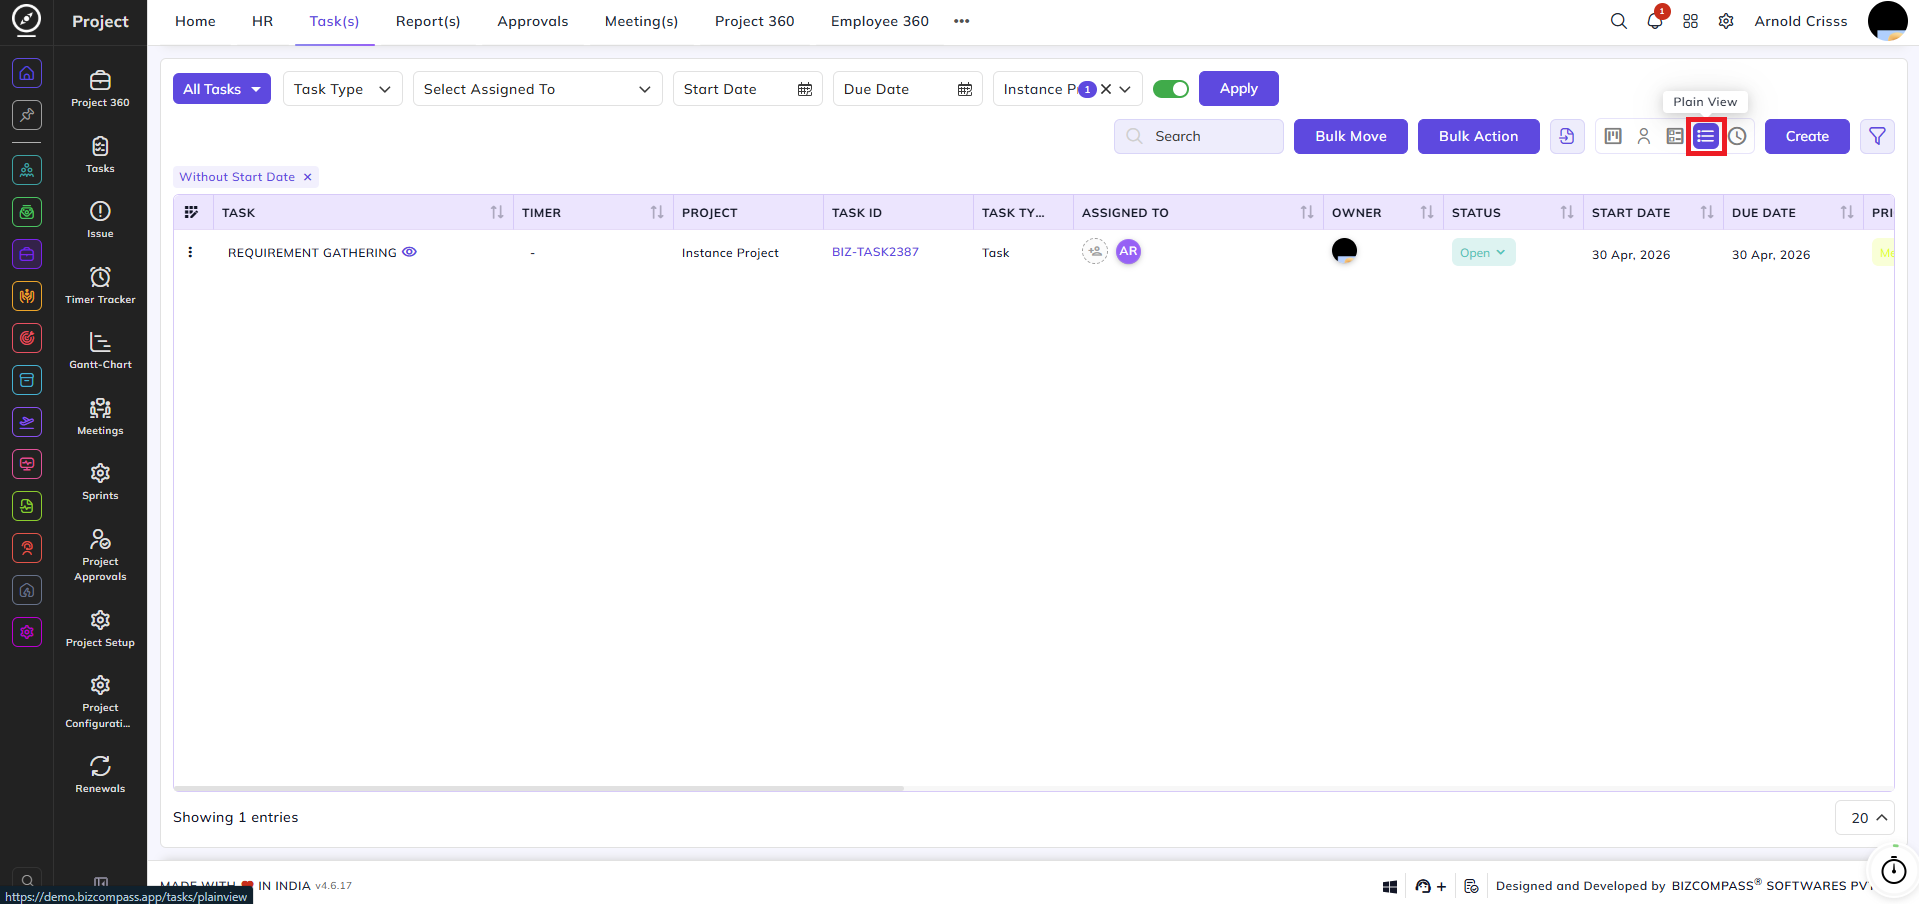
Plain View:
The Plain View displays all tasks in a flat, ungrouped list without any module grouping. All tasks across all modules appear in a single continuous list, making it easier to get a consolidated view of all tasks at once. The Bulk Move button becomes available in this view, allowing you to select one or more tasks and move them to a different project and module in a single action.
Toolbar Actions:
Import Tasks:
Tasks can be imported in bulk using a spreadsheet file. Click the Import icon from the toolbar to open the Import Task dialog.
Browse or drag and drop your file into the upload area. Only .xlsx and .xls file formats are supported. A Download Sample Template link is available to help you structure your file correctly before importing.
Bulk Move:
Select multiple tasks and move them to a different project and module in one action. The Move Task dialog allows you to select the target Project and Module, with an option to Update billing type according to target project. This feature is only available in the Plain View.


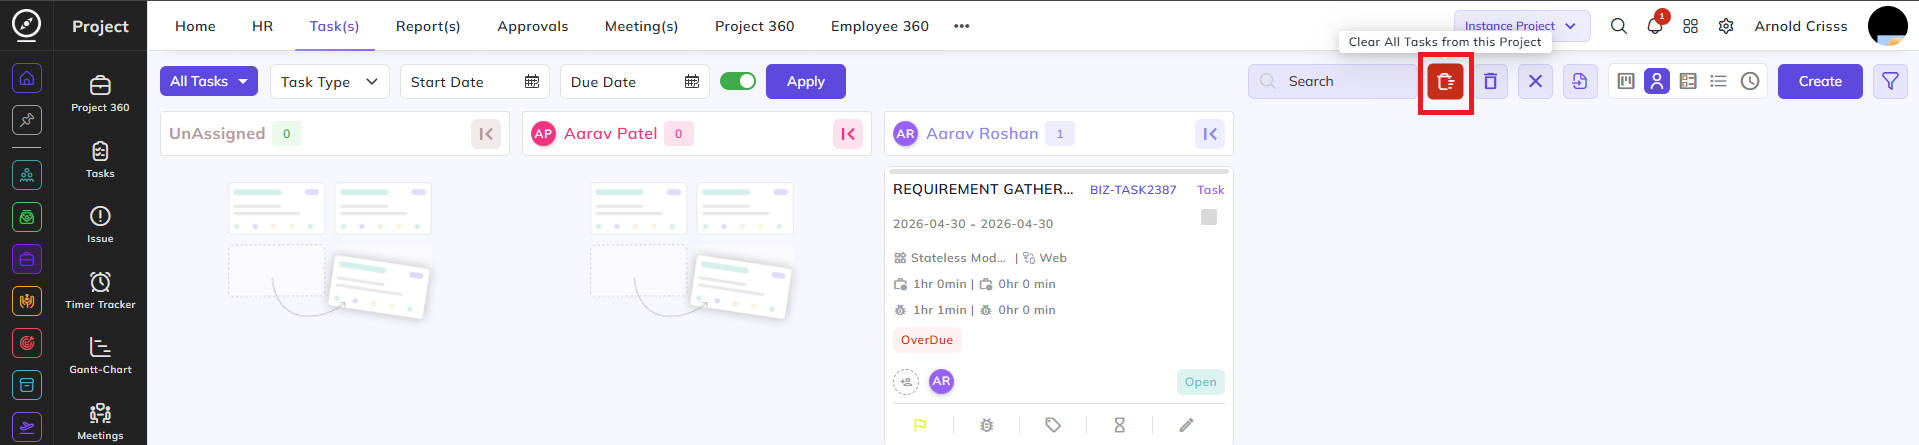
Bulk Action:
Deletes tasks in bulk, streamlining the management process. In Kanban and Person Kanban, this Bulk Action has an additional feature of Clear All Tasks from this Project. It removes all tasks from the currently selected project.