Project
From this page, you can create and manage all projects within your organization. Each project brings together team members, task configurations, budgets, alerts, and location details into a single structured setup.
The project create form is organized across six tabs:
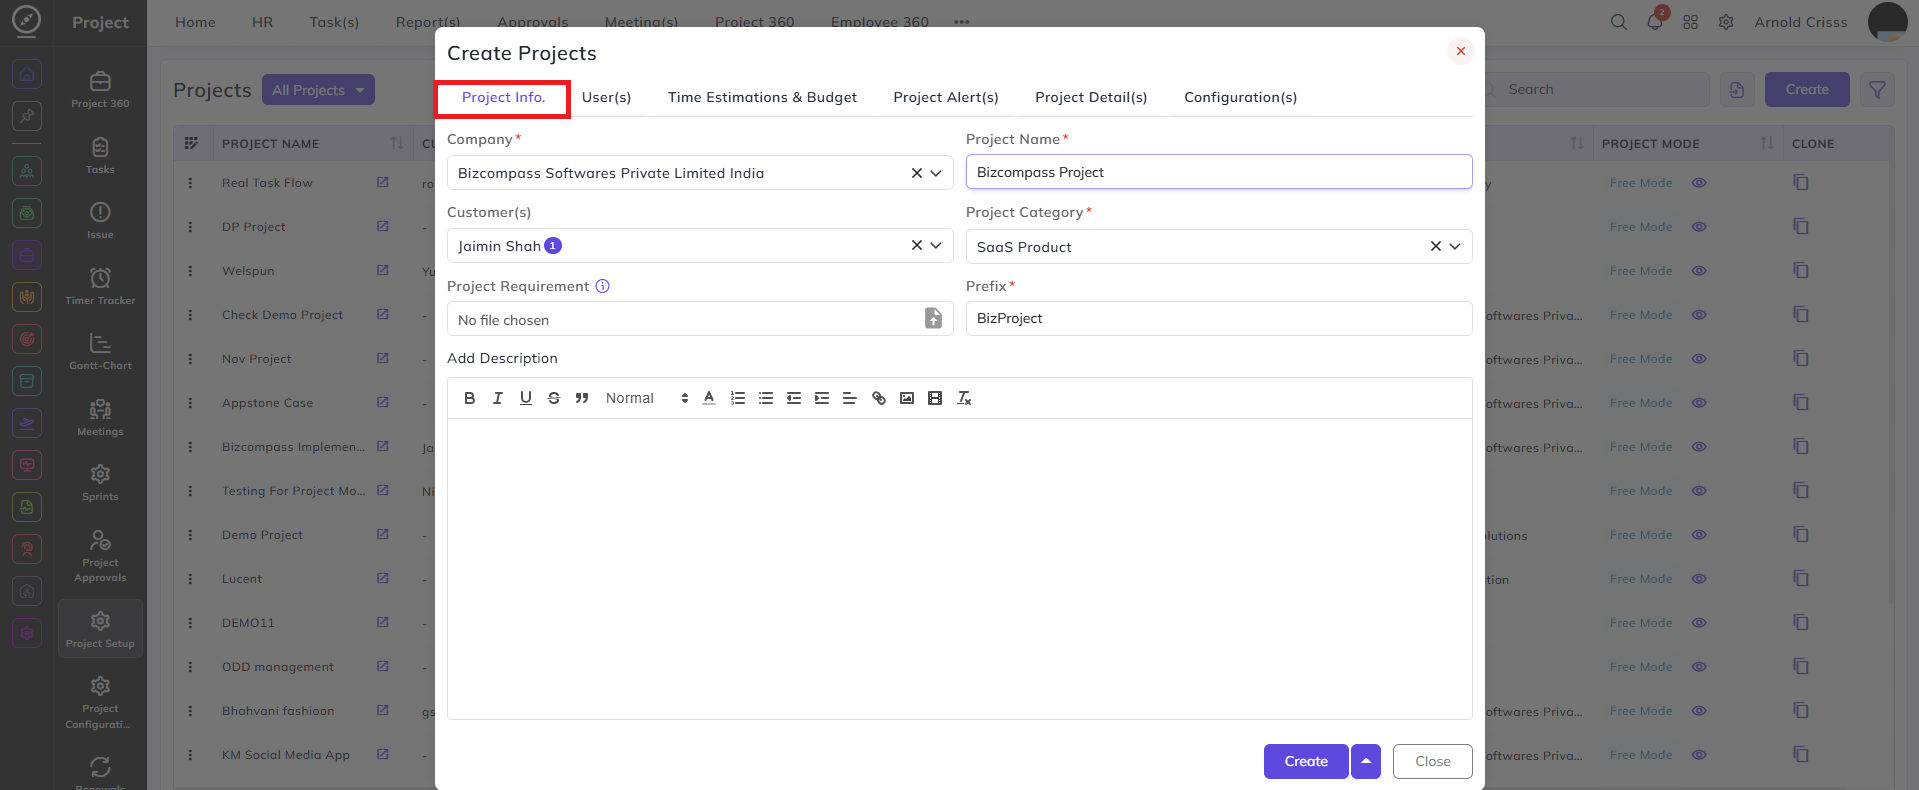
Project Info.
Company:
Select the company this project belongs to.
Project Name:
Enter the name of the project.
Customer(s):
Select the customer(s) associated with this project.
Project Category:
Select the category that best describes the project type.
Project Requirement:
Upload any project requirement document if available.
Prefix:
Enter a short prefix that will be used in the task series identifier for this project.
Description:
Add a description to provide additional context about the project.
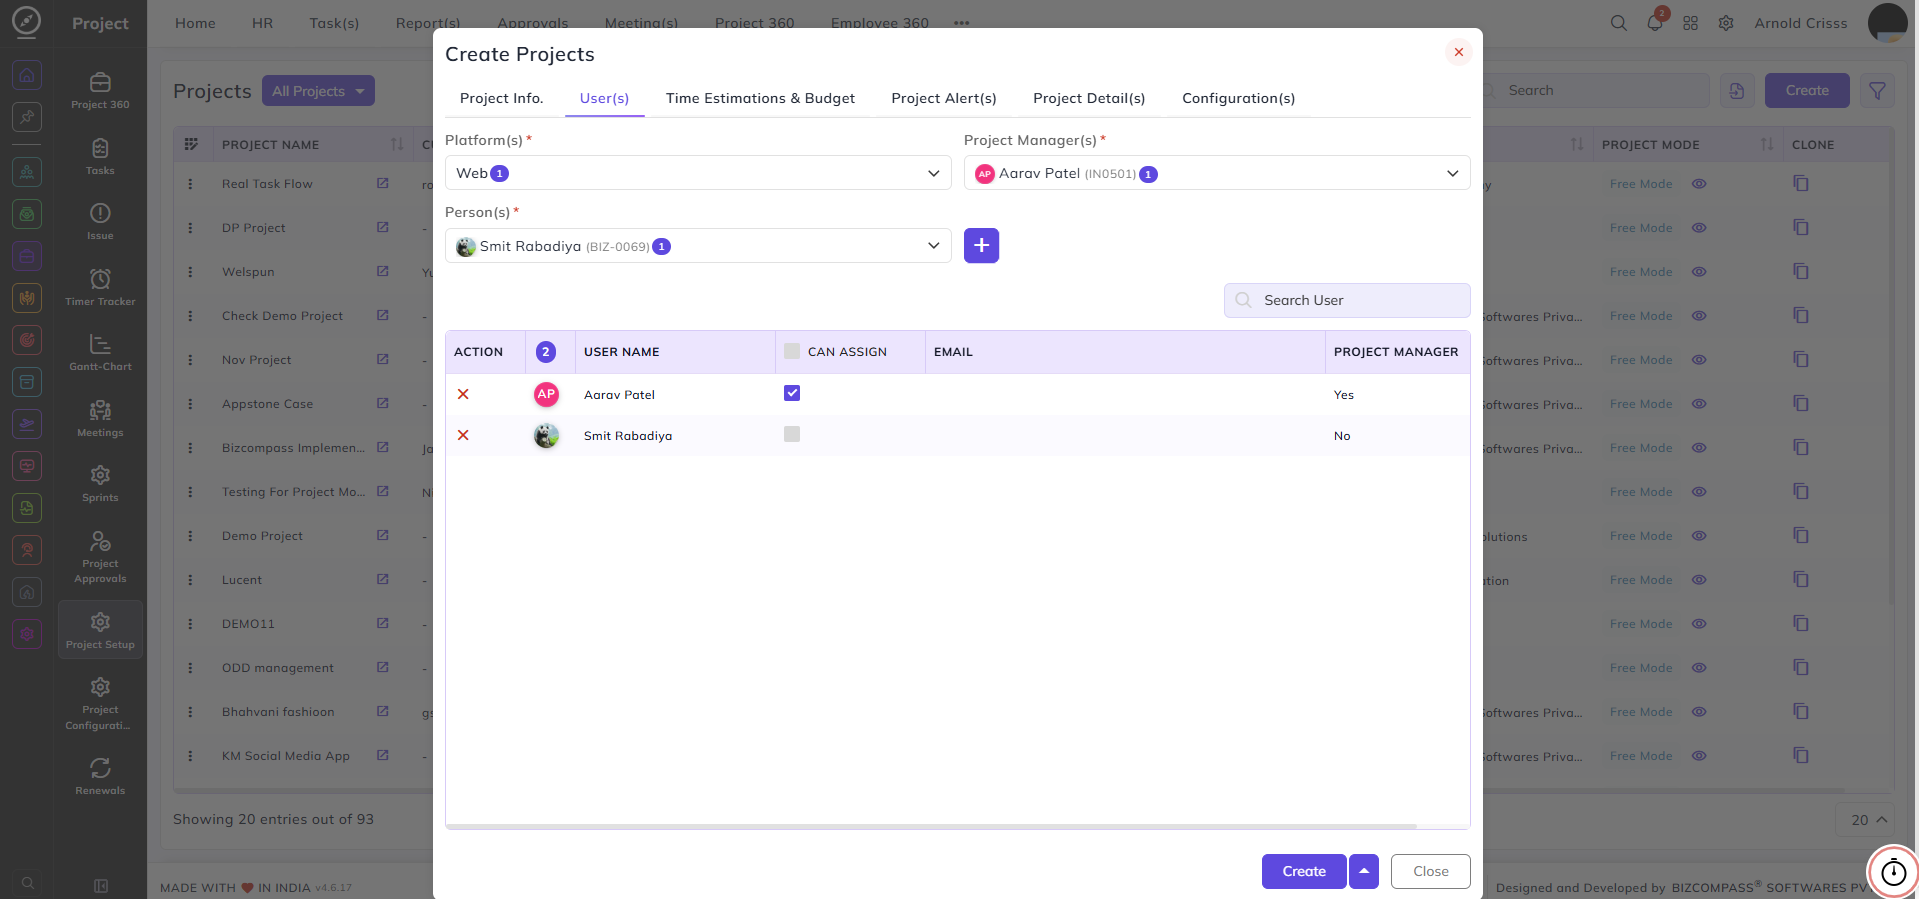
User(s)
Platform(s):
Select the platform(s) applicable to this project.
Project Manager(s):
Select the employee(s) who will manage the project.
Person(s):
Select the team members to be added to the project. Once selected, they appear in the table below showing their User Name, Can Assign checkbox, Email, and Project Manager status.
Can Assign:
Enable this checkbox to allow the user to assign tasks to anyone within the project. The user can also assign tasks for more than the shift hours if this option is checked on(Assign Force Fully).
Note: Any person that has the Can Assign enabled can see Person Kanban on the Tasks page.
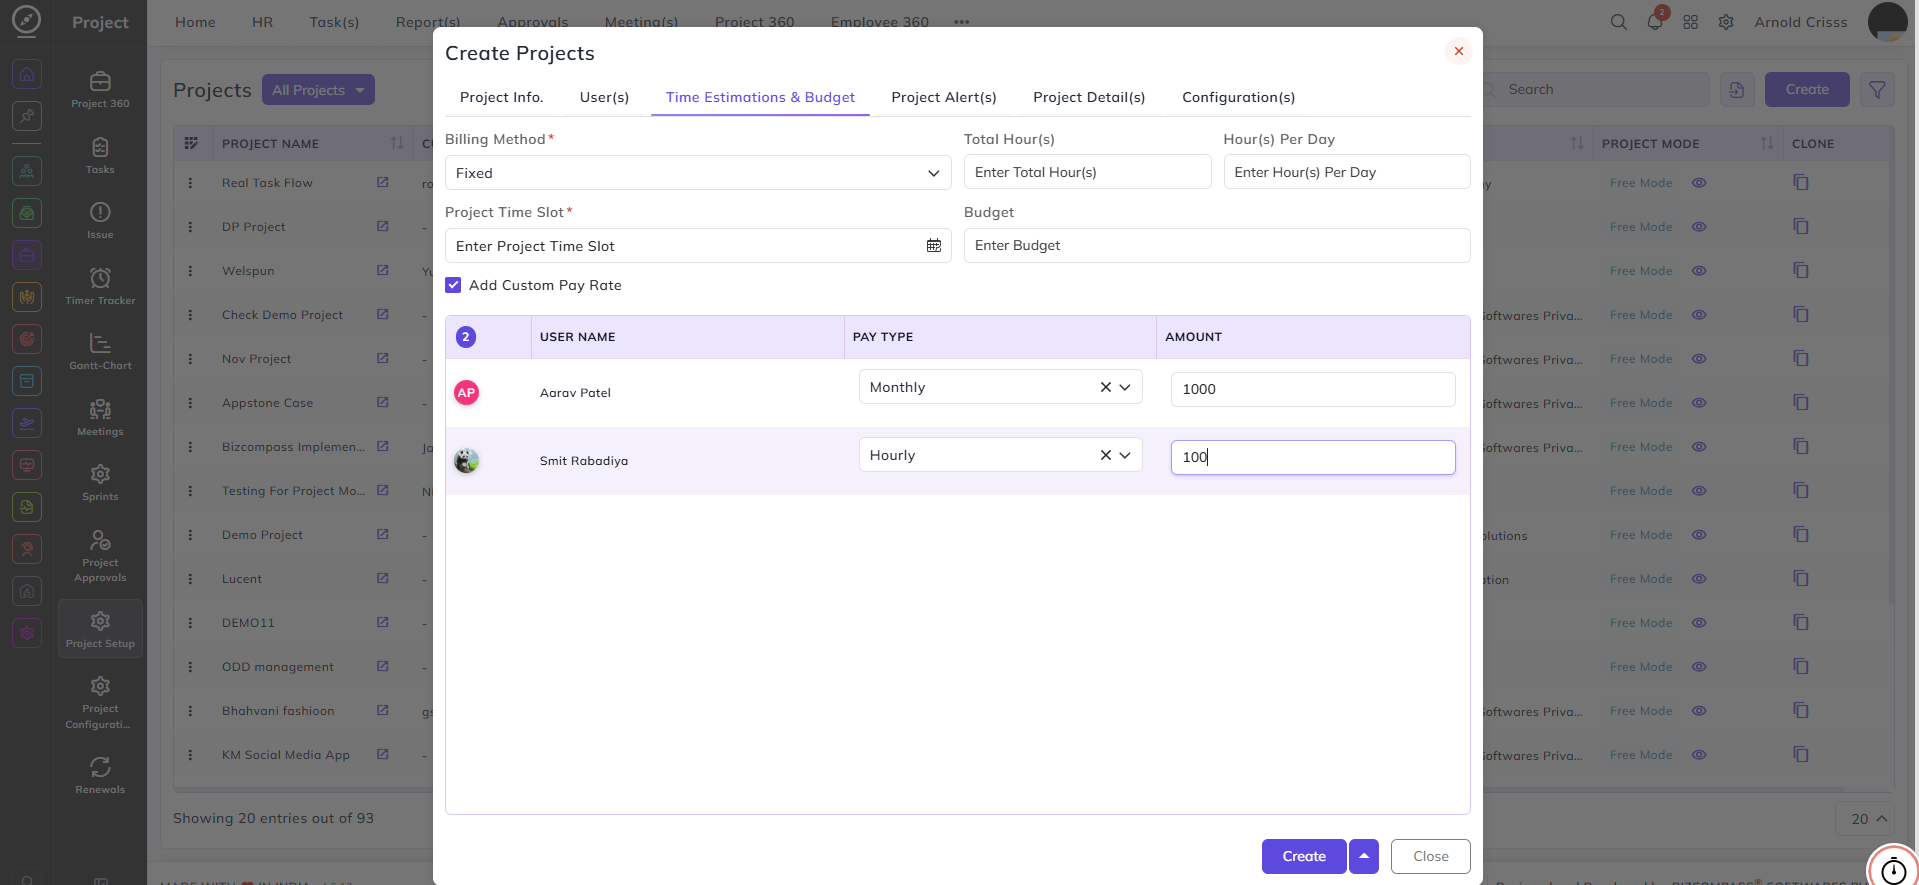
Time Estimations & Budget
This defines the Cost Report of the project.
Billing Method:
Select how the project will be billed — either Fixed (a set project price) or Hour Basis (billed based on hours logged).
Note: If Fixed is selected in the Billing Method, then only the Project Alert(s) tab will appear.
Total Hour(s):
Enter the total estimated hours for the project.
Hour(s) Per Day:
Enter the number of working hours per day for this project.
Project Time Slot:
Enter the project's time slot or deadline.
Budget:
Enter the total budget allocated for the project.
Add Custom Pay Rate:
Enable this checkbox to define individual pay rates for each team member. When enabled, the user table below allows you to set a Pay Type (Monthly or Hourly) and an Amount for each assigned person.
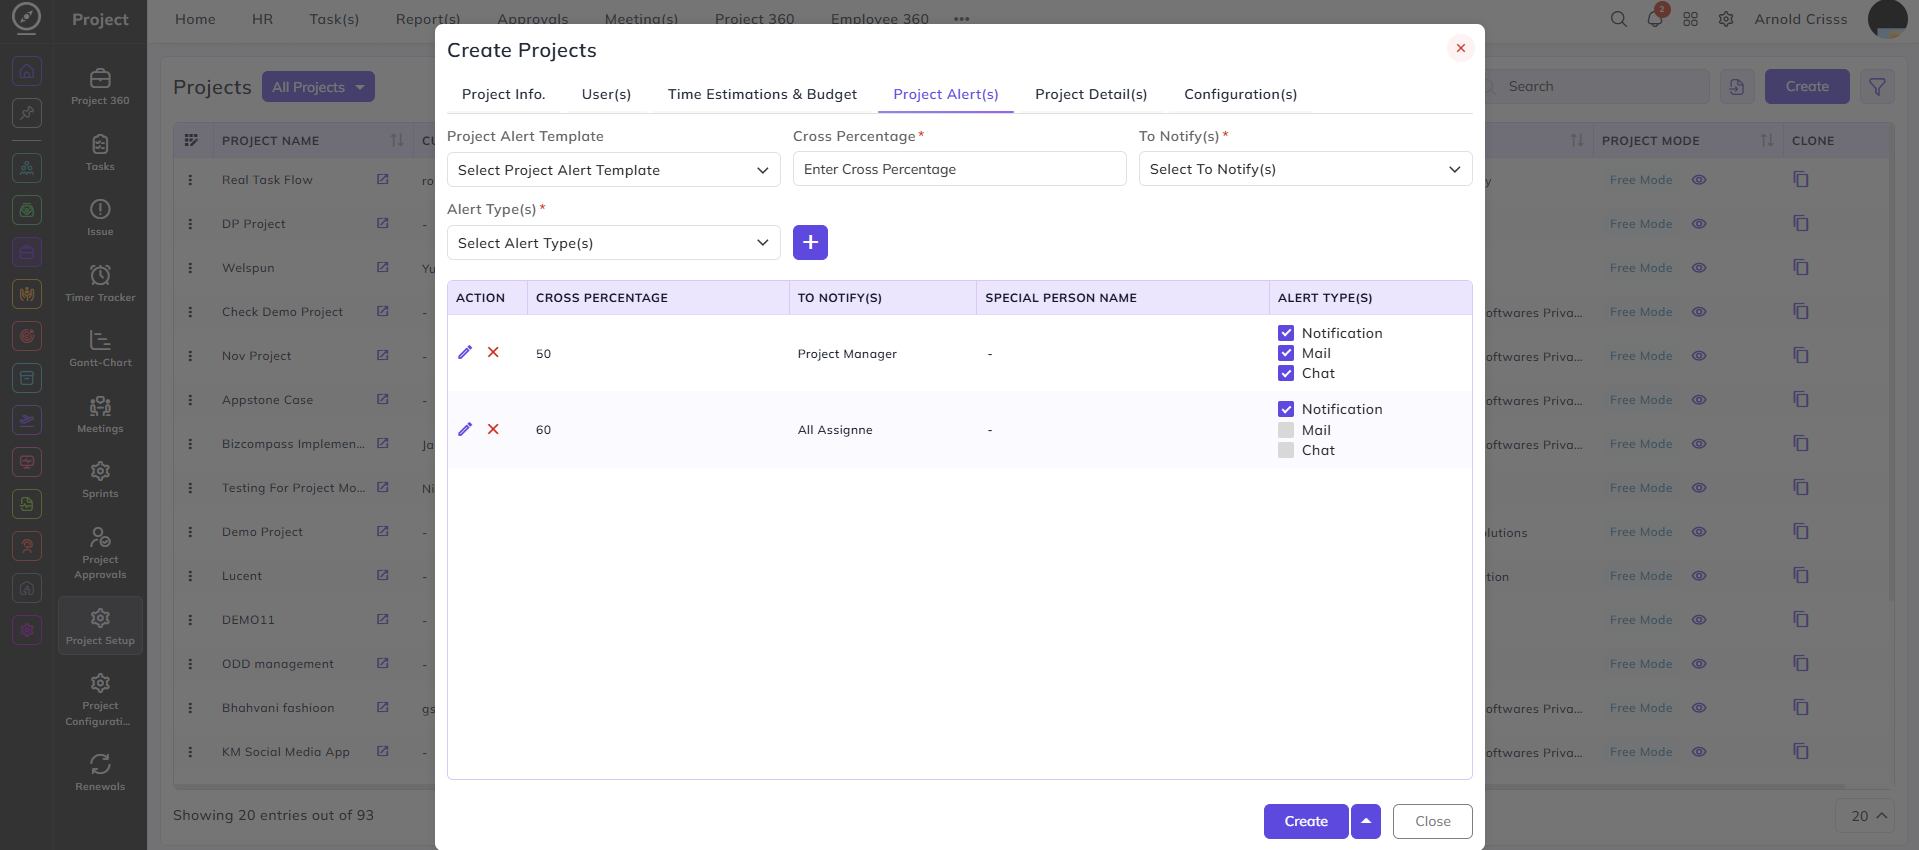
Project Alert(s)
Project Alert Template:
Select a pre-configured alert template to apply to this project, or configure a custom alert directly.
Cross Percentage:
Enter the estimation threshold percentage at which alerts should be triggered.
To Notify(s):
Select who should be notified when the threshold is crossed — All Assignee, Project Manager, or Special Selected.
Alert Type(s):
Select the notification channel — Notification, Mail, or Chat.
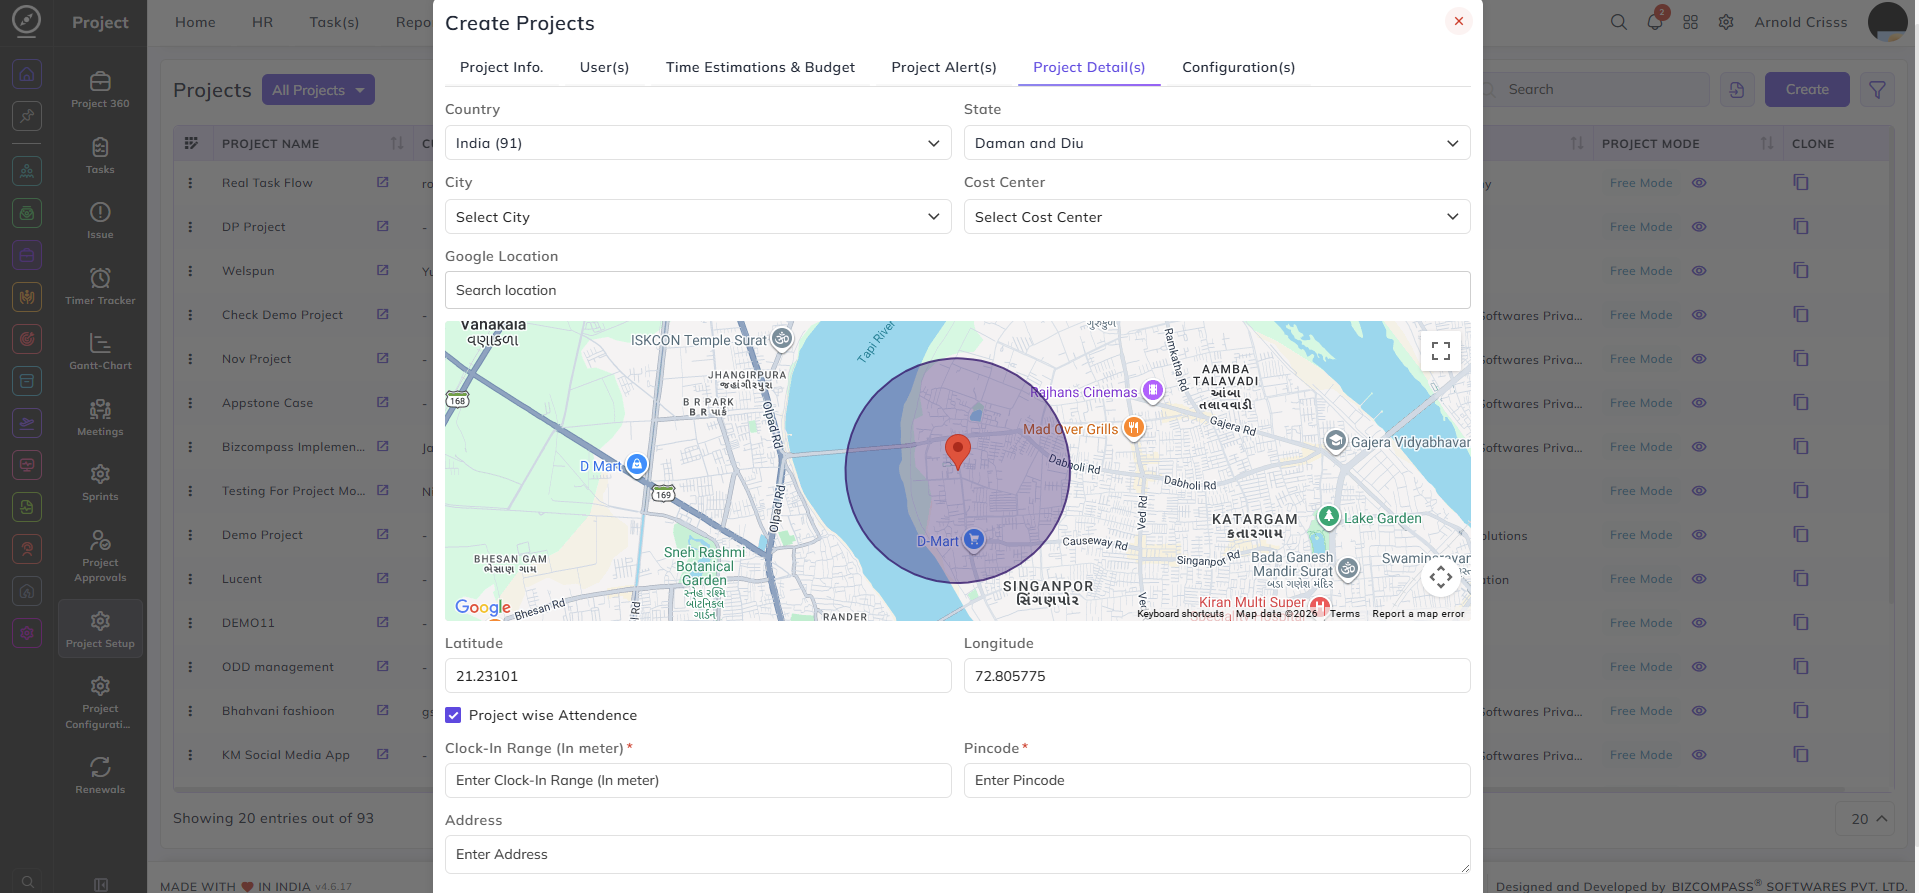
Project Detail(s)
Country / State / City:
Enter the location details for the project.
Cost Center:
Select the cost center this project is associated with.
Google Location:
Search for and pin the project location on the map. The Latitude and Longitude fields will auto-populate based on the selected location.
Project Wise Attendance:
Enable this checkbox to track attendance specifically for this project based on location. When enabled, the following additional fields appear:
- Clock-In Range (In meter): Enter the radius (in meters) within which employees must be located to clock in for this project.
- Pin code: Enter the pin code of the project location.
- Address: Enter the full address of the project site.
This is helpful and can be used to manage the validity of logs if person is outside of the branch range but within the Clock-In range of Project which is configured in Project Detail(s).
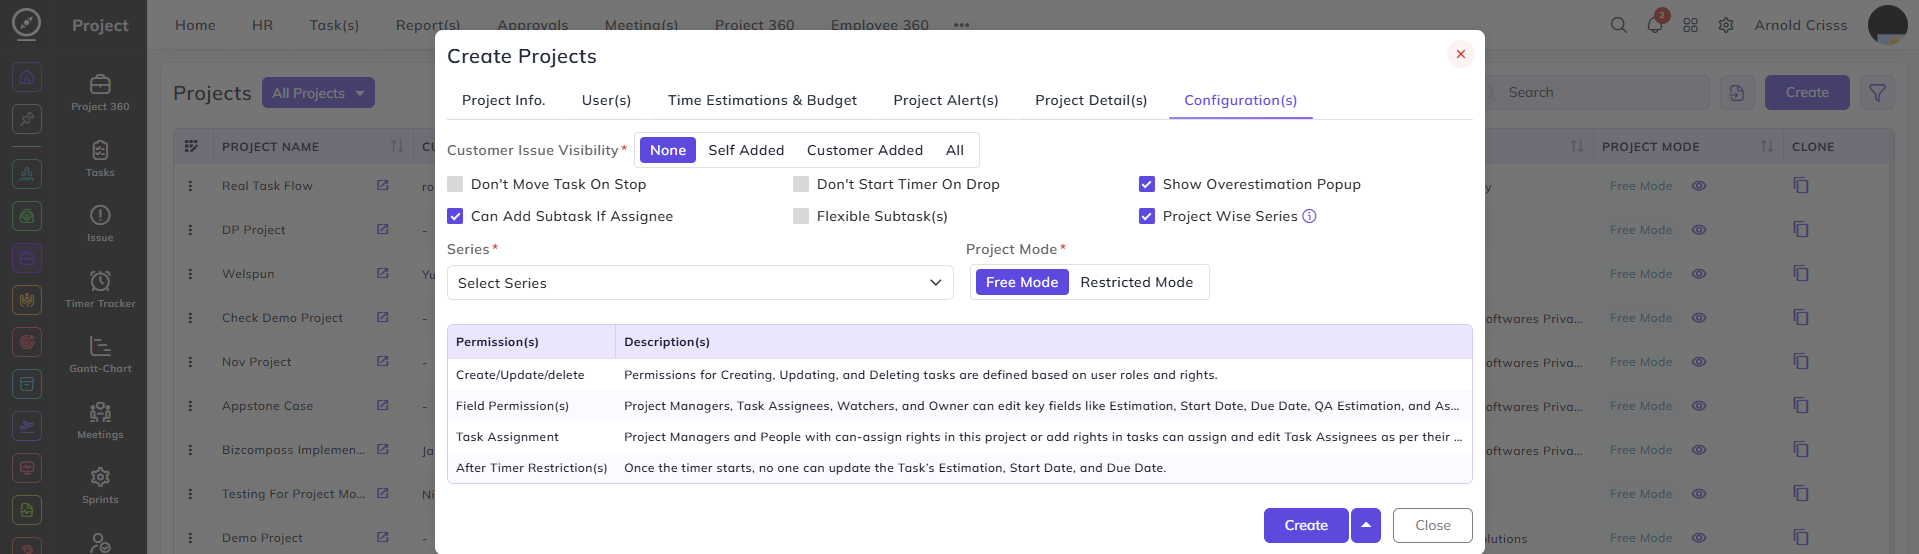
Configuration(s)
Customer Issue Visibility:
Select which type of issues the customer can view —
- None- cannot view any issues
- Self Added- can only view the issue added by him/ her
- Customer Added- can only view issues added by all the customers
- All- can view all the issues
Don't Move Task On Stop:
When enabled, tasks cannot move to the next stage when the timer is stopped.
Don't Start Timer On Drop:
When enabled, the timer will not automatically start when a task is dragged to a new stage.
Show Overestimation Popup:
When enabled, a popup warning will appear when a task's logged time exceeds its estimated time.
When this popup occurs, only the Rights given person can assign forcefully, Like Project manager or person with can assign given.
Can Add Subtask If Assignee:
When enabled, task assignees are permitted to add subtasks for parent tasks.
Flexible Subtask(s):
When enabled, subtasks can be separately moved to other stages. You don't have to move all sub tasks of a parent task to one same stage.
Project Wise Series:
When enabled, this project will use its own dedicated task series rather than a shared one.
Series:
Select the series to be used for generating task identifiers in this project.
Project Mode:
Select the project mode — Free Mode or Restricted Mode. The table below explains the behavior of each permission under the selected mode, covering Create/Update/Delete, Field Permission(s), Task Assignment, and After Timer Restriction(s).
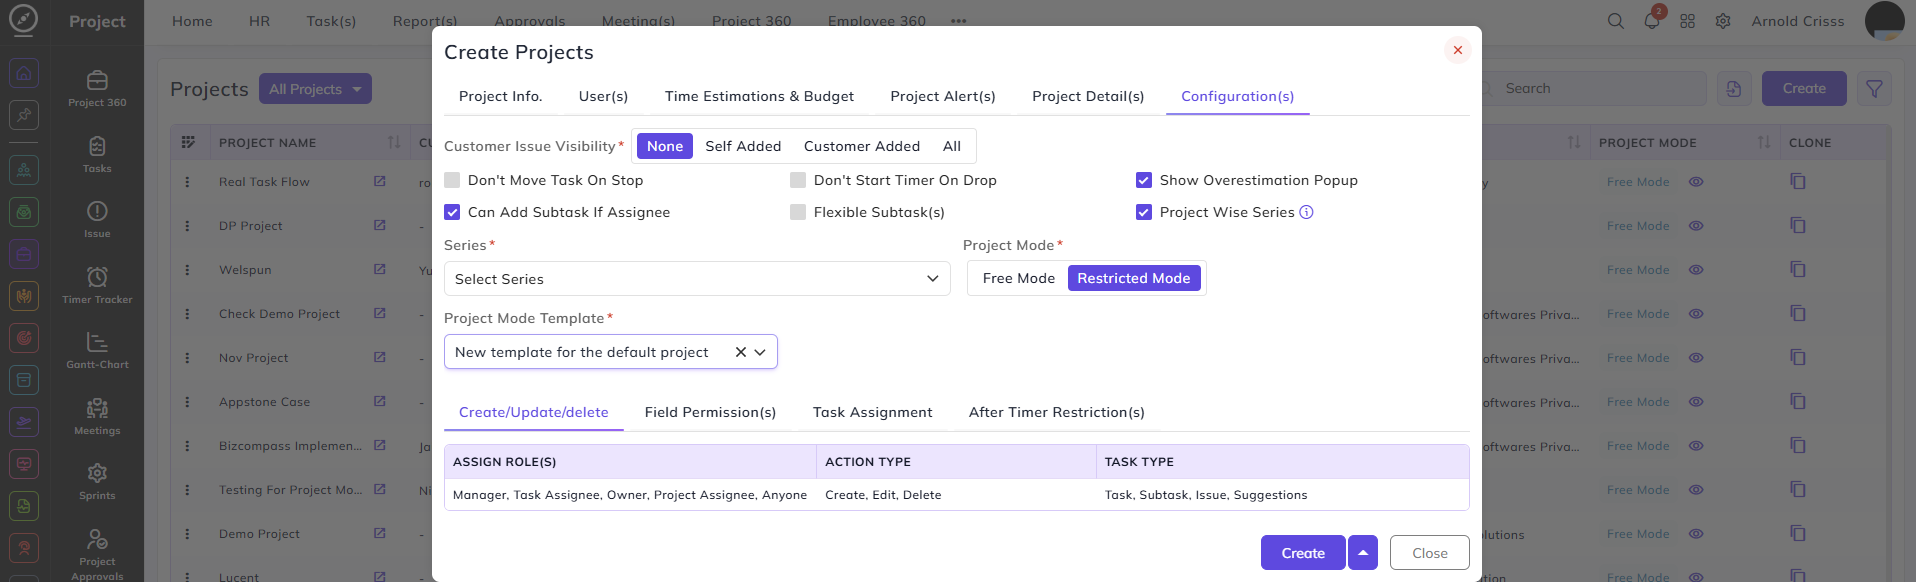
Project Mode Template:
This field appears when Restricted Mode is selected. Select the project mode template to apply to this project. Once a template is selected, the configured permissions are displayed in the tabs below for reference, showing the Assign Role(s), Action Type, and Task Type for each of the four permission sections — Create/Update/Delete, Field Permission(s), Task Assignment, and After Timer Restriction(s).
Once the project has been created, its flow can be edited by clicking on the three dots before its name and clicking on Edit.
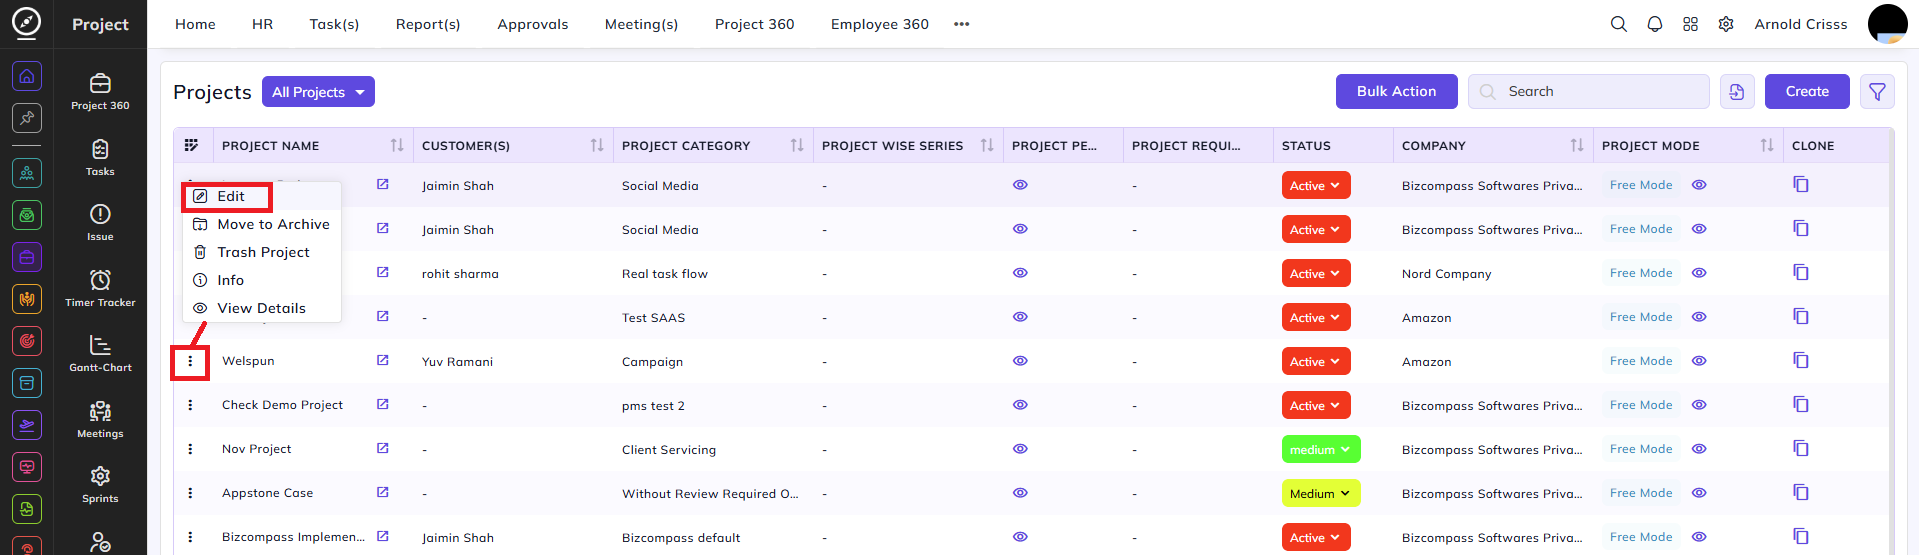
A new tab of Flow will appear from which you can edit the flow of the project. After editing, click on Update.
