Documents
This page is used to manage all types of documents required during the Document Collection stage of the Joining Stage.
The documents can be categorized in one of these Document Types:
- Academic Certificate (e.g., degree certificate)
- Academic Result (e.g., 12th marksheet)
- Government (e.g., Aadhar Card, Pan Card)
- Other (e.g., Bank Document)
These documents are selected during multiple stages of the Joining Procedure Flow. For example, Aadhar Card and Pan Card are selected by configuring the Background Verification stage. And 10th and 12th marksheets are collected by configuring the Document Collection stage. The documents are then sent to the candidates during the onboarding procedure.
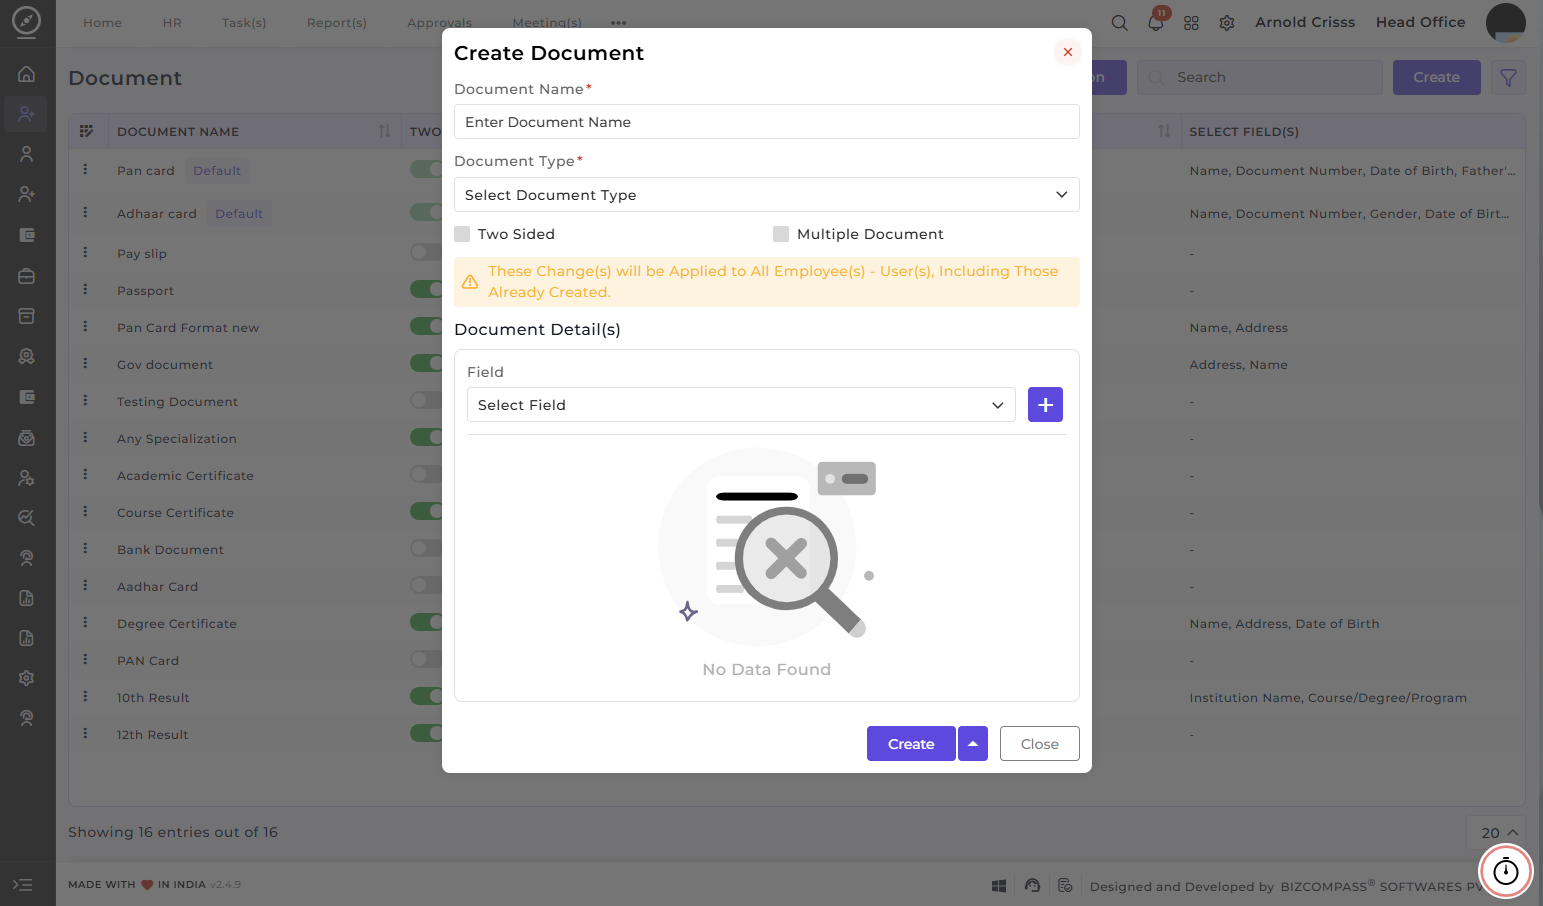
Create Document:
- Specify the name of the Document (e.g., Passport, Pan Card).
- Select the Document Type (Government, Academic Certificate, Any Other).
- Enable the Two-Sided option if the document has details on both sides.
- Enable the Multiple Document option if multiple copies of the same document are needed.
- Select the Fields required for each document (e.g., Name, Date of Birth, Address).
With the Bulk Action feature, you can delete multiple documents at once, streamlining the process of managing and maintaining recruitment process.
This feature is optional. If your company does not require document collection through the system, you can skip configuring it.
=====================================================
This is the Document Page, from where document types are created and configured. These document types are used to collect and manage different kinds of documents from employees or candidates during onboarding or later processes.
The system allows creation of different categories of documents. The main document types available are:
-
Academic Certificate
-
Academic Result
-
Government Documents
-
Any Other Documents
Each document type comes with its own predefined set of fields, which helps in capturing relevant information based on the nature of the document.
To create a document type, the first step is to define the Name of the document and then select the Document Type.
Now, based on the selected document type, the system automatically displays relevant fields.
For Academic Certificate, the available fields include:
-
CGPA
-
Roll Number
-
Issued Date
-
Expiry Date
-
Course
-
Degree
-
Year of Passing
These fields are useful for collecting detailed academic qualification information.
For Academic Result, the fields include:
-
Exam Month and Year
-
Grade
-
Semester
These fields help in capturing semester-wise or exam-wise results.
For Any Other Document, the available fields are:
-
Issued Date
-
Expiry Date
-
Supporting Notes
-
Document Roll Number
This type is flexible and can be used for miscellaneous documents that do not fall under academic or government categories.
For Government Documents, the fields include:
-
Nationality
-
Gender
-
Signature
-
Government Department
These fields are useful for documents like identity proofs or official government-issued records.
Now, while creating a document type, there are additional configuration options.
One important option is Two-Sided Document.
If this option is enabled, the system will require the user to upload both front and back images of the document. This is typically used for documents like ID cards where both sides contain important information.
Another option is Multiple Documents.
If this option is enabled, multiple documents of the same type can be uploaded.
For example, in the case of Academic Results, an employee may have:
-
Semester 1 Result
-
Semester 2 Result
-
Semester 3 Result
In such cases, enabling multiple documents allows uploading all these under the same document type.
Next, the system allows selecting which fields should be included for that document type.
For example, while creating a Result document, the selected fields can be:
-
Name
-
Institution Name
-
Semester
-
CGPA
Each of these fields can also be marked as Required, meaning the user must fill them while uploading the document.
Additionally, the fields can be arranged or rearranged as per the organization’s requirement. This helps in controlling how the form appears to the user.
Once the document type is created, it becomes available in the Employee Module.
In the employee profile, under the Document Tab, users can upload documents based on the defined document types.
If the document type is marked as Two-Sided, the user must upload both front and back images.
If certain fields were marked as required during configuration, such as Name or Institution Name, those fields must be filled during upload.
If Multiple Documents was enabled, the user will see an option to add multiple entries under the same document type. They can add or remove documents as needed.
If Multiple Documents is not enabled for a document type, then only a single document upload option will be available, and the option to add more documents will not be shown.
Using this document configuration, organizations can standardize how documents are collected, ensure all required information is captured, and also allow flexibility by adding custom fields where necessary.