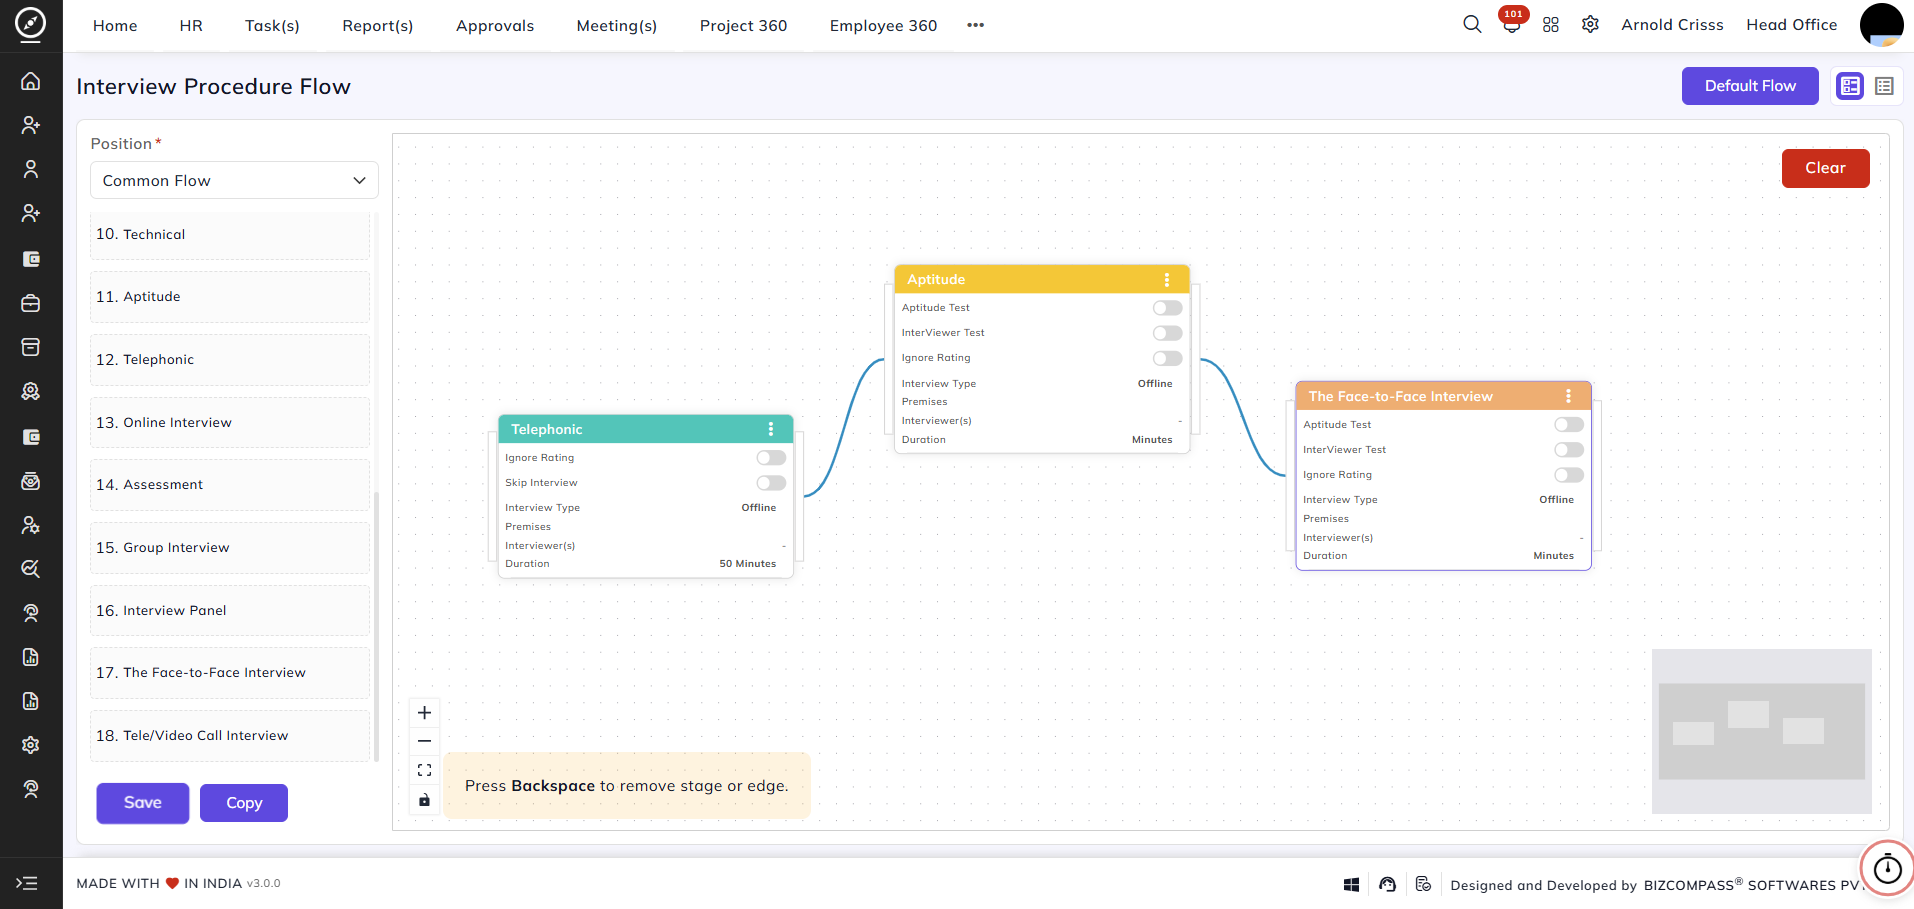
Interview Procedure Flow
The Interview Flow or Interview Procedure Flow page is used to create the SOP/workflow of the interview process. It defines how the interview will be evaluated.
For example, if the organization wants to take a telephonic round first, then an aptitude test, followed by a practical test, they can arrange these stages one after another and create the workflow.
On the left side panel, the organization can:
-
Select the opening
-
Select the interview stages
The created flow can be saved and also copied for another opening. This screen provides a dynamic visual workflow builder where interview stages are arranged in sequence.
Types of Interview Flow:
There are two ways to create an interview flow:
-
Create a Common Flow for all openings
-
Create a Separate Flow for each Opening, where that opening will follow its own flow instead of the common flow
If an opening is selected from the left side and no flow is visible, it means the opening is following the common flow.
If a flow is already created for an opening and the organization wants that opening to follow the common flow again, click the Clear button available in the workspace/canvas.
Steps to Create a Flow:
All stages created in the Interview Stage Setup will be visible on this page.
To create a flow, drag and drop the stages into the workspace.
Connecting Stages:
To connect two stages (nodes), connectors are visible on the left and right side of each stage.
Steps:
-
Hover on the connector
-
Left-click and hold
-
Drag the connector to the left side of the next stage
The interview flow works from left to right.
Flow rules:
-
The first node will not have a left connection
-
The last node will not have a right connection
-
All nodes should be properly connected and configured
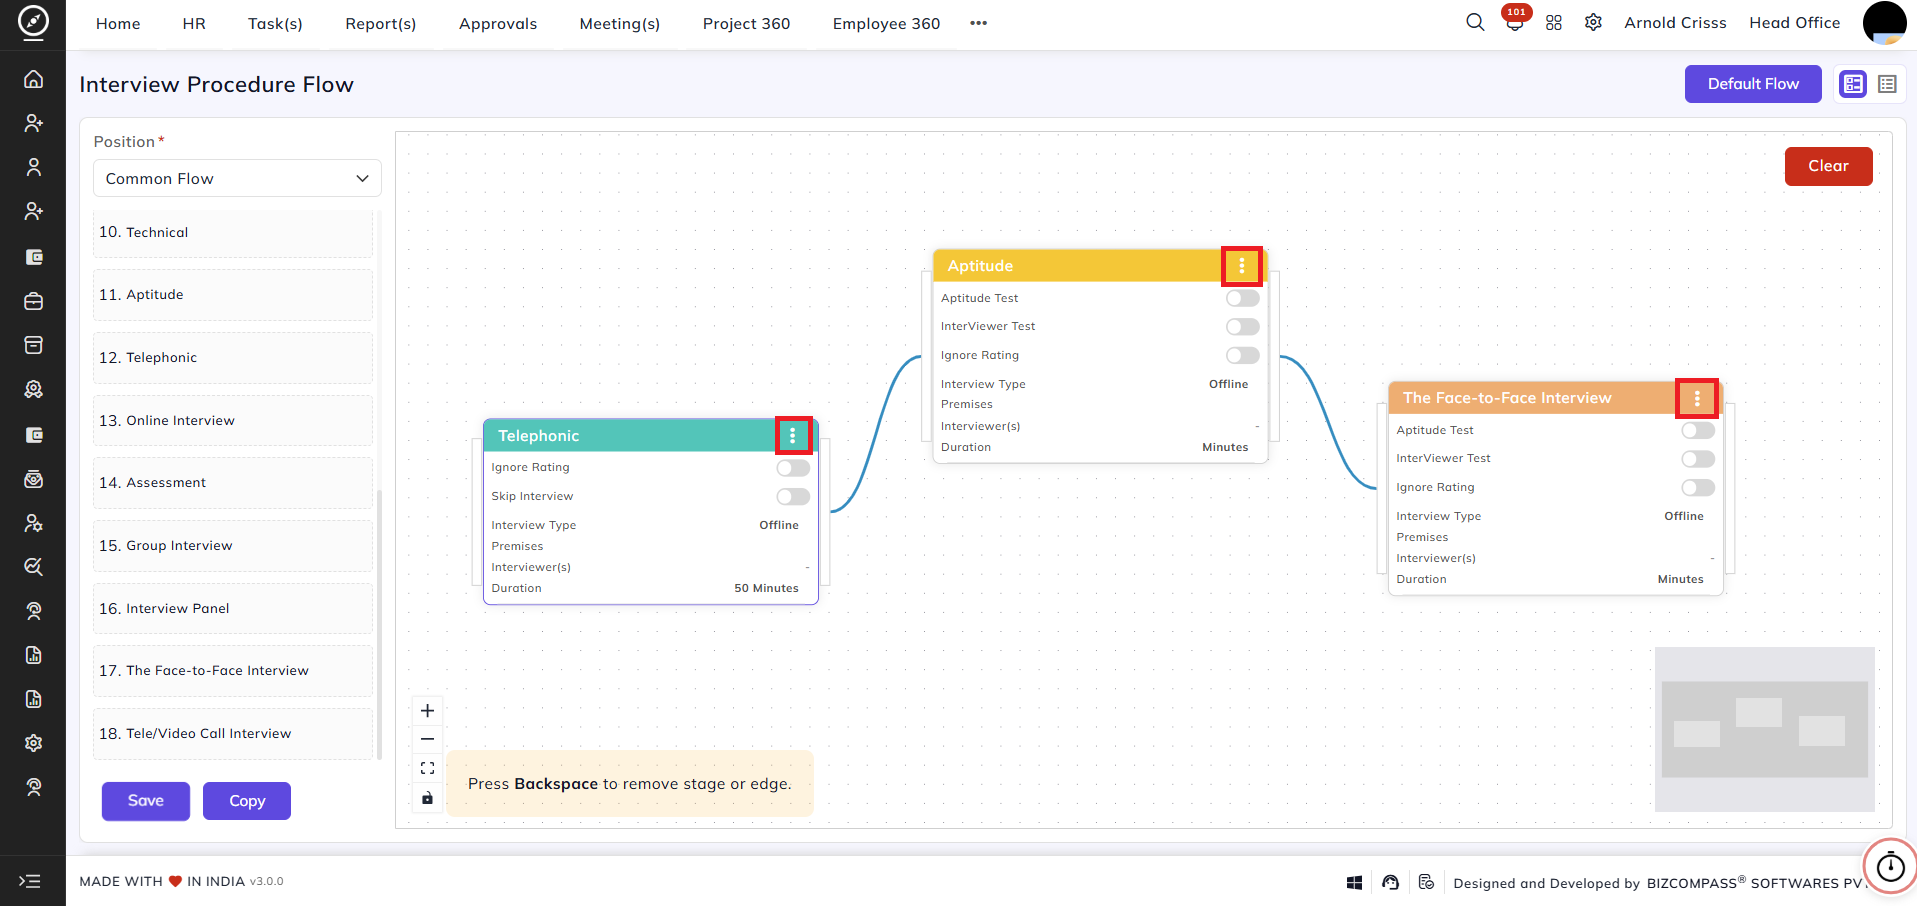
Stage Options in Workspace / Canvas:
After adding a stage to the workspace, certain options become visible based on how the stage was configured.
Note: Only three options are visible based on stage configuration. Other options are common for all stages.
Options based on stage configuration include:
- Skip Interview
- Interview Timer (Timer)
- Aptitude Test
- Ignore rating
Stage Configuration in Workspace / Canvas:
Some options are visible directly on the stage card, while other configurations are available in the three-dot menu.
These configurations apply only to the selected stage in the current flow.
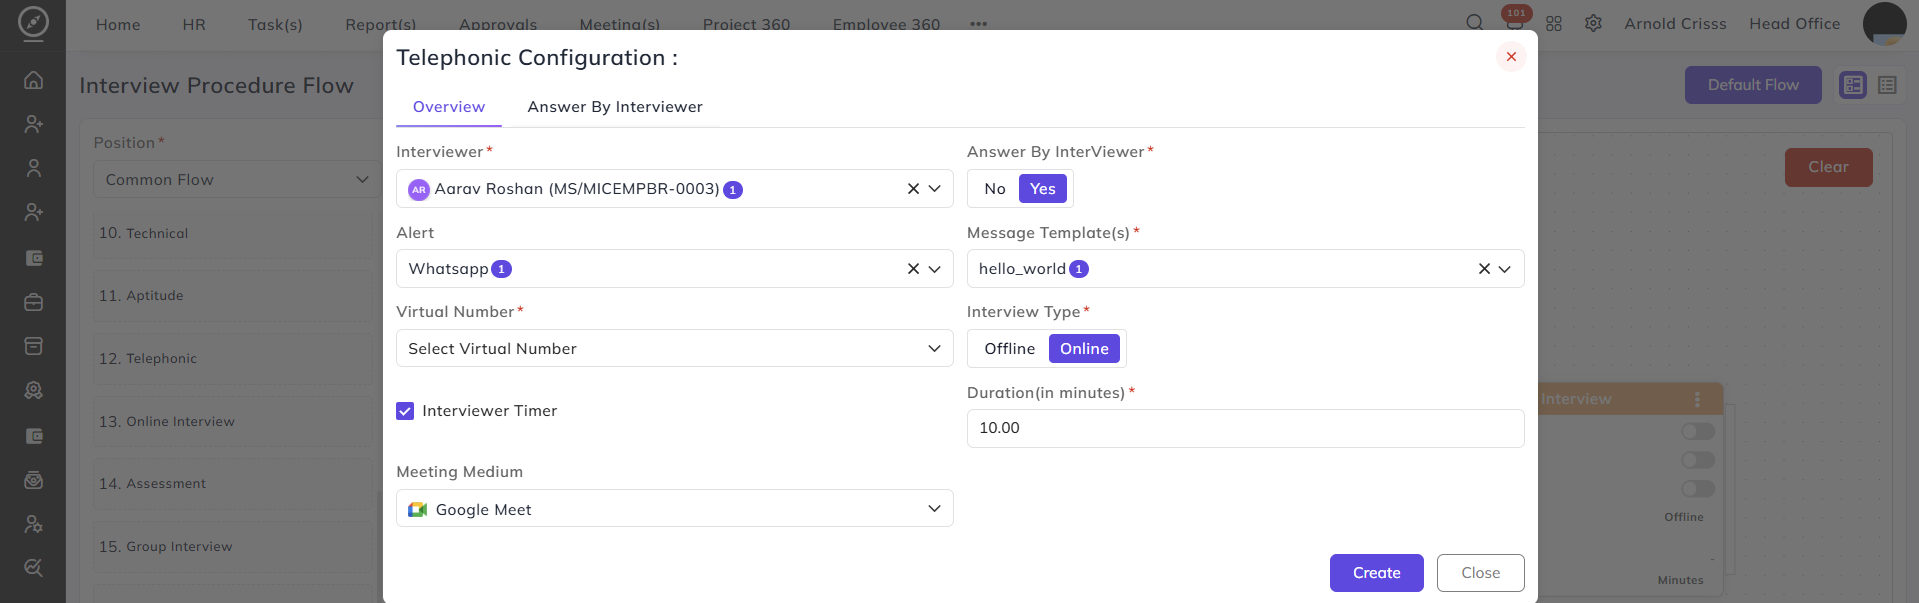
To configure an interview stage:
-
Select the Interviewer(s)
-
Select the Interview Type
Interview types include:
-
Offline – Select the premise
-
Online – Select the meeting medium (optional)
Online meetings can also automatically generate meeting links through Google or Microsoft integration.
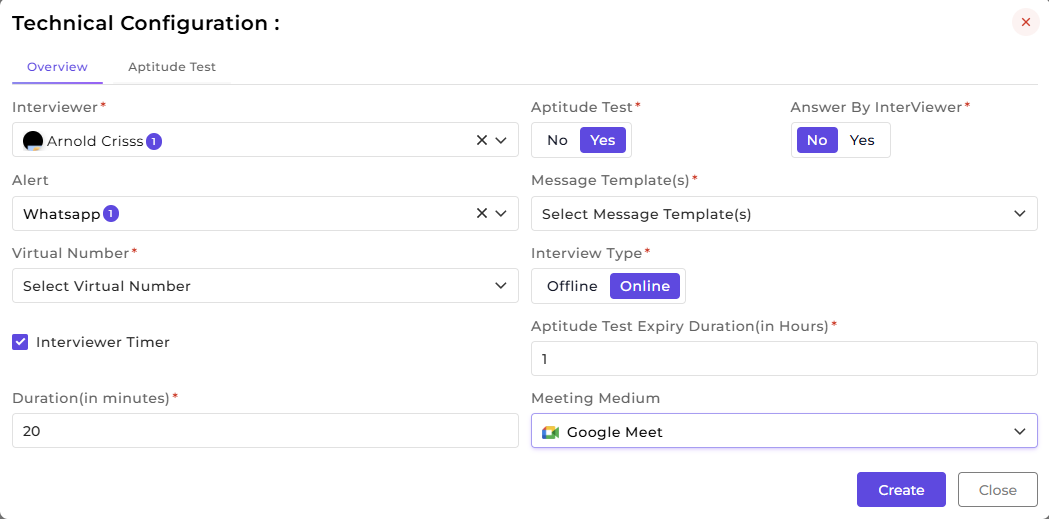
Duration:
Define the Duration, which represents the total time allocated to complete that interview stage.
Additional configurations can be applied depending on the organization’s requirements.
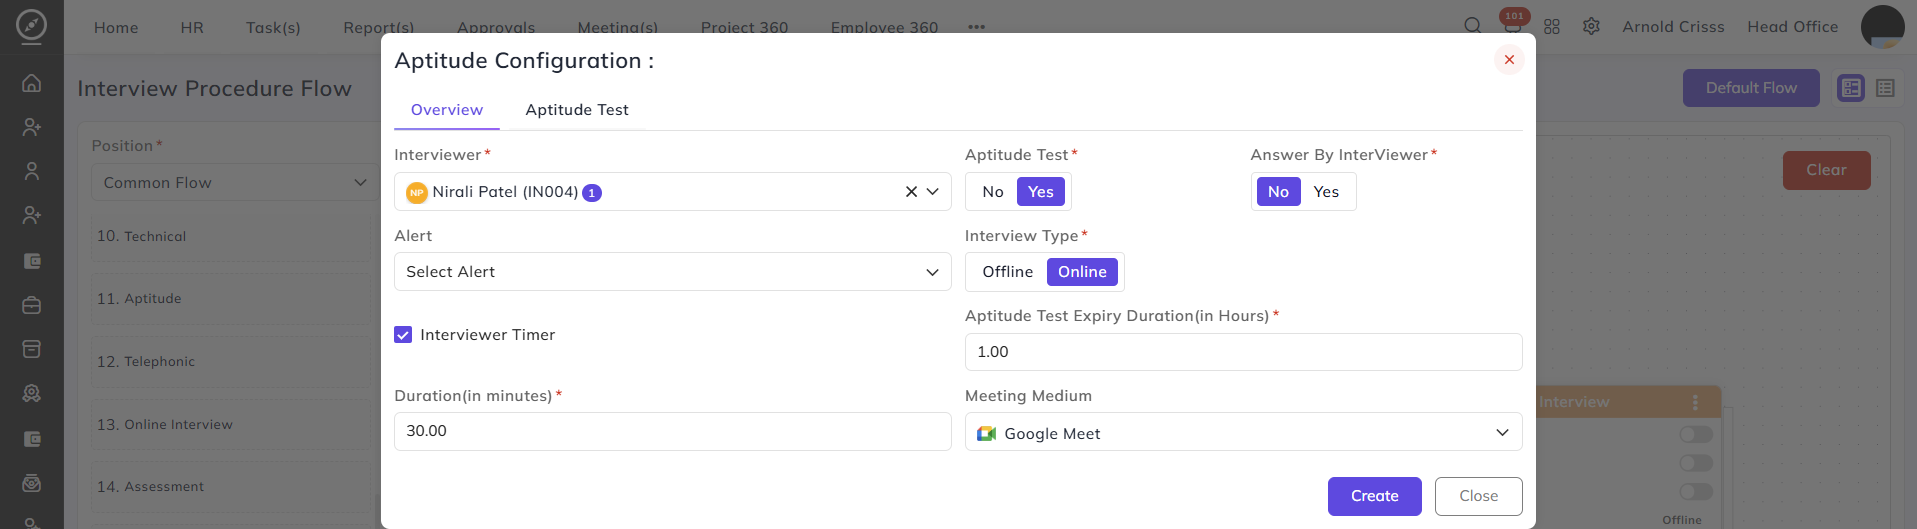
When clicked on the three dots of any stage in the Interview Procedure Flow (for example, Telephonic), a Stage Configuration screen opens. This screen is used to define detailed settings for that specific interview stage.
Skip Interview Option:
If the stage can be skipped during the interview process, enable the Skip Interview option.
Note: This option allows skipping the stage only during interview scheduling or at the time of the interview.
Ignore Rating:
If the Ignore Rating option is enabled, the interviewer will not be required to provide a rating for that stage's comment. The stage can be completed without assigning any rating.
By connecting and configuring stages sequentially, the complete interview procedure flow can be created. By clicking on the three dots of any stage, it can be configured.
Aptitude Test Configuration:
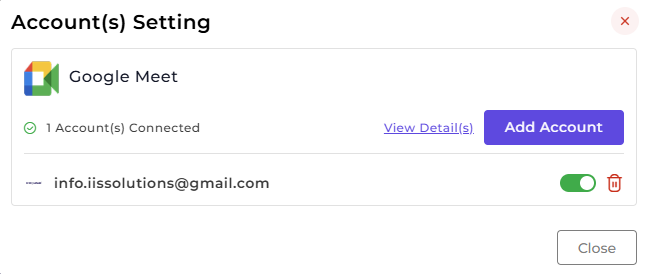
If you want to configure Aptitude Test, you first need to integrate your account into a meeting medium like Google Meet or Microsoft Teams for sending meeting link by navigating to the Integration page.
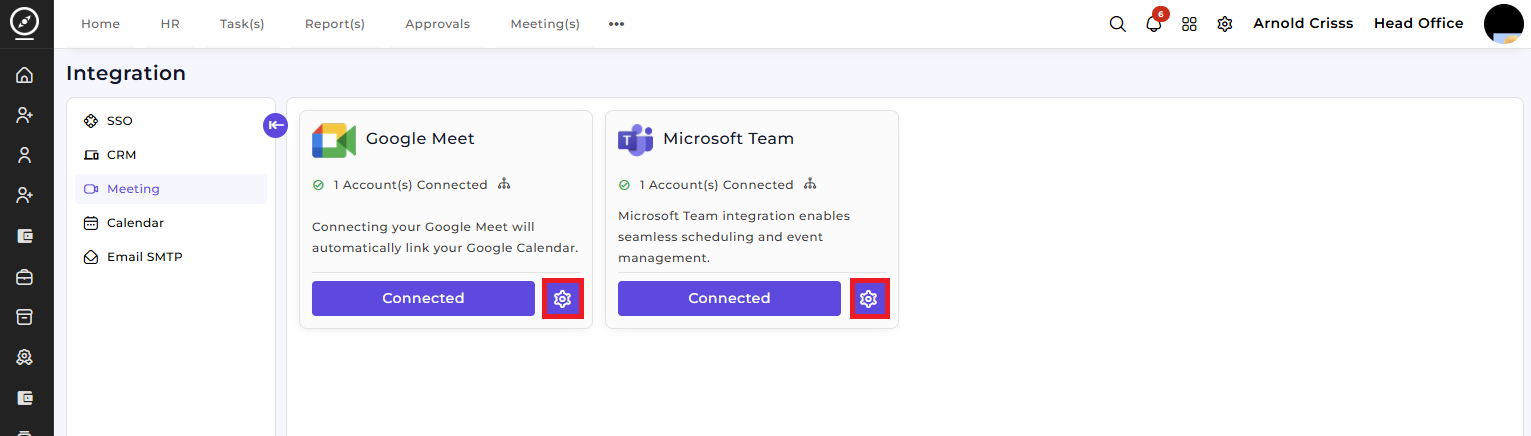
By clicking on the Settings button shown above, you can add another account into a meeting medium.
Then you can configure any stage that has to be completed online.
Then,
-
Enable the Aptitude Test option
-
Open the three-dot menu
-
Go to the Aptitude tab (next to Overview)
-
Configure the questions
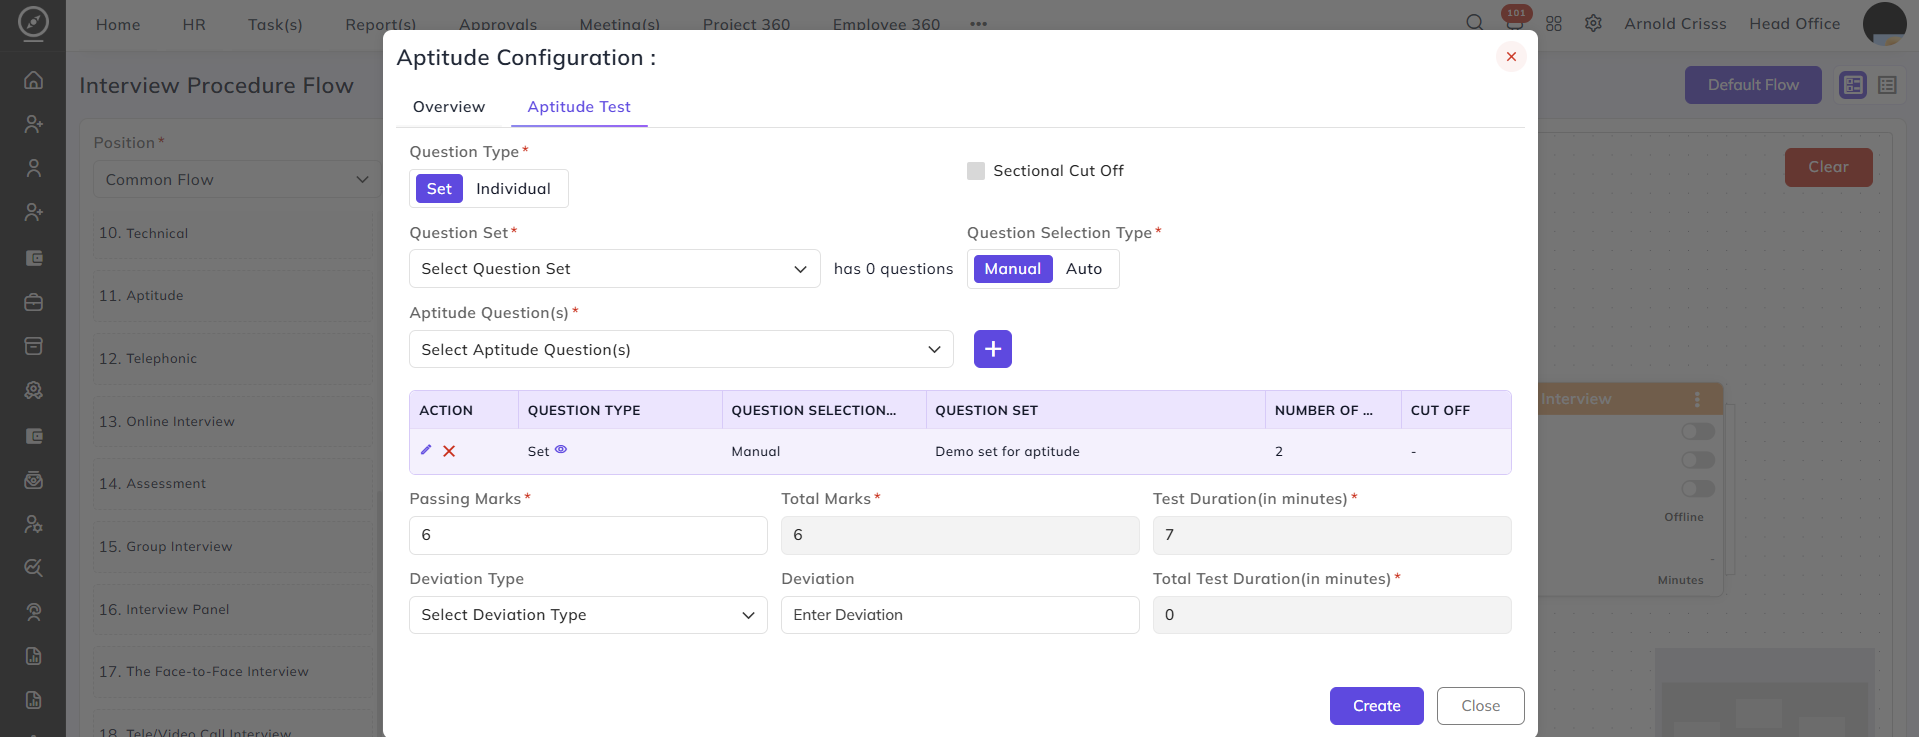
Interview Questionnaire:
If the organization wants the interviewer to answer mandatory questions during the interview, those questionnaires can be configured here.
To enable this:
-
Select Answer by Interviewer from the Overview tab or directly from the stage card
After enabling it, the interviewer will be required to answer the configured questions while conducting the interview.
The organization can select entire question sets or individual questions depending on the recruitment requirement.
Selecting Question Sets:
Select the Question Set from the list created in the Question Set page.
After selecting the set, the organization can define a Sectional Cut Off if required.
Question Selection Methods:
Two methods are available for selecting questions from a set:
1. Manual Selection:
In Manual Selection, the organization can manually choose specific questions from the selected set.2. Auto Selection:
In Auto Selection, the organization can:
Define the number of questions to be selected automatically
The system selects questions from the total questions available in the set
Managing Questions in a Set:
Each question set contains an info button (🛈) next to the word Set in the table. Using this option, the organization can configure the questions inside the set.
Selecting Question Sets:
For Opening Question Sets, the Info option allows the organization to:
Select or deselect questions
Mark whether a question is required
Interview Question Sets:
For Interview Question Sets, the info option allows the organization to:
Select or deselect questions
Update the time required to answer each question
Modify the passing points if available
Aptitude Test Question Sets:
For Aptitude Test Question Sets, the Info option allows the organization to:
Select or deselect questions
Update passing points if applicable
Duplicate Questions:
If two different question sets are selected, and a question appears in both sets, the system shows a warning icon (⚠) next to that question. This helps identify duplicate questions across sets.
Passing Marks and Deviation:
Below the question table, there are fields to configure- Deviation and Total Passing Marks.
Deviation Type:
Deviation defines extra time allowed during the test.Two types are available:
1. Fixed Deviation: A fixed number of extra minutes is added to the total test time.
2. Percentage-Based Deviation: Extra time is calculated as a percentage of the total time of all selected questions and question sets.Passing Marks:
If the Question Selection Type is Manual, the organization can define the total passing marks required to clear the test. This determines whether the candidate has successfully passed the opening screening stage.
Note:
Changes made to the interview flow do not affect already created applications.
If the organization wants to run an application based on the newly updated flow, they must either:
Re-approach the candidate, or
End the current follow-up and create a new application.
Similarly, configure all the stages. Make sure to click on the Save button after designing and configuring the Interview Procedure Flow.
The Interview Procedure Flow ensures a structured and efficient interview process. This ensures that the entire interview process remains organized, scalable, and aligned with recruitment goals.