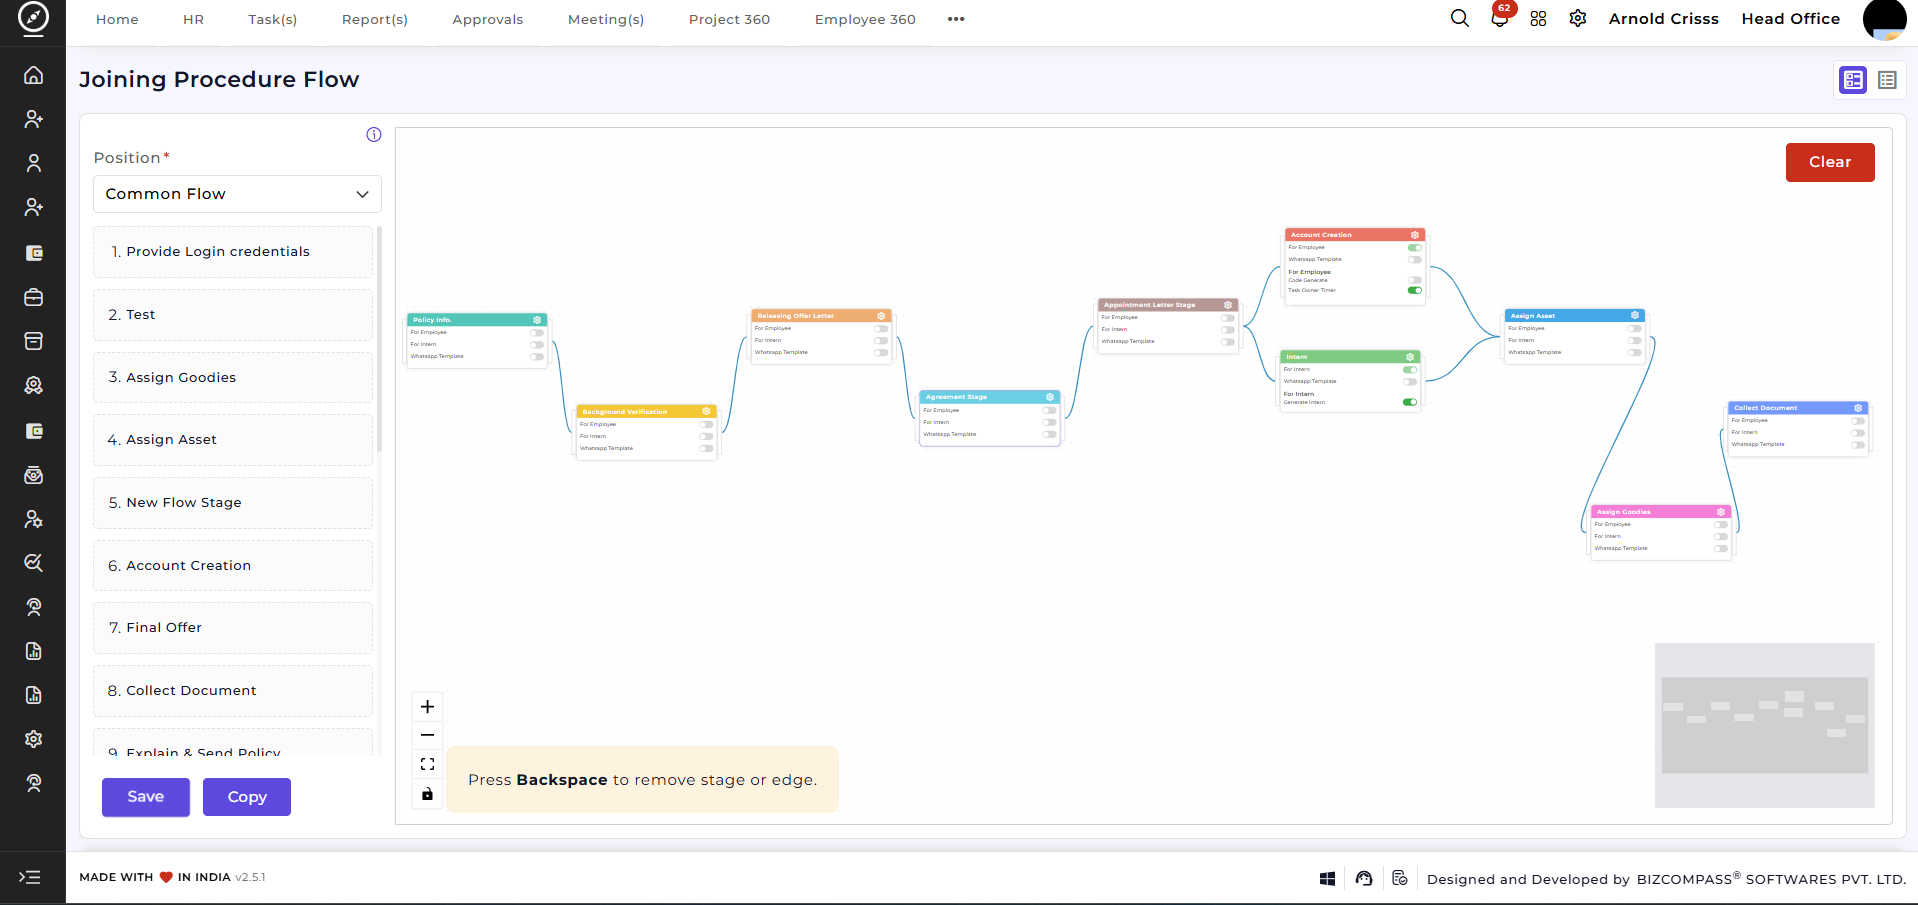
Joining Procedure Flow
The Joining Procedure Flow defines the complete onboarding journey for a candidate after selection. It provides a dynamic visual workflow builder.
Using allowsthis HR teams to design, configure, and manage every step involved inflow, the employeeorganization joining process in a structured and sequential manner.
Designing Joining Procedure Flow:
Select a Position / Flow (for example, Common Flow).can:
-
ViewSendall onboarding stages arranged visually from start to end.policies -
EachGivestagejoiningrepresents a specific onboarding activity.goodies -
StagesGenerateare/connectedacknowledge / send letters toclearly define the execution order.candidates -
UseCreateSaveEmployee, Intern, Apprentice, Trainee, or Consultant records -
Assign assets
-
Collect documents
-
Perform background verification
Flow Selection:
On the left-side panel, Copy,the ororganization Clearcan:
-
manageSelect the
flow.Opening -
Select the Stages
The leftflow panelcan listsbe allsaved availableand stages,also whilecopied thefor mainanother canvas shows the connected onboarding workflow.opening.
are Customizabletwo Stages:
The joining process consiststypes of multipleflow configurable stages, such as:creation:
-
ExplainCreate&aSendCommonPolicyFlow for all openings -
BackgroundCreateVerificationa Separate Flow for each Opening, so that the opening follows its own flow instead of the common flow
If an opening is selected from the left side and no flow is visible, it means the opening is following the common flow.
If a flow is created for an opening and the organization wants it to follow the common flow again, click the Clear button available in the workspace/canvas.
Steps to Create a Flow:
All stages created in the Joining Stage Setup will be visible here.
To perform any action in a stage:
-
That stage type must be used in the workspace/canvas
-
IssuingTheOfferrequired/optionAppointmentmustLettersbe enabled in that stage
Once the option is enabled in the joining stage, it can be used for Intern Flow or Employee Flow.
A single stage can be used for both Employee and Intern.
For Intern-to-Employee transition flow, select the Repeat option.
-
First, the flow will execute for the Intern
-
conversionAccountDuringCreationto - Employee,
theAssignonlyAssetstages - with
RepeatAssigntheGoodiesoption - enabled
executeCollectwillDocuments Final Offer Confirmationagain
These stages are fully customizable and can be created or managed separately, allowing organizations to adapt the onboarding flow to their internal processes without changing the workflow structure.
Visual Workflow Builder:
The visual builder allows administrators to:
Add onboarding stages to the flowConnect stages to define execution orderRearrange stages as requiredRemove stages or connections easilyClearly visualize the entire joining process in one screen
This ensures transparency and clarity across all onboarding steps.
Stage Configuration:
Clicking on the Settings icon of any stage will open its stage configuration in which you can specify the task owner, employee, task completion details and setup reminder emails.
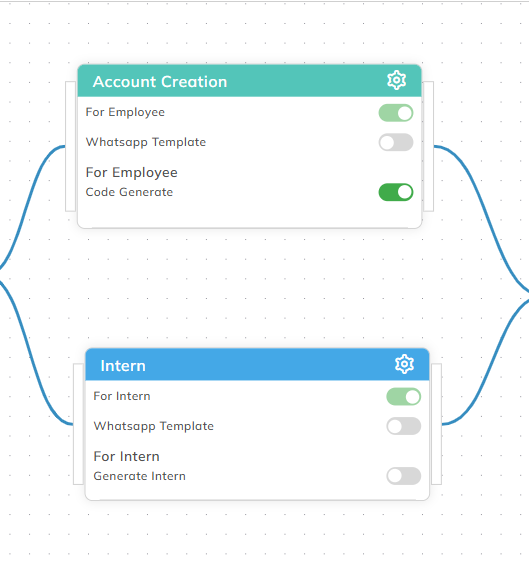
Generate Intern:
Used to create an Intern record.
Enable this option if the flow is used for Intern onboarding.
Code Generate:
Used to create an Employee record.
Enable this option if the flow is used for Employee onboarding.
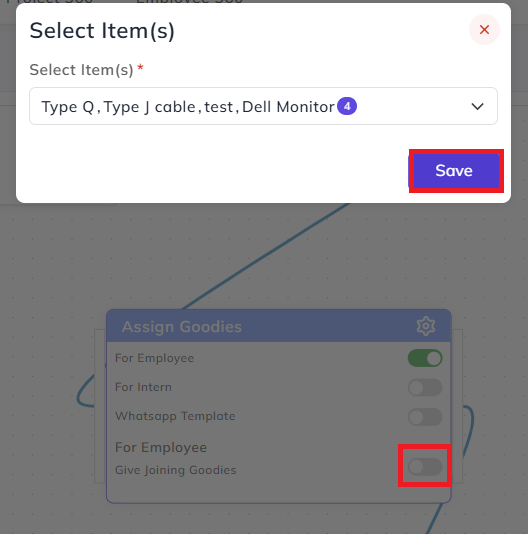
Give Joining Goodies:
Enable this option to provide joining goodies.
Only consumable items will be visible for selection.
Task Owner Timer:
Enable this option if the recruiter or task owner needs to track time spent on that stage.
This can also be updated from the (🛈) Info button.

Introduction Email:
Enable this option to send an introduction email to the candidate.
-
Select the Email Template
-
Configuration can also be updated using the (🛈) Info button
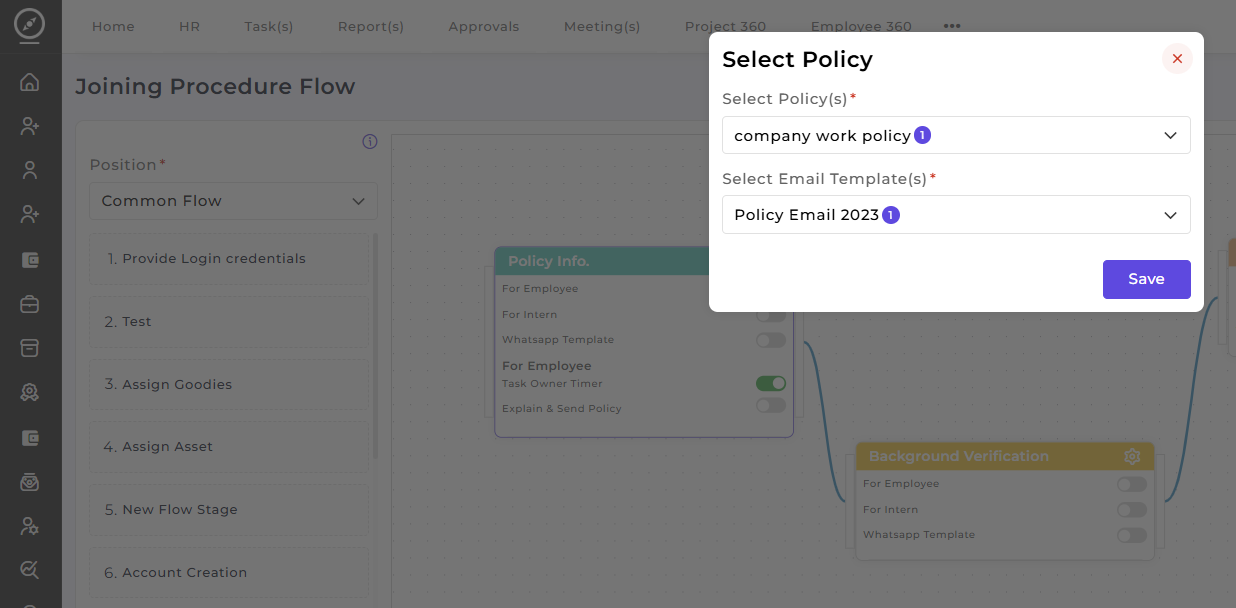
Explain and Send Policy:
Enable this option to send policies via email.
Configuration includes:
-
Select the Policy
-
Select the Email Template
This can also be updated using the (🛈) Info button.
You can specify if any stage applies to employee, intern or both by checking the flag options. Enable the Task Owner Timer flag if you want to apply the stage configurations you made in the above step to this stage.
PolicyDocument Info.:Collection:
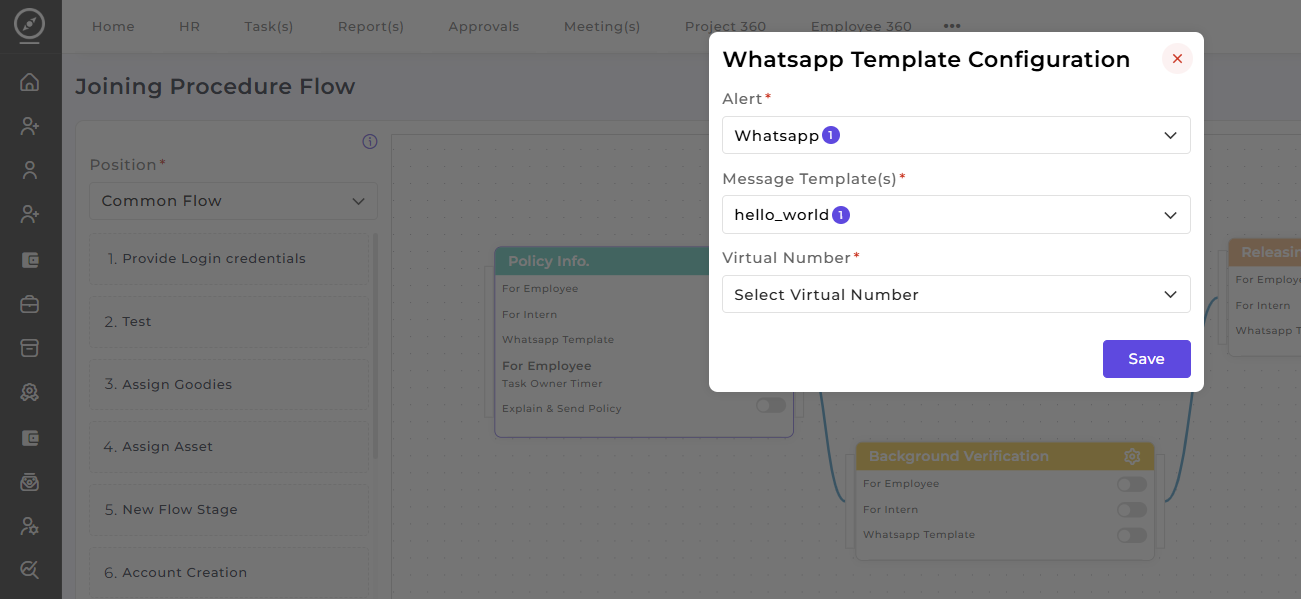
Enable and configure the WhatsApp Template button if you want to send alert on WhatsApp.
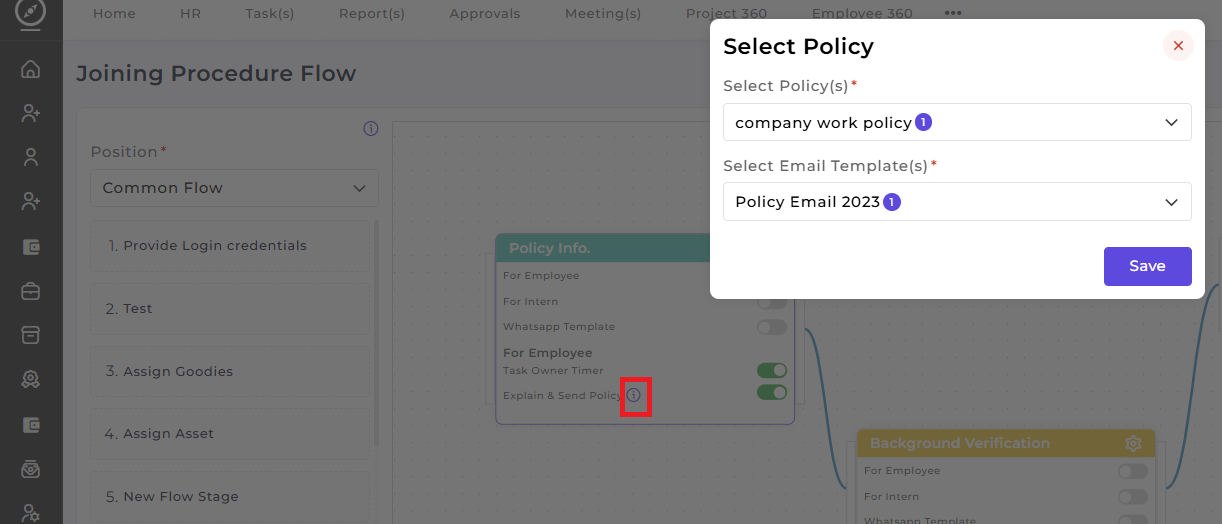
After enabling the Explain and Send Policy button, you can select the applicable policies and email templates for sending that policy to the employee/ intern.
You can also edit the selected policy by clicking the eye button as shown below:
Background Verification:
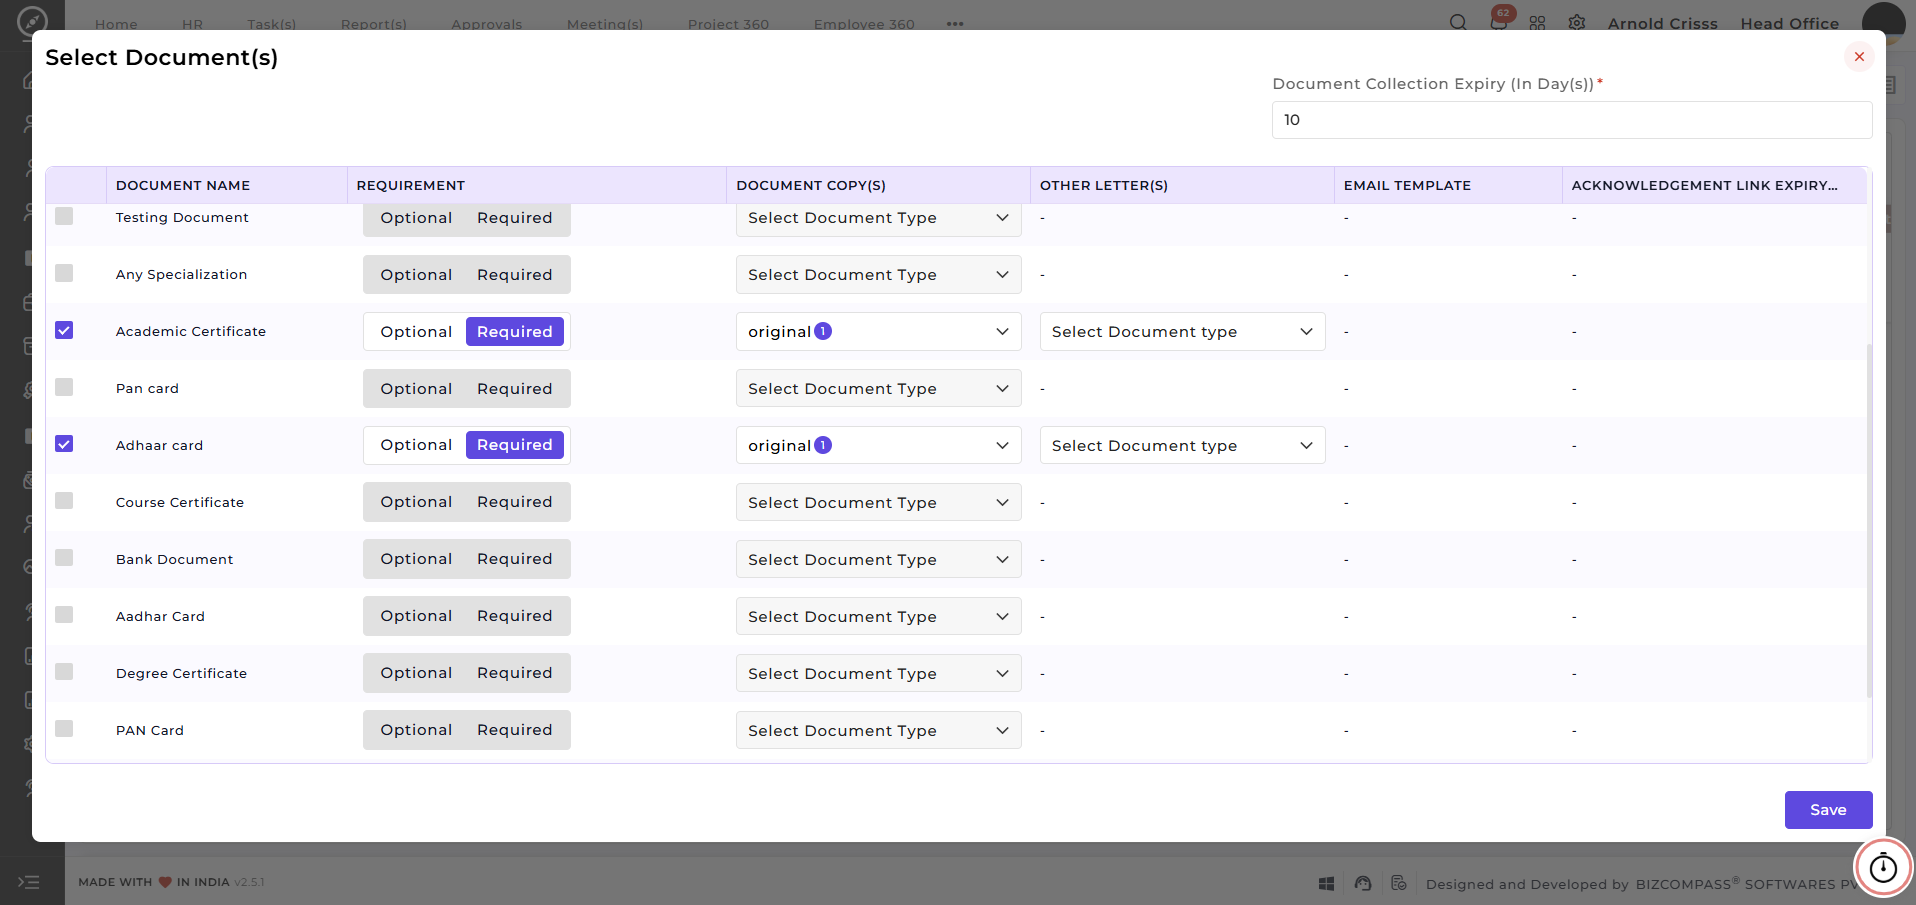
Same way, for this stage, enable the Document Collection button to select the required documents to be collected from the employee/ intern.
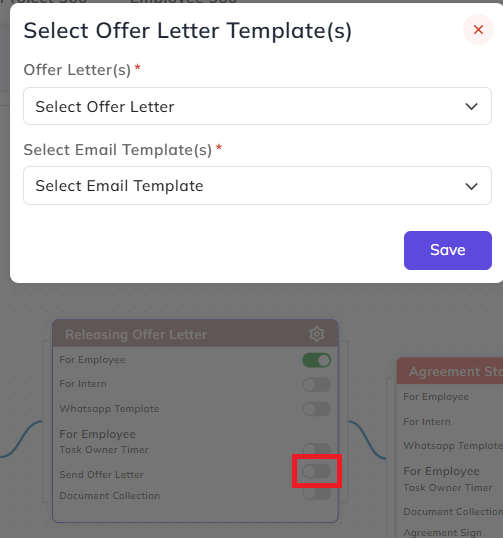
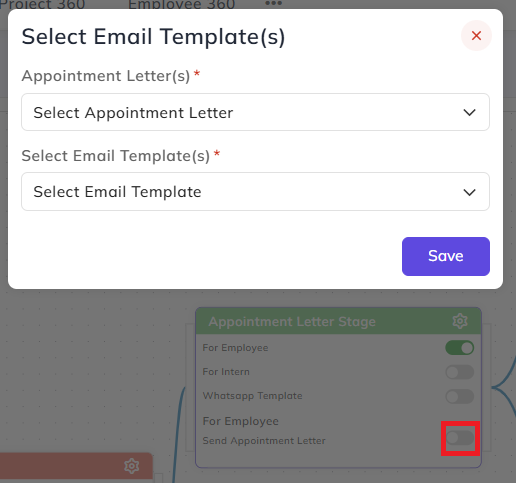
Same way, enable the options Send Offer Letter, Agreement Sign, and Send Appointment Letter for their respective stages to select the necessary letters.
For Account Creation and Intern stages, enable the Code Generate and Intern Generate options. Similarly, configure the remaining stages.
The stage-level configuration ensures flexibility and precision in the onboarding process. This ensures a streamlined, adaptable, and well-controlled joining process aligned with organizational requirements.
==================================
Joining Procedure Flow
The Joining Procedure Flow is used to define the joining or onboarding procedure for the organization’s recruitment flow.
Using this flow, the organization can:
SendpoliciesGivejoining goodiesGenerate / acknowledge / send lettersto candidatesCreateEmployee, Intern, Apprentice, Trainee, or Consultant recordsAssign assetsCollect documentsPerformbackground verification
Flow Selection
On the left-side panel, the organization can:
Select theOpeningSelect theStages
The flow can be saved and also copied for another opening.
There are two types of flow creation:
Create aCommon Flowfor all openingsCreate aSeparate Flow for each Opening, so that the opening follows its own flow instead of the common flow
If an opening is selected from the left side and no flow is visible, it means the opening is following the common flow.
If a flow is created for an opening and the organization wants it to follow the common flow again, click the Clear button available in the workspace/canvas.
Steps to Create a Flow
All stages created in the Joining Stage Setup will be visible here.
To perform any action in a stage:
Thatstage type must be used in the workspace/canvasTherequired option must be enabled in that stage
Once the option is enabled in the joining stage, it can be used for Intern Flow or Employee Flow.A single stage can be used for both Employee and Intern.
For Intern-to-Employee transition flow, select the Repeat option.
First, the flow will execute for theInternDuring conversion toEmployee, only the stages with theRepeat option enabledwill execute again
Stage Options
Generate Intern
Used to create an Intern record.Enable this option if the flow is used for Intern onboarding.
Code Generate
Used to create an Employee record.Enable this option if the flow is used for Employee onboarding.
Give Joining Goodies
Enable this option to provide joining goodies.Only consumable items will be visible for selection.
Task Owner Timer
Enable this option if the recruiter or task owner needs to track time spent on that stage.
This can also be updated from the (🛈) Info button.
Introduction Email
Enable this option to send an introduction email to the candidate.
Select theEmail TemplateConfiguration can also be updated using the(🛈) Info button
Explain and Send Policy
Enable this option to send policies via email.
Configuration includes:
Select thePolicySelect theEmail Template
This can also be updated using the (🛈) Info button.
Document Collection
If the organization wants to collect documents, configure the following:
-
Whether the document is Required or Optional
-
Whether the document should be Original or Xerox
If the document is marked as Original:
-
Another letter can be sent using an Email Template
-
Link expiry days can be defined for agreement signing
The system also allows:
-
Sending a document collection link
-
Setting default expiry days
These options are available from the top-right side.
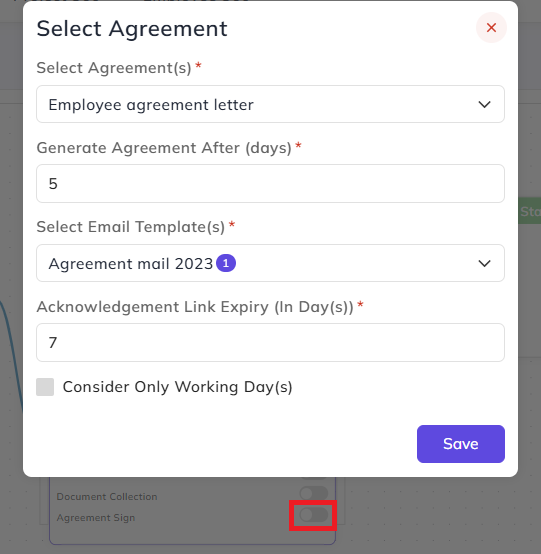
Agreement Sign
Sign:
Enable this option if the organization requires an agreement signing process.
Configuration includes:
-
Select the Agreement Letter
-
Set Reminder/Event days for agreement generation
-
Option to consider only working days
-
Set Acknowledgement Link Expiry Days
-
Select the Email Template
If the Agreement Letter contains a Document Tag, and the organization wants to attach documents:
-
Select the documents that were collected during the Document Collection Stage
-
Attach them to the Agreement Letter
Letters
Letters:
Send Offer Letter
Letter:
Used to generate and send the Offer Letter.
Configuration includes:
-
Select the Letter
-
Select the Email Template
-
Set Acknowledgement Link Expiry Days
Send Appointment Letter
Letter:
Used to generate and send the Appointment Letter.
Configuration includes:
-
Select the Letter
-
Select the Email Template
-
Set Acknowledgement Link Expiry Days
Send Other Letter
Letter:
Used to generate and send other types of letters.
Configuration includes:
-
Select the Letter
-
Select the Email Template
Other Options
Options:
Asset Allocate
Allocate:
Enable this option to assign assets to the employee during the joining process.
Assign Training
Training:
Enable this option to assign training programs.
Configuration includes:
-
Training assigned based on Department
-
Select the Number of Trainings
Survey
Survey:
Used for Background Verification.
Configuration includes:
-
Select a Form with type Background Verification
-
Set Form Submission Limit
Common Configuration (Gear Icon on Stage Card)
:
From the top-right Gear Icon, reminders can be configured for the Task Owner.
The Task Owner can be:
-
Candidate
-
Employee
-
User Role (Employees assigned to that role)
-
Application Assignee (Recruiter)
-
Department (Employees in that department)
-
Sub Department (Employees in that sub-department)
Reminder Configuration
Configuration:
The organization can send reminders:
-
Before Joining Date
-
After Joining Date
Additional reminders can also be sent to the Assignee (Recruiter):
-
Before Due Date of the Stage
-
After Due Date of the Stage
Example:
If 10 days are given to complete the Agreement Process, reminders can be sent:
-
Before the Due Date
-
After X days, at a selected time
If the stage includes Agreement Sign, reminders can also be configured for the Candidate.
Flow Execution
Execution:
By configuring and connecting stages sequentially, the Joining Procedure Flow can be created.
NoteNote:Changes made in the flow do not affect already created applications.
If the organization wants to run the flow based on the new configuration:
Delete all follow-ups until the Interview Stage
Select the candidate again
Run the flow again
This should be done only if required. Otherwise, it is recommended to create a new application.
During deletion of follow-ups, the system may ask whether to:
Delete Employee
Deactivate Employee
Do Not Delete Employee (if the employee record is already created)