Clock In-Out, Log Regularizations & Attendance
Clocking In:
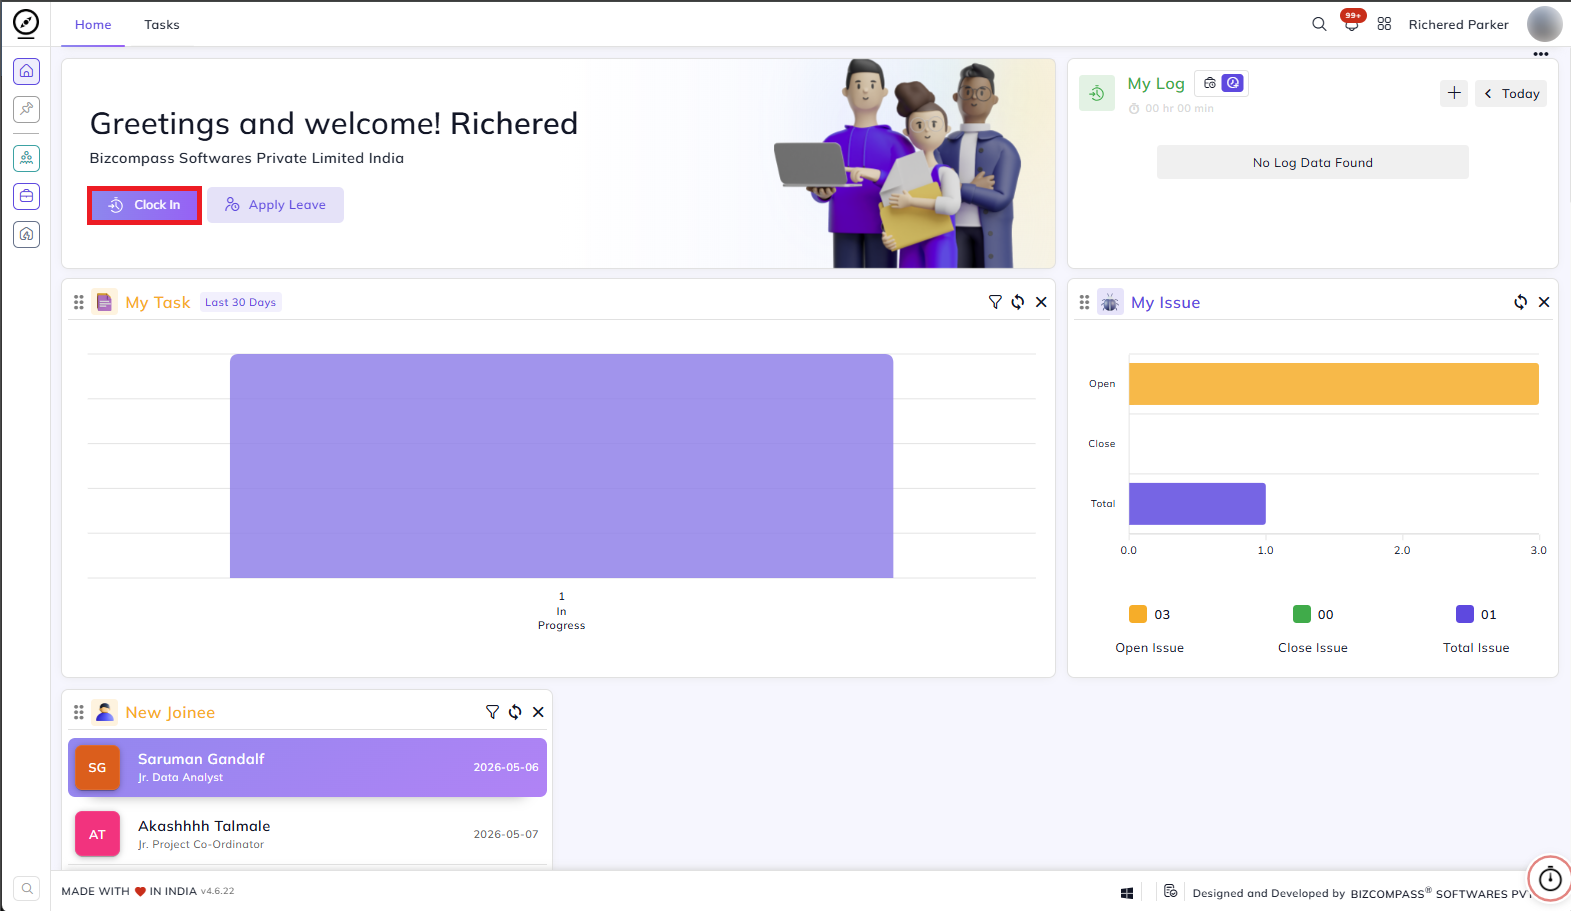
To start your workday, click the Clock In button on the Home page.
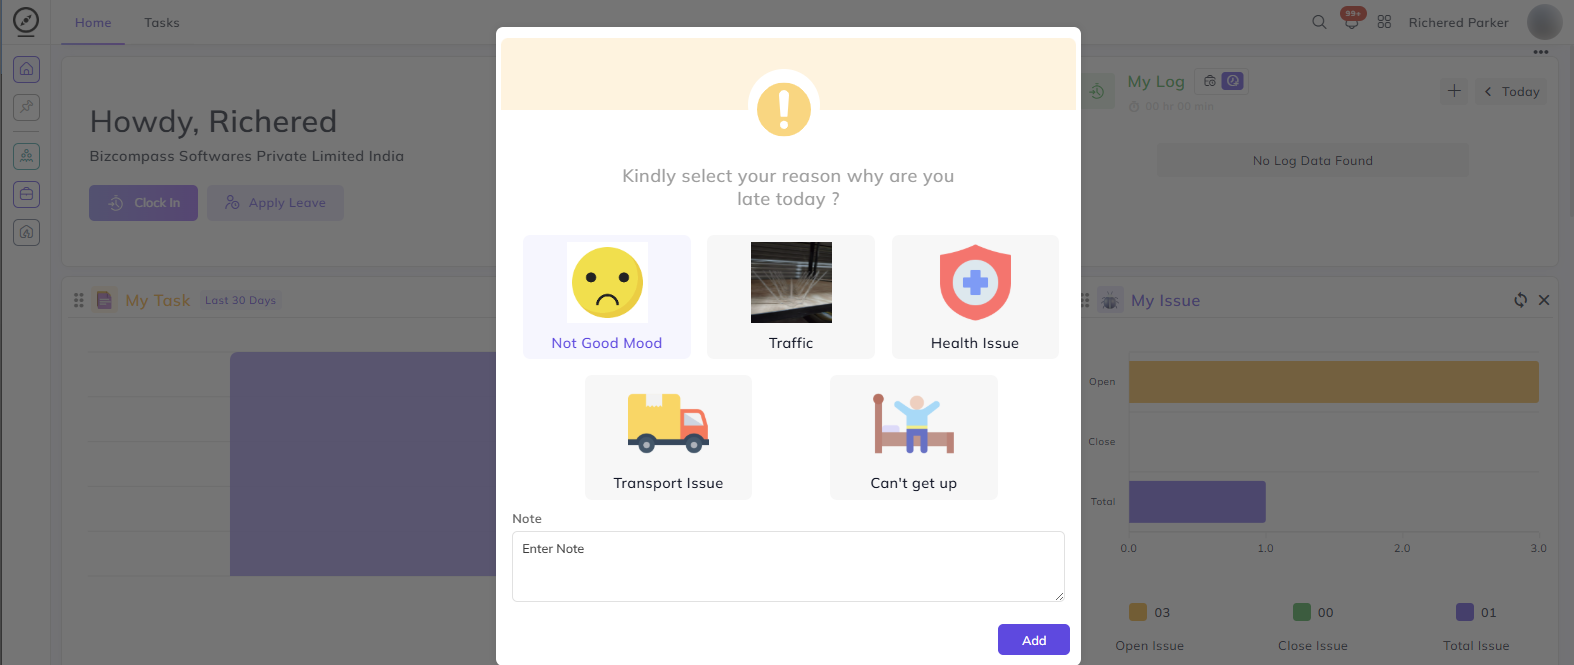
If you're arriving late, a popup will appear asking you to select a reason. Choose whichever applies to you — Not Good Mood, Traffic, Health Issue, Transport Issue, or Can't Get Up — add an optional note, and click Add. This gets recorded along with your log for the day.
Once you've clocked in, you'll notice the page updates — the Clock In button is replaced with Clock Out and Break In, and your log entry appears in the My Log panel on the right.

A Valid Location badge means your location was successfully verified when you logged in.

A log entry marked Late Arrival means you clocked in after your scheduled shift start time. This is automatically flagged based on your shift configuration and is recorded against your attendance for that day.

Taking a Break:
When you step away during your shift, click Break In to record your break. When you're back, clock back in to resume. Break hours are automatically excluded from your total worked hours so your records stay accurate.
Note: Break In/Out options are only visible if the Break In/Out field is enabled in the Shift of the employee by the organization.


Clocking Out:
At the end of your day, click Clock Out to close your attendance for the day.

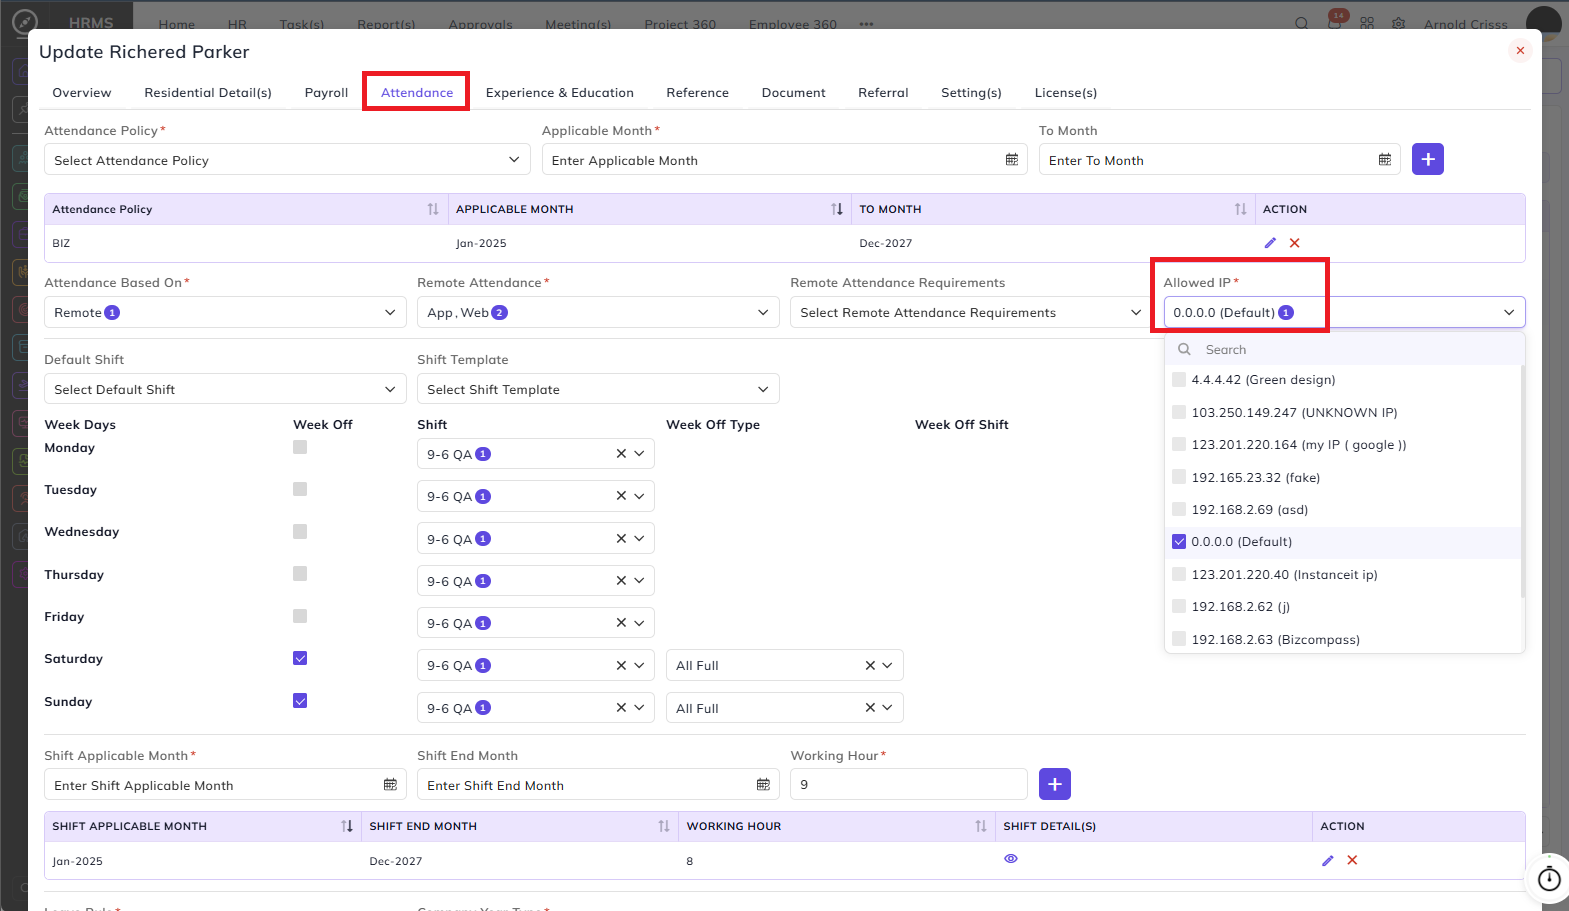
Clocking In from Outside Your Allowed Location or IP:
Your organization may restrict attendance to specific locations or IP addresses. If you clock in from outside these allowed ranges, your log entry will still be recorded but will be highlighted in yellow in the My Log panel, indicating it is pending approval from approved person. Once approved, it will reflect normally in your attendance record.
If your browser was unable to detect your location at all while you were clocking in, the entry will be flagged as an invalid location.

In this case, reach out to your administrator to ensure your IP address has been added to the allowed IP list in your attendance settings.
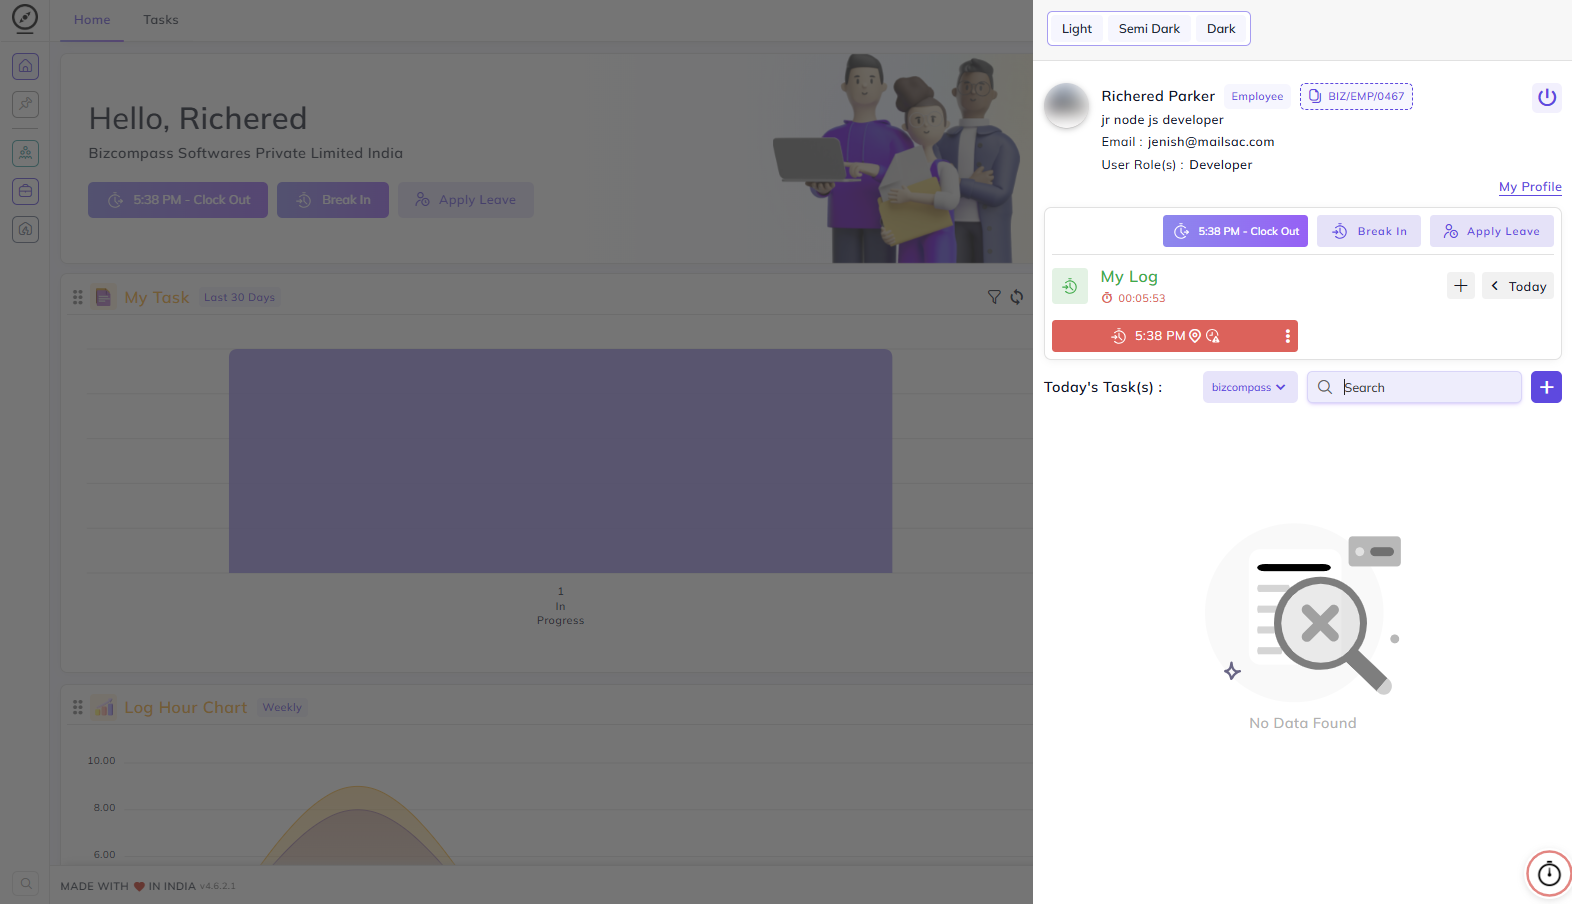
My Log Panel:
The My Log panel on the right side of your Home page shows your attendance entries for the day. You can use the arrow buttons to look at logs from previous dates.
At the top of the panel, you'll see two display options:
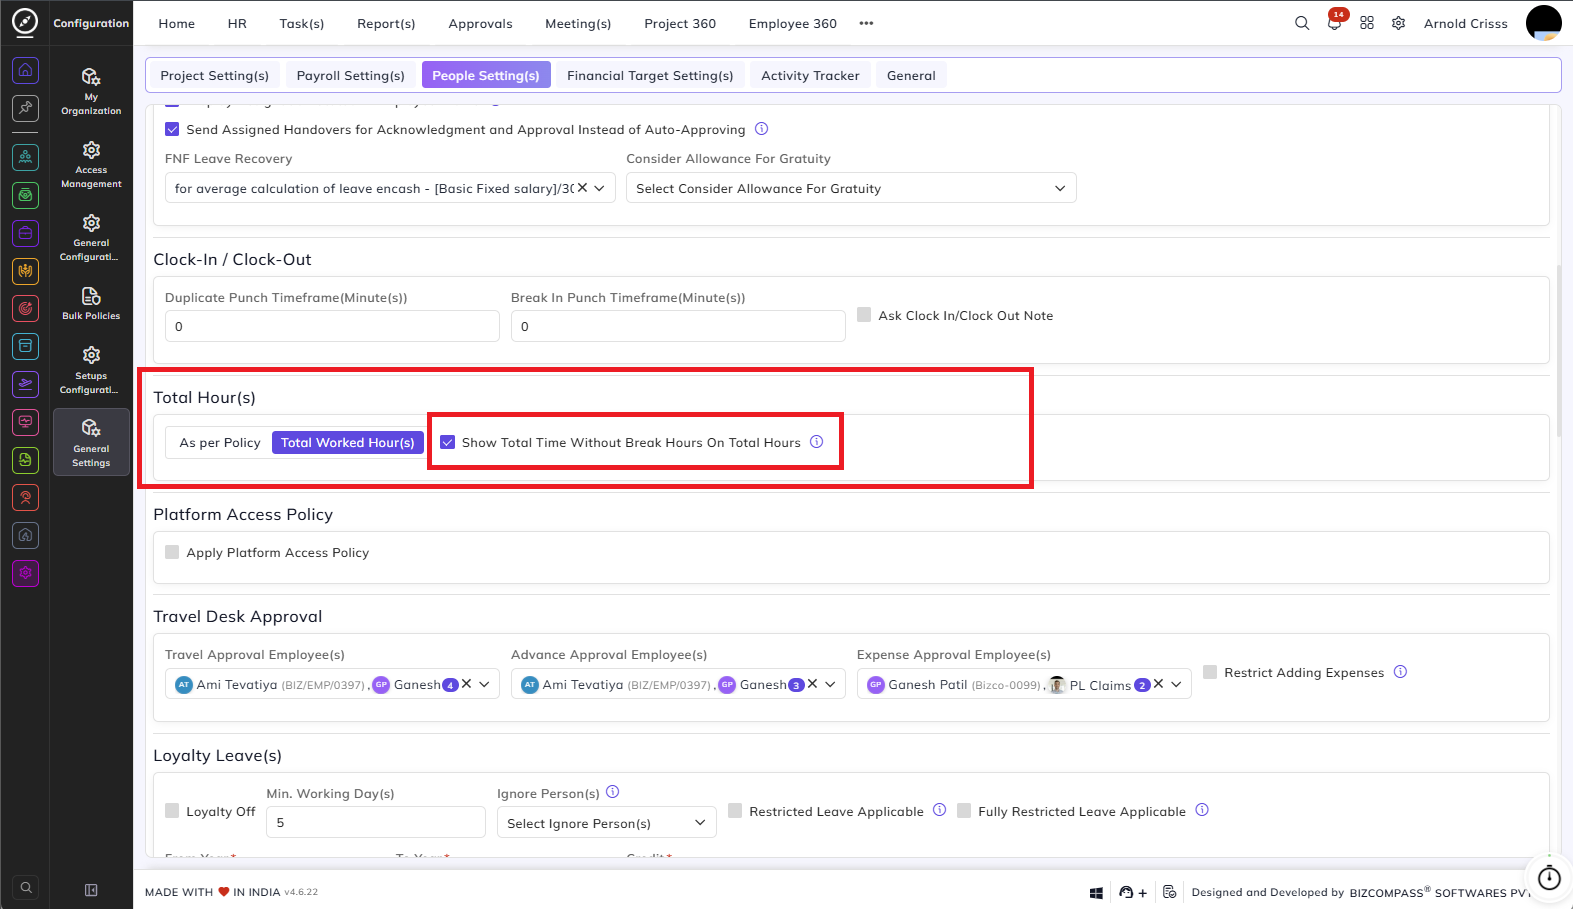
As per Policy shows the total shift hours defined for you — essentially, how long your workday is supposed to be according to your shift.

Total Worked Hour(s) shows the actual hours you've worked so far today, not counting any break time.

You can switch between these two views to get a clearer picture of your attendance.
If your company has the Show Total Time Without Break Hours On Total Hours disabled for the views As Per Policy and Total Worked Hour(s), your Total Worked Hour(s) will show hours you've worked counting break time.
Adding a Missing Log (Log Regularization):
If you forgot to clock in or clock out at some point, you can add a missing log entry for a past or present day using Log Regularization. Click the three-dot menu on any log entry in the My Log panel and select Apply Log Regularization.
Fill in the following details:
- Log Date: The date and time you want to add the log for.
- IN / OUT: Select whether this is a clock-in or clock-out entry.
- Previous Date: Turn this on if the log belongs to the previous day.
For e.g., if an employee has a shift of 9:00 p.m. to 6:00 a.m. and he clocks out at 6:00 a.m., it means he is clocking out next day. But in reality, he was present on the previous day when he clocked in at 9:00 p.m. In this case, the employee can select Previous Date while applying log regularization so that log will be considered for the previous day.
- Break In/Out: Turn this on if this entry is for a break.
- Reason: Select the reason for the regularization.
- Note: Add any additional context if needed.

Depending on your organization's settings, this will require approval before it reflects in your attendance record.
Editing an Existing Log:
If a log entry already exists but has the wrong time or details, you can edit it directly. Click the three-dot menu on the log entry and select the edit option. Make your corrections and save. Just like regularization, edits may require approval based on your organization's configuration.

Deleting a Log:
If a log entry was added by mistake and needs to be removed, click the three-dot menu on that entry and select the delete option. A confirmation dialog will appear asking you to select a reason for the deletion.

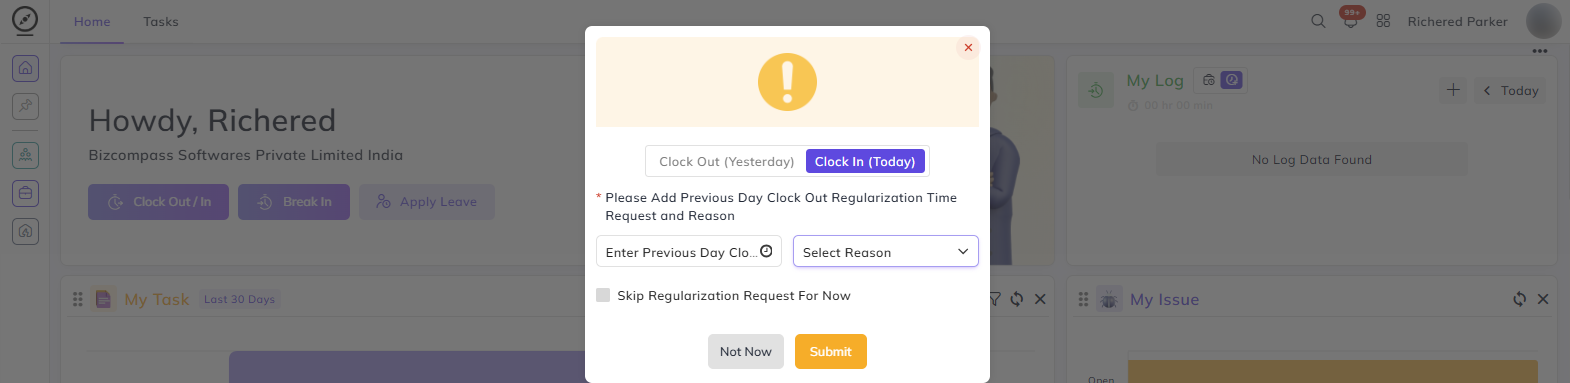
If an you forgot to clock out the previous day, then you will get the option to clock in for the current day or clock out for the previous day.

You can either clock out for the previous day by adding the previous day clock out regularization time request and reason. The clock in for the current day will be done and the clock out request for the previous day will go for approval.

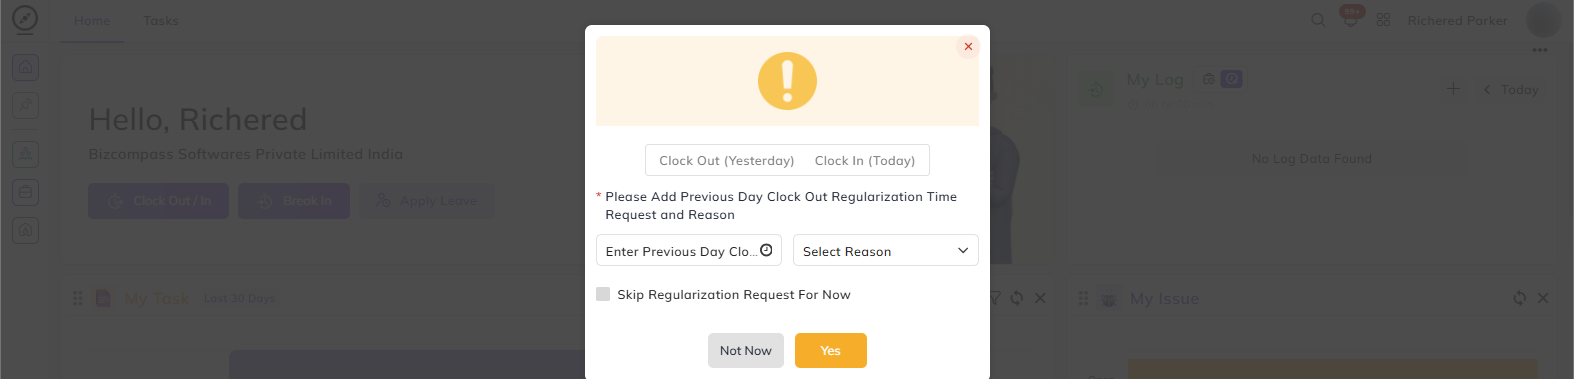
Or you can clock in for the current day and enable the Skip Regularization Request For Now if you just want to clock in for the current day and do not want to clock out for the previous day for now.
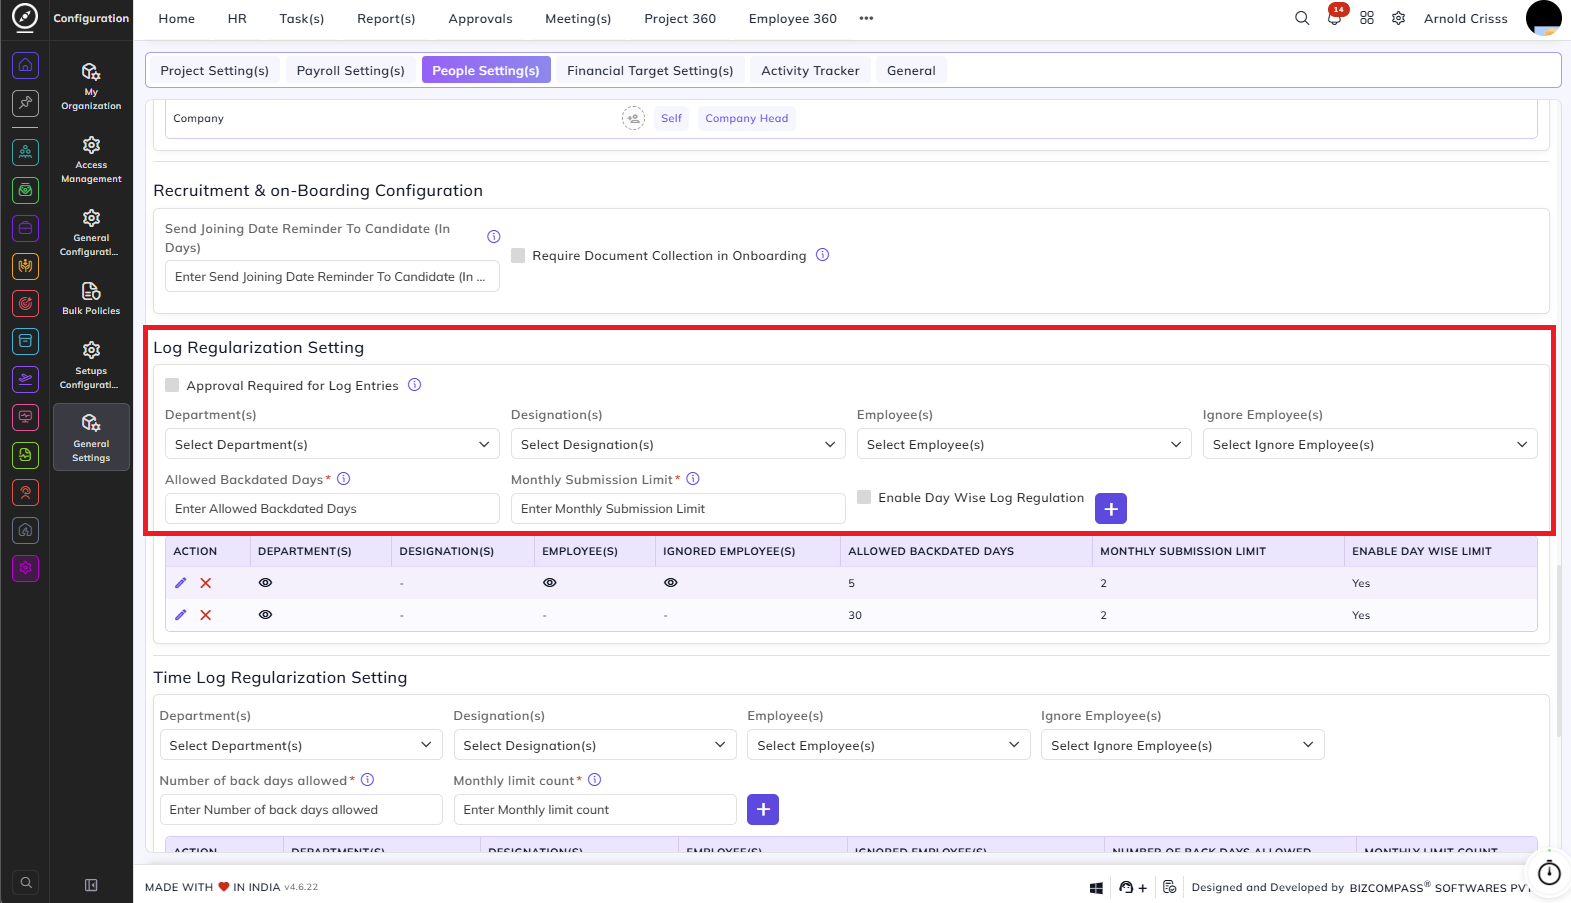
Adding a Log for a Previous Date:
The organization can set the monthly log regularization requests limit and also allow limit for backdated days (log regularization for previous days). This can be done from General Settings->People Setting(s).
Clock In-Out From Quick Access:
You can also clock in-out by clicking on your profile icon from the op right corner.
Attendance Calendar:
The Attendance page gives you a full monthly view of your attendance records. To navigate here, go to HRMS->Attendance->Attendance Calendar.
At the top of the calendar, a color-coded legend helps you understand what each type of entry means at a glance:
- Log Ok — Your attendance was recorded correctly for that day.
- Break Log — A break was recorded during your shift.
- Deleted Log — A log entry that has been deleted.
- Log Error — There is an issue with your log for that day.
- Changed Log — A log entry that has been modified.
- Leave — You were on approved leave.
- Holiday — A company holiday.
- Week Off — Your scheduled day off.
- Restricted Day — A restricted holiday.
- NOT P/A — No attendance was marked for that day.
- Rejected Leave — A leave request that was rejected.
- Remote Work — Attendance marked while working remotely.
- Partial Day — Only part of the day was logged.
- Log Request Pending — A regularization request is awaiting approval.
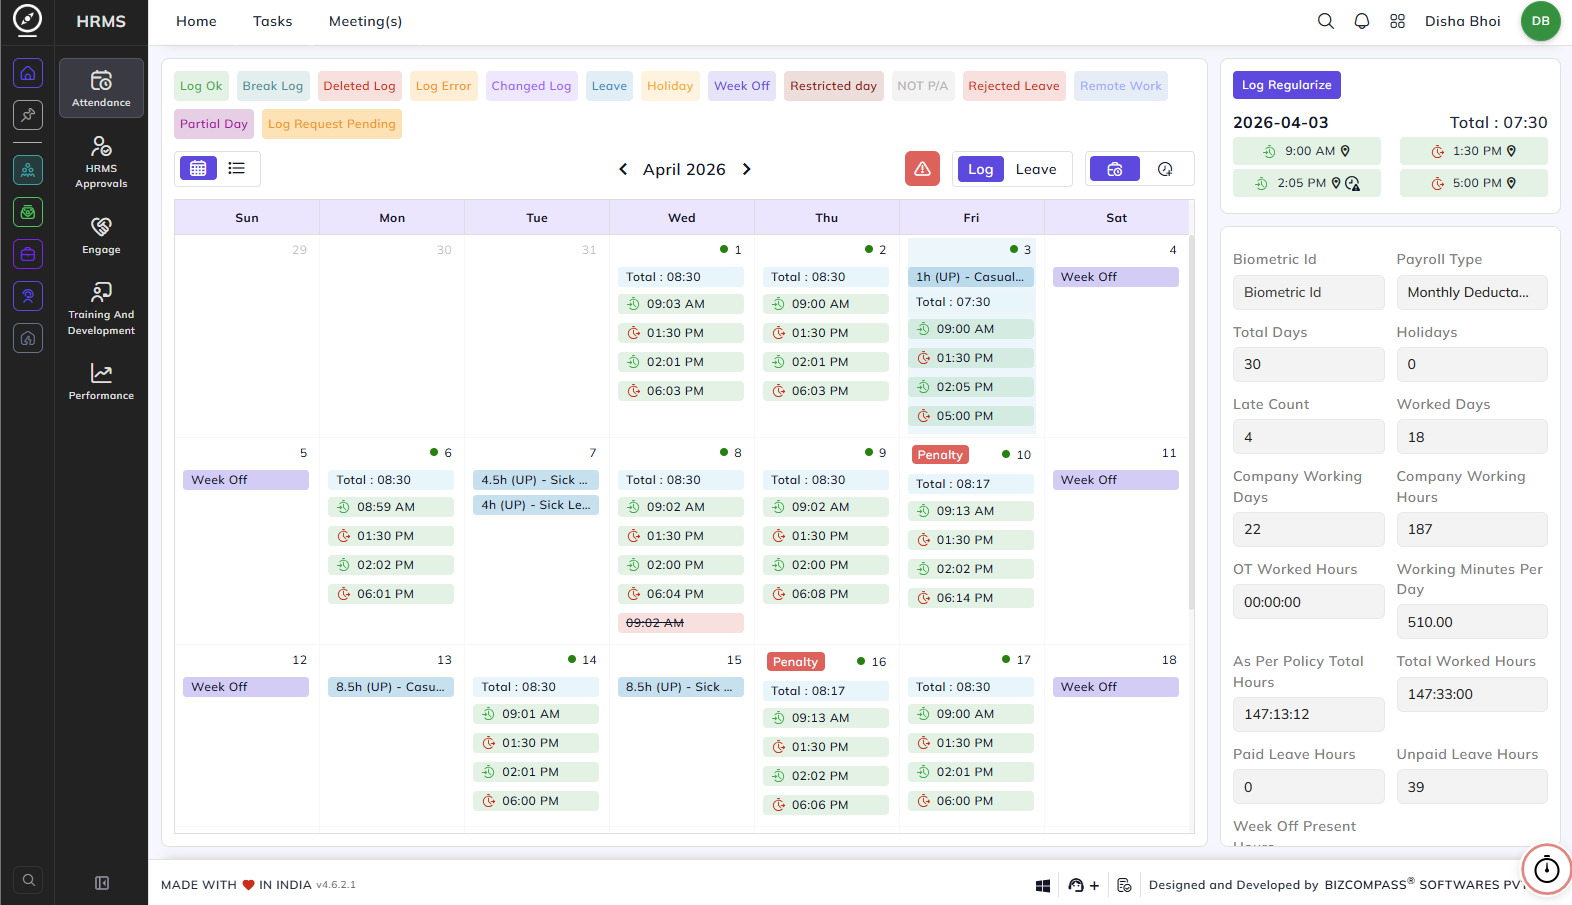
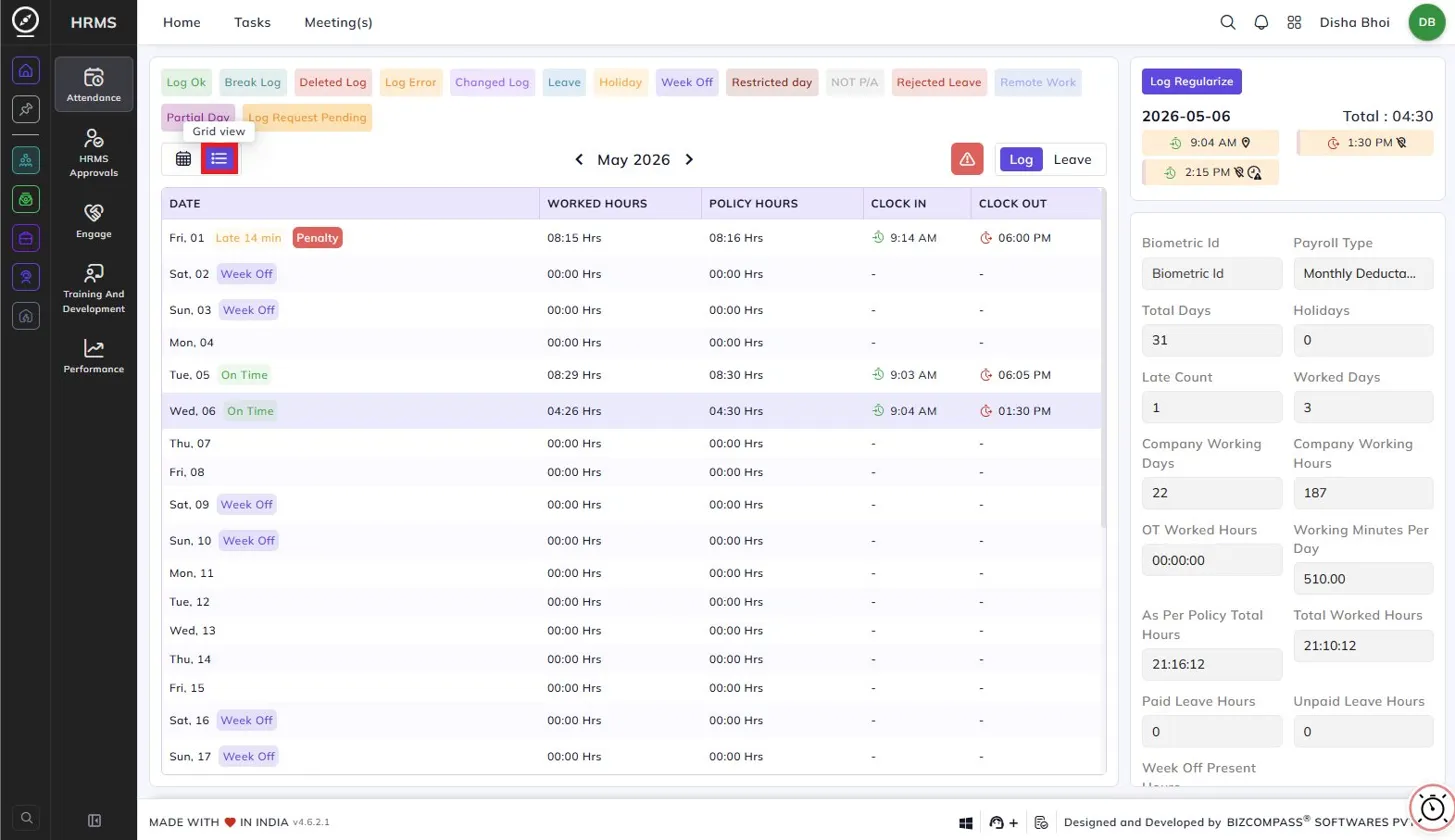
Calendar Views:
You can switch between two views (Calendar and Grid) using the icons at the top left of the calendar:
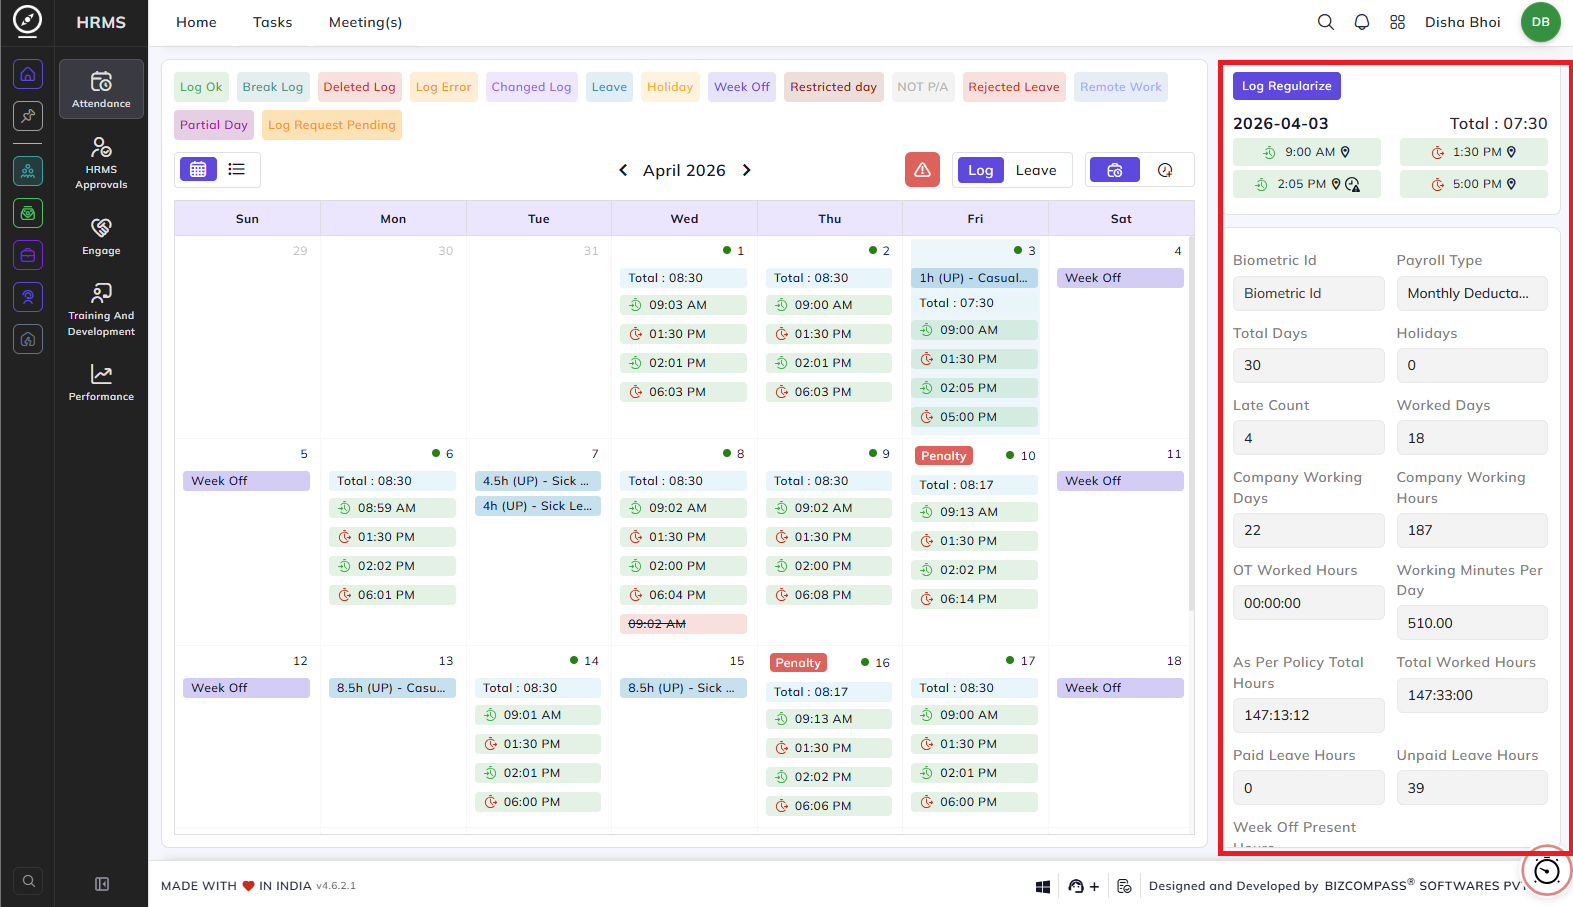
Grid View: Displays your attendance as a day-by-day list for the month, showing the date, worked hours, policy hours, clock-in time, and clock-out time. Days where you arrived late are flagged as Late X min and any penalties applied are shown as a Penalty badge.
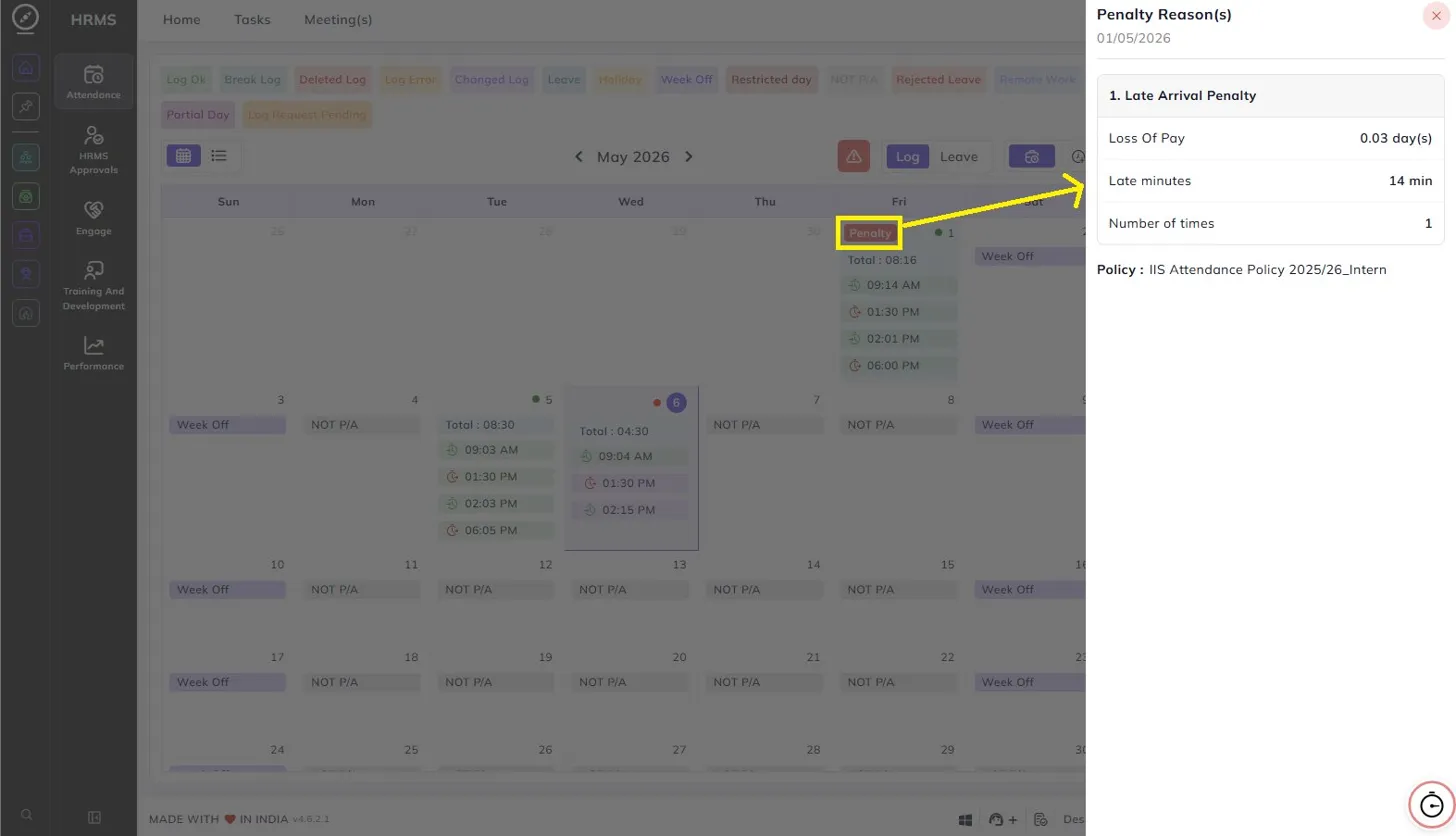
Penalty:
If a penalty has been applied to a day — for example due to a late arrival — you will see a Penalty badge on that date in the calendar. Clicking on it opens a Penalty Reasons panel on the right showing the penalty type, loss of pay, number of late minutes, how many times the penalty has been applied, and the attendance policy it is based on.
Right-Side Summary Panel:
On the right side of the Attendance page, you can see a summary of your attendance for the current month, including:
- Total Days and Holidays
- Late Count and Worked Days
- Company Working Days and Company Working Hours
- OT Worked Hours and Working Minutes Per Day
- As Per Policy Total Hours and Total Worked Hours
- Paid Leave Hours and Unpaid Leave Hours
- Week Off Present Hours
The right panel also shows your log entries for the selected date, displaying each clock-in and clock-out time along with location and IP indicators.
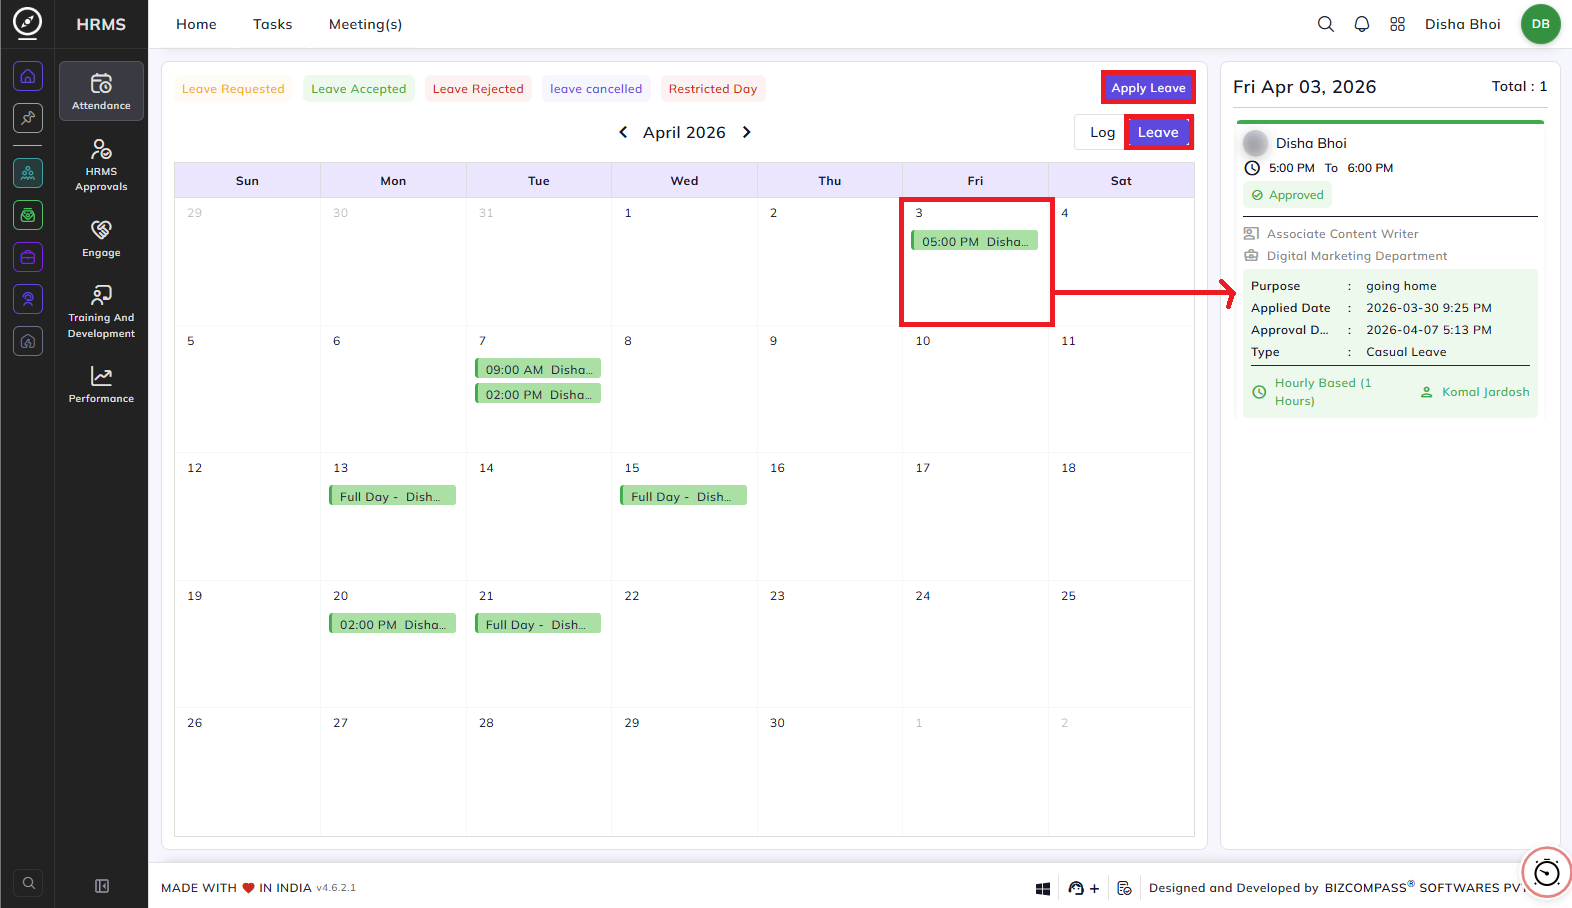
Log and Leave Tabs:
At the top of the calendar, you will find two tab options — Log and Leave. Clicking Leave switches the calendar to a leave view, showing your leave requests for the month colour-coded by their status — Leave Requested, Leave Accepted, Leave Rejected, Leave Cancelled, and Restricted Day. You can also click Apply Leave directly from this view to submit a new leave request.
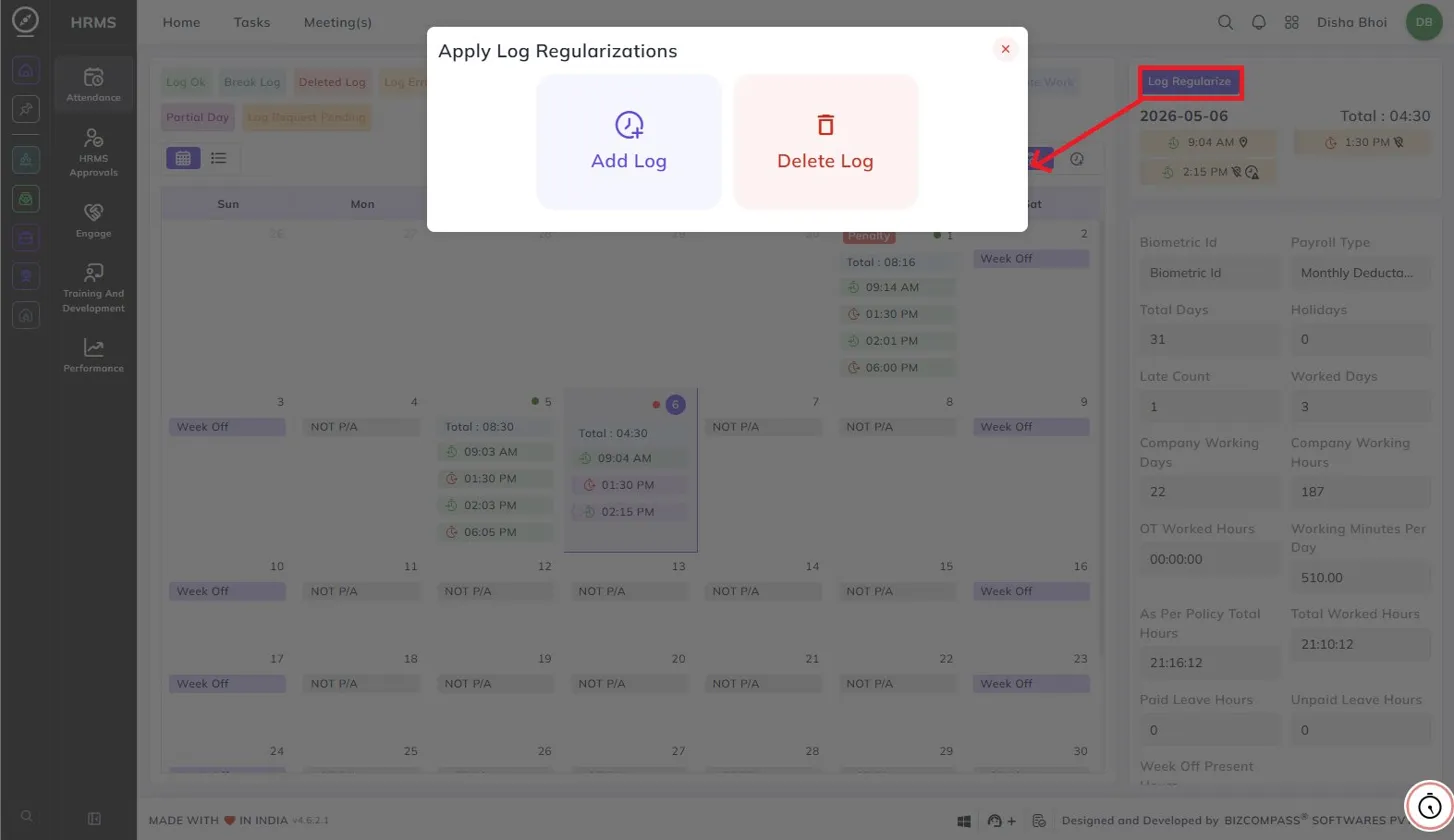
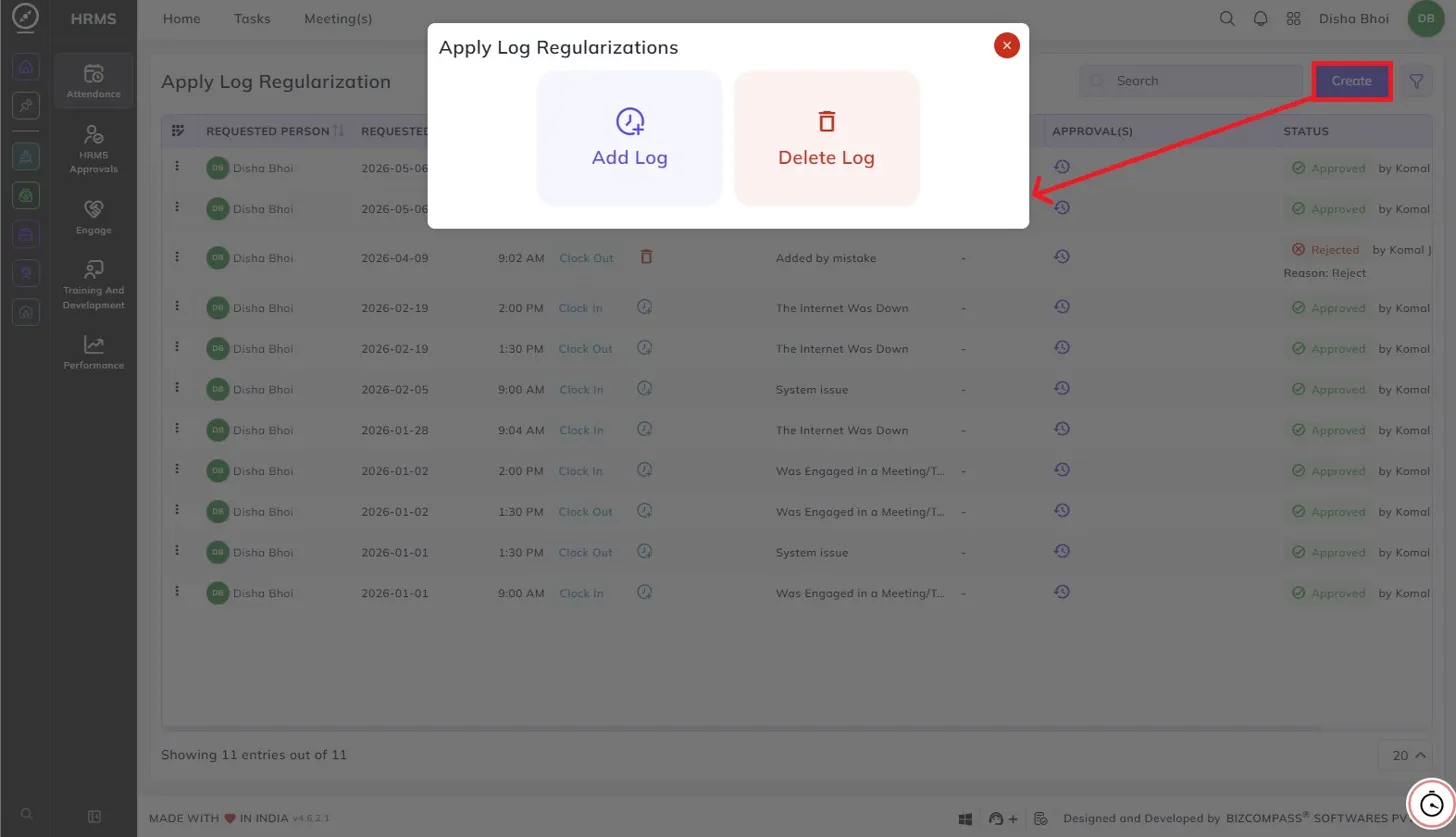
Log Regularize:
The Log Regularize button at the top right of the attendance panel opens the Apply Log Regularizations dialog, giving you two options:
- Add Log — Use this to add a missing clock-in or clock-out entry for a day where a log was not recorded.
- Delete Log — Use this to request the deletion of an incorrect log entry.
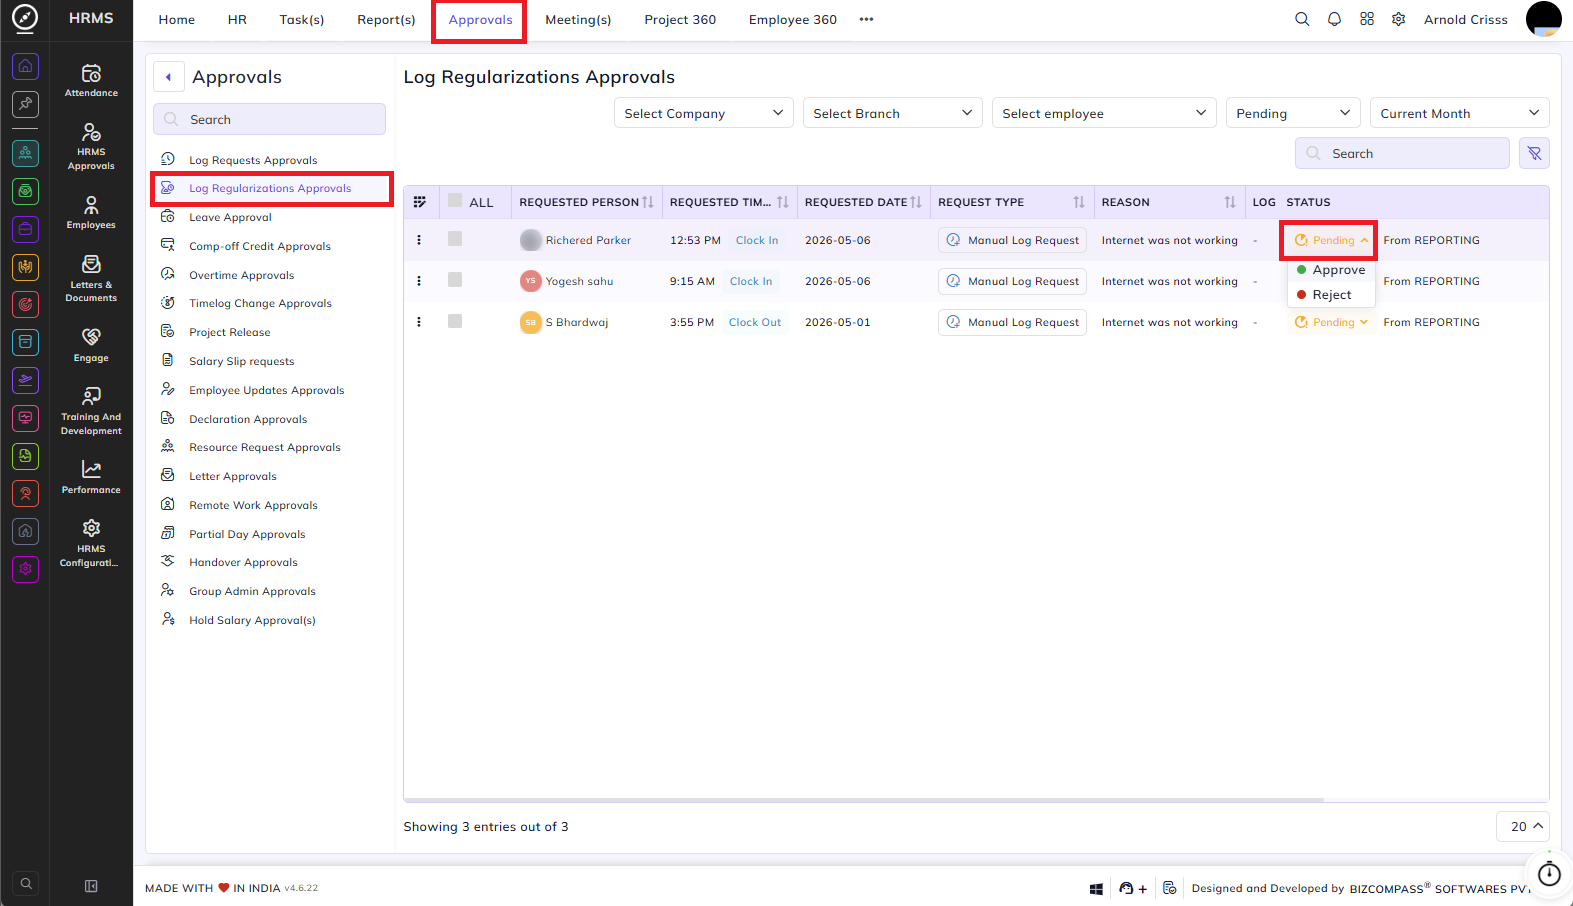
You can also access the full log regularization history by navigating to the Apply Log Regularization page (HRMS->Attendance->Apply Log Regularization), which lists all your past regularization requests. Each entry shows the requested date, time, type (Clock In or Clock Out), reason, and current approval status — Approved, Pending, or Rejected (with the rejection reason shown if applicable). To submit a new request from this page, click the Create button at the top right, which opens the same Add Log / Delete Log options.
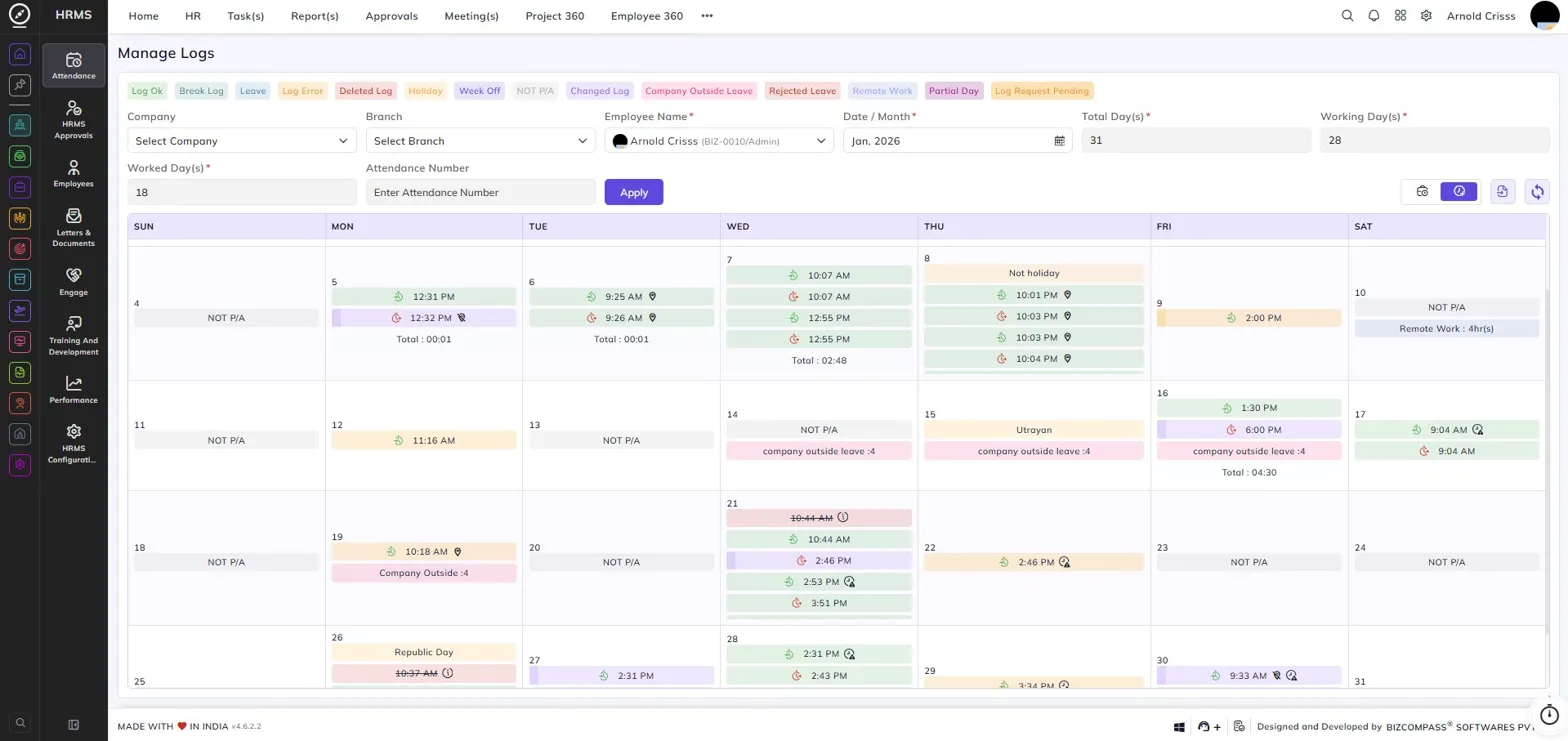
Manage Logs:
The Manage Logs page gives administrators a detailed calendar view of any employee's attendance logs for a selected month. To navigate here, go to HRMS->Attendance->Manage Logs.
Use the filters at the top to select the Company, Branch, Employee Name, and Date/Month to load that employee's attendance calendar. The page also displays a summary of key figures for the selected month — Total Days, Working Days, Worked Days, and Attendance Number.
The color-coded legend at the top works the same way as the employee attendance calendar, helping you identify each type of log entry at a glance — Log Ok, Break Log, Leave, Log Error, Deleted Log, Holiday, Week Off, NOT P/A, Changed Log, Company Outside Leave, Rejected Leave, Remote Work, Partial Day, and Log Request Pending.
Each day on the calendar shows the employee's clock-in and clock-out times along with location and IP indicators. Days marked with Company Outside Leave, Remote Work, or holidays are clearly highlighted with their respective labels.
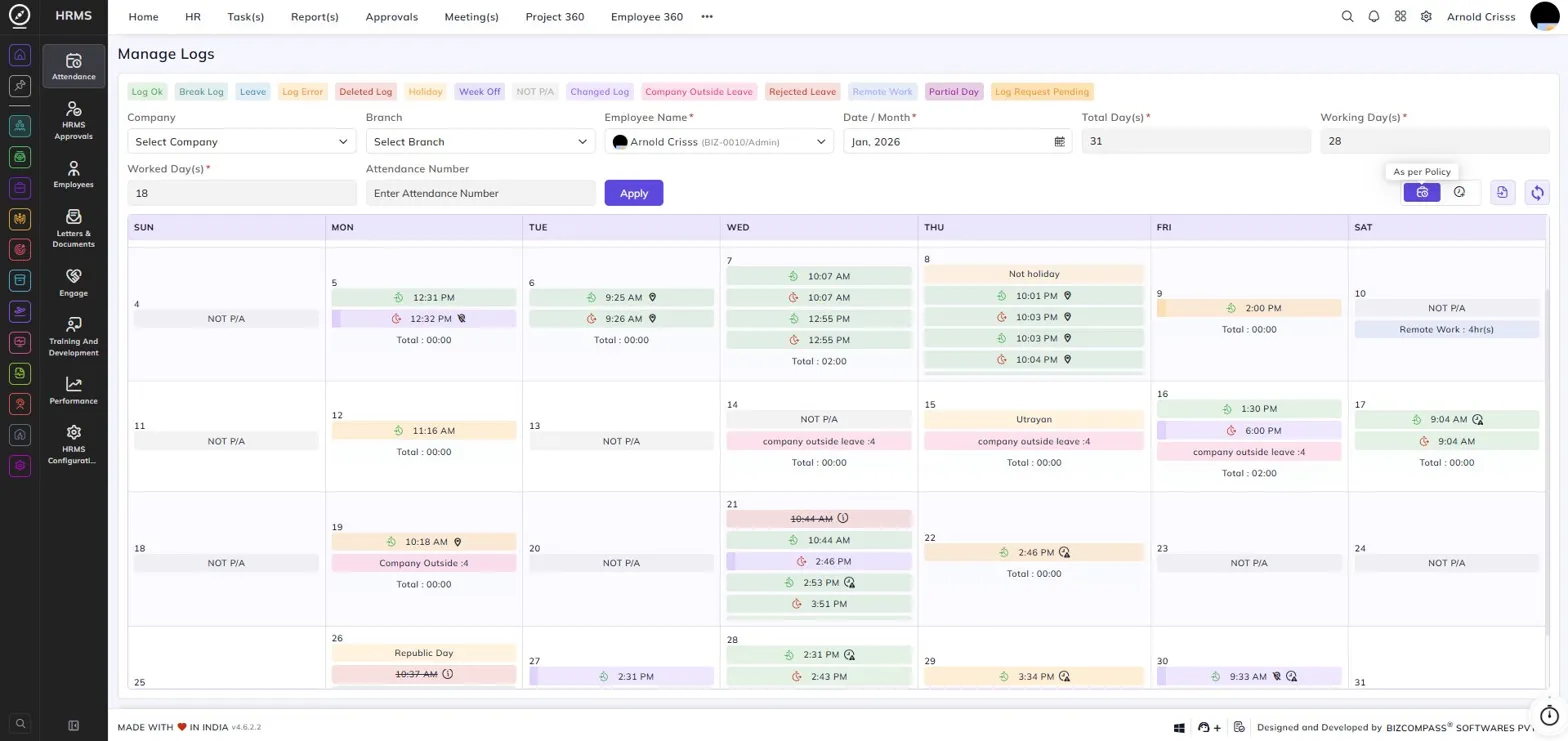
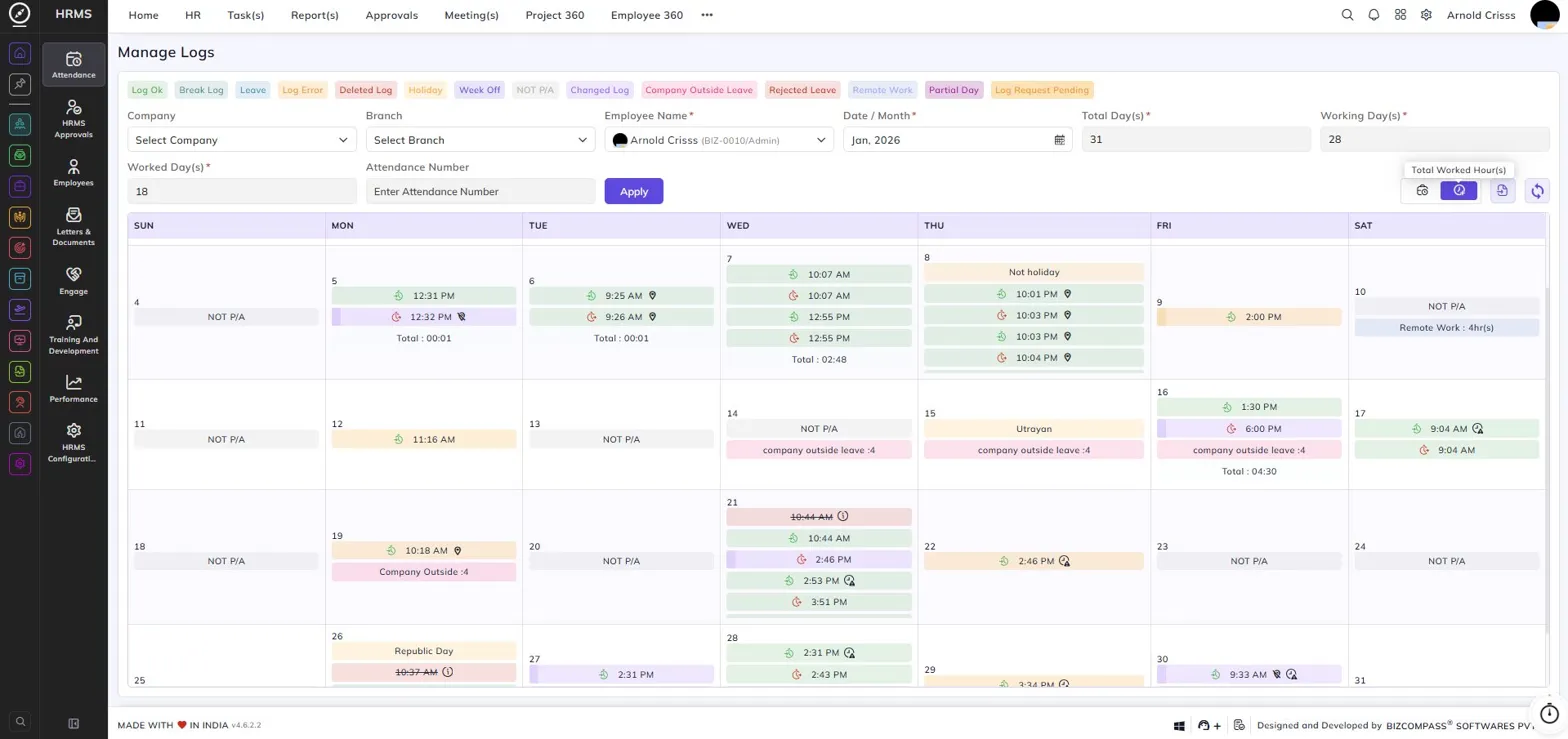
Total Hours Display Toggle:
At the top right of the calendar, you can switch between two hour display modes using the toggle icons:
As per Policy — Shows the total hours as per the employee's shift policy for each day.
Total Worked Hour(s) — Shows the actual hours worked by the employee each day.
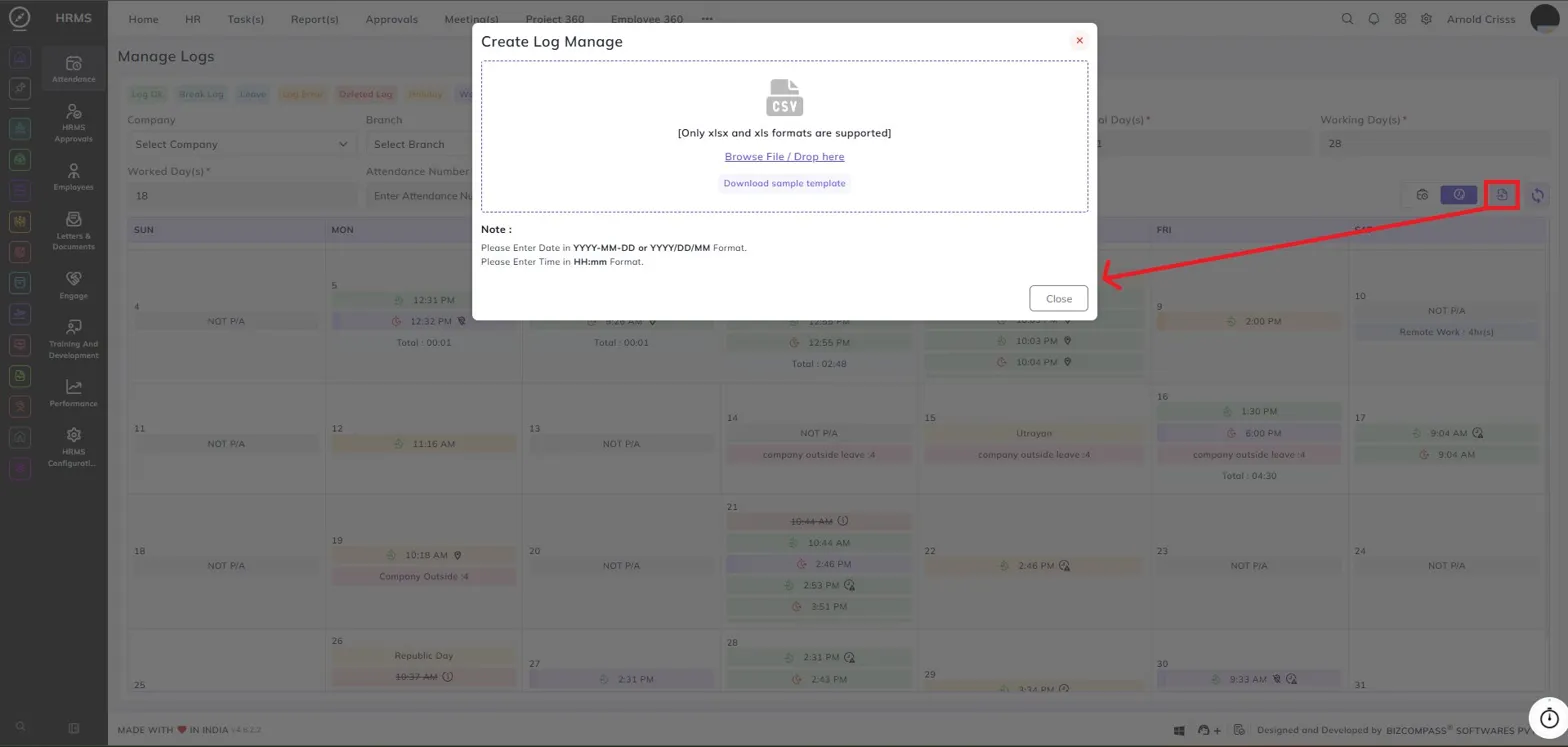
Import Logs:
Click the import icon at the top right of the Manage Logs page to open the Create Log Manage dialog. This allows you to bulk import attendance logs for employees using a spreadsheet file. Only xlsx and xls formats are supported. You can drag and drop a file into the upload area or click Browse File / Drop here to select one. Click Download sample template to get a pre-formatted file showing the required columns.
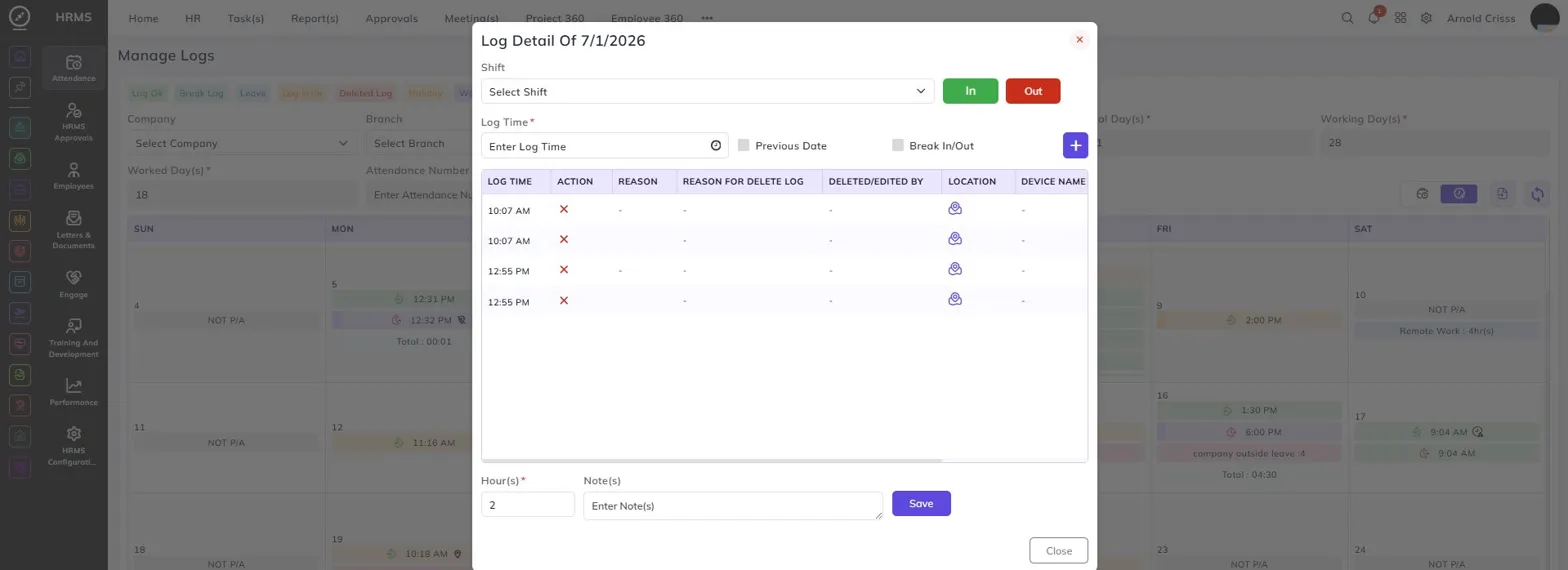
Log Detail View:
Clicking on any date in the Manage Logs calendar opens the Log Detail dialog for that day. This gives administrators a complete view of all log entries for that date along with the ability to add new ones.
The log table shows each entry's Log Time, Action, Reason, Reason for Delete Log, Deleted/Edited By, Location, and Device Name. Existing logs can be deleted directly using the delete icon on each row.
To add a new log entry for that day, fill in the following fields at the top:
Shift:
Select the employee's shift for that day.
In / Out:
Select whether this is a clock-in or clock-out entry.
Log Time:
Enter the time for the log entry.
Previous Date:
Enable this if the log belongs to the previous date.
Break In/Out:
Enable this if the entry is a break log.
Hour(s):
Enter the number of hours.
Note(s):
Add any additional notes if needed.